The pads view appears when Nektarine is launched with Aura - Nektarine Beat Composer connected. With Panorama T4/T6, toggle between the pads profile and the keys profile by pressing [Shift]+[Instrument]. The graphical representation of Aura's 16 pads give a clear overview of how each pad is set up and how they are routed to sounds.
4.1 Pad Overview and Routing
In the Pads view, 16 virtual pads route to one or more instrument channels in the Rack view.
A MIDI In note can be set to trigger the pad and also programs the corresponding pad on Aura, keeping hardware and software nicely in sync. When Nektarine receives MIDI note events from a DAW or MIDI controller, the notes that correspond to the MIDI In note set on any of the 16 pads, are routed to those pads.
Any MIDI note event received by a pad, is next converted to the pads MIDI Out note and sent to the instrument channel the pad is routed to.
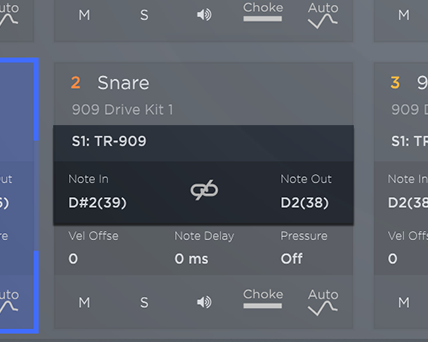
In the above example, pad 2 responds to MIDI In note event D#2(39) which is then sent as MIDI Out note D2(38) to the Roland Cloud plugin TR-909, hosted in instrument channel S1.
There are a couple of additional points to note:
- Two pads set to the same MIDI In note will both be triggered when that note is received.
- Any MIDI notes received that do not match a pad, are sent to instrument plugin channel 1.
- It's possible to use Nektarine's pads view with MIDI Omni set to off but only if it's supported by the hosting DAW.
4.2 Loading an instrument
Loading a plugin, instrument or patch can be done by double-clicking content in the Browser pane or dragging it to a pad. In Nektarine's default state, only one empty instrument channel is created and all pads are routed to it. Because the instrument channel doesn't contain a plugin, either drag and drop or double-clicking will load a plugin patch in the first slot. If the plugin is a drum machine or drum kit plugin, all the 16 pads can now immediately be used to play it.
Drag and drop is the fastest method to load content, if the aim is to create new slots in the process. Here are the main rules that determines how Nektarine interprets drag and drop.
- If one or more pads are routed to an empty instrument channel, drag and drop will load the content in that instrument channel.
- If only one pad is routed to an instrument channel, and it's not empty, drag and drop will load the content in that instrument channel.
- If an instrument channel is not empty and multiple pads are routed to it, drag and drop will create a new instrument channel and load the content in it.
With a drum machine plugin loaded and all pads routed to it, drag and drop a patch to a pad will result in the creation of a new instrument channel on which the content will be loaded (rule 3.).
If you use tags, make sure to switch to the Global Instrument Browser to avoid changing tag settings on the current instrument channels browser when you drag and drop.
If you prefer an organized approach, you may prefer to create a default multipatch with a plugin slot already created for each of the pads. We have created such a multipatch for download. Just drop it on the browser pane to import:
[wpdm_package id='49820']
4.3 Pad/Patch and Plugin Name
The pad header shows the pad number, pad name (below: 'Snare'), patch name (below: '909 Drive Kit 1') and the instrument channel and hosted plugin it's routed to (below: 'S1: TR-909). If a default patch named after the plugin is loaded, all 3 fields contain the same information.
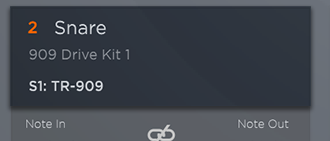
The pad name appears prominently in Nektarine, as well as on Aura, and originates from any one of 3 sources:
- The currently loaded patch name is displayed unless 2. or 3. is present.
- If a tag is selected in the instrument channel browser, it takes precedence over the patch name on the basis that a selected 'Kick' tag is more informative than most plugin patch names.
- A manual name overrides a tag name. Double-click the field and enter a name, using the computer keyboard. This option is particularly useful is one plugin with multiple sounds, such as a drum machine plugin, is hosted. Each of the pads can in this case be given a unique descriptive name.
4.4 Note In / Note Out
Note In and Note Out are by default set to the same note and linked. When linked, changing either the in or out note, will change both to the same value.
The MIDI note value can be changed for either fields by pointing the mouse and moving the mouse wheel or by clicking the current note value. A call-out window shows a control bar with the current value above. Move the control bar to scroll through note values or click in the value field and enter a note using the computer keyboard. The value field will accept MIDI note numbers as well as note names.
Click the link button to unlink the in and out MIDI notes. Once they are unlinked, the notes can be set separately.

Though it may not be immediately apparent, this is one of the most important features on the pads page. Any of the 16 pads can be individually configured to receive a specific note number which is then routed to different note number, before it's sent to the hosted plugin.
Example: Nektarine is hosting a drum machine plugin with 24 sounds, including several snare drum variations. After recording a snare drum part in a DAW, you can then change the drum sound by changing the snare drum pad's MIDI out note. Each pad can be routed to any MIDI out note which is finally sent to the selected instrument channel. This makes it possible to combine multiple drum machine plugin's sounds with a minimum of setup.
Pads can be selected by clicking on the pad number. If 'Select pad via MIDI' is engaged, a pad is also selected in Nektarine when the pad is played on Aura.
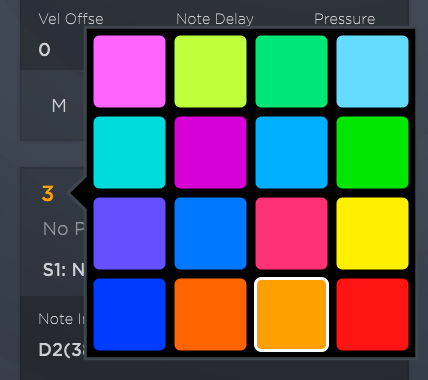
To change the pad's color, right-click the pad number and select a color from the pallet. The color selection is updated on the corresponding Aura pad.
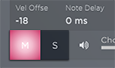
4.6 Velocity Offset
Velocity Offset affects the MIDI note velocity velocity sent to the plugin hosted in the instrument channel. The value can be -/+ 127. If Velocity offset is set to value of 127, the pad always plays at max velocity. Changing the setting to -50 will reduce the velocity of every MIDI note event by 50 resulting in a lighter performance assuming plugin instrument receiving the not is programmed dynamically. It's also possible to to achieve slightly different velocity response per pad, without having to change the velocity calibration of the pads and/or to adjust the velocity response of a recorded performance without having to edit velocity in the DAW.
To set Velocity Offset, click on the value field. Move the control bar to scroll through values or click in the value field to enter the value wanted.
4.7 Note Delay
Note Delay sends the pad note to it's destination instrument channel, delayed by the amount of milliseconds set. Click on the value field ('0 ms' by default) and change the value moving the control bar or click in the value field to enter a value. The value can be set to a maximum 500ms. Use this feature to add a slight drag to a drum instrument, without having to move the MIDI notes in the DAW.
4.8 Programming Pad Pressure
Nektar Aura's pads have a pressure element which can be programmed to send MIDI messages, per pad.
To setup pressure for a pad, click on the Pressure value field ('Off' by default). The popup field lists 4 options: Off, After Touch, Pitch Bend and CC#. Additional options appear after selecting and option:
- After Touch: Select either Channel or Poly After Touch.
- Pitch Bend: Select either Pitch Bend Up or Pitch Bend Down.
- CC#: In the value field select the MIDI CC# you want pressure to send, from 0-127.
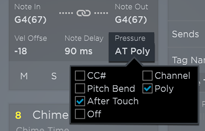
The receiving instrument must be set up to take advantage of the message sent by pad pressure. Most plugins respond to Channel After Touch but it will affect all instrument channels unless MIDI Omni is set to off in Nektarine. If you want to use the pressure element on Nektarine to control specific notes, the best option is to select Poly After Touch which is supported by Nektar DP-1.
4.9 Mute & Solo
The mute & solo buttons on each of the 16 pads work differently from the mute & solo buttons on the instrument channels. Where channel mute affects the audio channel, pad mute affects the flow of MIDI data sent via the pad. If mute is active on the pad, the instrument triggered by the pad is therefore not playing. Similarly, if Solo is active, it mutes the MIDI data sent to any pad with solo inactive (and therefore muted).
4.10 Audition
Click the audition button to send the pads note out to the instrument channel.
4.11 Choke
Choke is an instrument channel function but is displayed on the pad because it provides a clearer overview of current choke status. If all pads are routed to the same instrument channel, activating choke on one pad, will activate choke on all pads. If the DP1 Drum Player is used to play audio drum samples there might be an instrument channel for every pad, each hosting DP1. Activating choke on one pad in that situation will therefore not affect all the other pads.
Choke works like this: Activate choke for at least two pads, each routed to a different instrument channel. When one of the choke pads is playing, it will choke/cut off the audio output of the the other pad. The most common use is to choke an open hi hat with a closed hi hat instrument but any instrument (cymbals, toms, synths) can be choked another instrument channel.
4.12 Auto
The Auto button is also located on the instrument channel in Rack view. As with choke, it's an instrument channel feature but it helps identify any issues with automation. Read more in Plugin Rack: 2.6 Automation.
4.13 Copy, Paste and Swap Pads
Pads can be reorganized or duplicated using the following options:
Swap: Click (and hold) a pad, then drag it on top of another. The two pads trade places.
Copy Pad Settings: Copy all pad settings but not the instrument channel. Right-click on a pad and select the option from the menu.
Copy Pad + Slot Settings: Copy all pad settings including the instrument channel which means a new duplicate instrument channel is added upon paste.
Paste: Right-click on a pad and select Paste from the menu.
Shortcut commands can also be used. Select a pad before each operation. For 'Copy Pad Settings' use Ctrl+C. For 'Paste' use Ctrl+V.
4.14 Pad Lock and Omni Off buttons
As pads are played on Aura, they are also selected in Nektarine. Aura has a 'Lock' button which locks the currently selected pad. When 'Lock' is active, Nektarine pads are no longer selected from the hardware, thereby locking the currently selected pad.
Pad Lock can be activated or deactivated from Pads view by disabling the 'Select pads via MIDI' button. Pads can still be selected using the mouse, which in turn updates Aura.
The 'Omni Off' button is inactive by default which means that pads disregard the MIDI channel associated with any MIDI note event received.
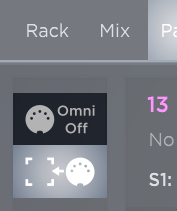
Any MIDI note that correspond to the MIDI in not on a pad will therefore be sent to the slot the pad is routed to, regardless of the MIDI channel the note is sent on. MIDI notes that don't correspond to any pad in note, are sent to instrument channel 1. This setting ensures Nektarine's pad routing works correctly in any DAW because several DAWs are MIDI channel agnostic.
Activating 'Omni Off' by contrast associates each instrument channel with a MIDI channel from 1-16. In this case, if notes are received on MIDI channel 3, they are sent to instrument channel 3 etc. Aura's pads are programmed to send the correct MIDI channel so notes are recorded correctly in the hosting DAW so it doesn't change that part of the experience. The main benefit of activating 'Omni Off' is that each instrument channel can receive any or all 128 MIDI notes send on it's corresponding MIDI channel and are therefore operating in 'Multitimbral' mode. Now it's possible to play and record keyboard plugin parts using Aura's 'Pad Setup: Scales' menu using one more more instrument channels while using other instrument channels to play drum sounds.
This causes problems in DAWs that are MIDI channel agnostic (such as Live and Reason) because all data is then sent to instrument channel 1 only. Make sure to check your DAW can handle multiple MIDI channels on one track, before experimenting with this feature.
4.15 Mixer Instrument Channel Strip
A mixer instrument channel strip is located to the right of the array of pads. It's identical to channels in the Mix view but only one instrument channel is visible at any time.
The channel strip updates as pads are selected, if one or more pads are routed to different instrument channels. If all pads are routed to the same channel strip, changing settings in the mixer will affect the sound triggered by all pads.
Send channels can also be displayed by activating the Sends button in the header.
To learn more about the channel strip, read Channel Mixer: 3.1 Instrument Channels.
![]()
Nektarine Manual
Version 2.6
3. Channel Mixer & Audio Routing
4. Pads (Aruba only)
4.1 Pad Overview and Routing
4.2 Loading an instrument
4.3 Pad/Patch and Plugin Name
4.4 Note In / Note Out
4.5 Selecting a Pad and changing it's color
4.6 Velocity Offset
4.7 Note Delay
4.8 Programming Pad Pressure
4.9 Mute & Solo
4.10 Audition
4.11 Choke
4.12 Auto
4.13 Copy, Paste and Swap Pads
4.14 Pad Lock and Omni Off buttons
4.15 Mixer Instrument Channel Strip
DP-1 Drum Player for Aruba/Aura
K1, S1 and T1 Drum Synth for Aruba/Aura
Controlling Battery 4 from Aruba/Aura
Controlling Groove Agent from Aruba/Aura
Aura: Hyper-Sensitive Pad Optimization