The Nektarine browser contains all content including audio files, plugin patches and multipatches. Content can be found quickly by using search or tag settings such as Category, Timbre, Library and User tags, sort by ratings or by selecting a plugin directly to narrow options to just that plugin. Browser settings are stored per slot, so the Nektarine patch target list changes when you select any of the 16 instrument, 64 insert or 4 send effect slots.
Nektarine automatically create default patches for plugins when they are scanned. The browser lists all instrument patches when an instrument channel is selected and all effect plugin patches when either an insert effect slot or send channel is selected.
Factory patches for many popular VST plugins are available for download here (VST only, not compatible with AU and VST3 plugins). Most include tag assignments so this can be a good place to start. Once downloaded, unzip the file and batch import the desired patches as described in the section Batch Importing Patches.
5.1 Browser Tabs and Content Options
The browser pane is visible on the right side of Nektarine when 'Browse' is active in the header.
 .
.
The browser pane has 3 tabs that each display different content:
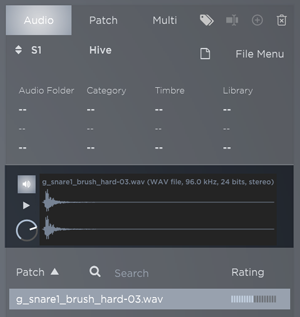
Audio - Audio files are visible in the browser after mounting audio file folders or if they are dragged from an OS file browser location and dropped on the browser pane. Supported formats include WAV and AIFF files. Though the browser can list and audition audio files, loading audio samples requires the installation of Nektarine DP1 sample player. Audio files are at this point mainly intended for Nektar Aura users.
Patch - Contains all parameter settings of a hosted plugin as well as tags and rating settings associated with the patch. At minimum all scanned plugins appear in the patch tab. Import or save plugin patches to expand the accessible libray.
Multi - A multipatch stores all Nektarine settings including all plugin slots, browser and plugin settings. Multipatches can be loaded in any version of Nektarine, either from the Nektarine header or the browser pane Multi tab. When Nektarine is used in a DAW, all settings are stored with the DAW song/project. It's not necessary to preserve a setup by saving a multipatch in this case.

Audio files, Patches and multipatches are individual assets without interdependencies. If you load a plugin patch, then tweak it and save as a multipatch, the multipatch will contain the tweaks but the original plugin patch remains unchanged. Similarly, if you tweak plugin parameters and re-save the patch, it will not affect any multipatch that might have been created previously using the same patch.
5.2 Loading an Audio, Patch or Multipatch file
There are several options to load browser content in Nektarine:
Drag and Drop: Drop Audio or Patch files to a specific slot to load or to empty space below the last slot to load in a new slot.
Double-click: Any Audio, Patch or multipatch can be loaded by double-clicking. Audio and Patch files will be loaded in the currently selected slot.
Select from plugin slot: Patches can be loaded directly in any slot by clicking on the patch field and select from the list.
Select from Header: Multipatches can be loaded from the header by clicking on the field and selecting from the list.
Load from Nektar hardware: Content can be loaded from Aura and Panorama T4/T6. Impact GXP products are also able to load Nektarine Patch and Multi patches but browsing is limited to simpler configurations.
5.3 File Menu: Save a Patch or Multipatch
- To save a plugin patch, first make sure the correct plugin slot is selected
- Select the 'Patch' tab if it's not already selected.
- Click the 'File Menu' in the browser pane header and select 'Save' from the popup menu.
- In the dialog window, enter a name and click 'OK'.
- To exit the dialog window without saving, click 'Cancel'.
The process of saving a multipatch is identical except, make sure the 'Multi' tab is selected in the Nektarine browser pane.
5.4 Saving a Default Multipatch
The bootup configuration of Nektarine can be customized. Once Nektarine is setup as needed, select the 'Multi' tab in the browser pane and select 'Save' from the file menu.
Save the setup with the 'Default' name. Nektarine will know to load it every time a new instance is created.
It's possible to save multiple default multipatches. Make sure to delete duplicates.
5.5 Adding Audio Files
Audio files can be added to the Nektarine browser for use with the DP-1 Drum Player. This feature is mainly applicable to users of Nektar Aura.
To add one or more individual files, make sure the Nektarine Audio tab is selected in the browser pane. In your OS file manager locate audio files and drag and drop them to Nektarine's browser pane.
Another option is to mount a folder in Nektarine. This option will make all files in the folder as well as sub folders, available in the Nektarine browser.
Important: The folder structure appears immediately but each file needs to be scanned by Nektarine which for large libraries can take a long time. Allow plenty of time to keep Nektarine open during the process. Quitting Nektarine prematurely may result in database corruption resulting in subsequent crashing. Contact support if this occurs by mistake.
- To mount a folder make sure the 'Audio' tab is selected and activate the 'Tags' button in the browser pane.
- In the top left 'Folder' section, click +.
- In the OS browser window that appears, navigate to the top folder of the file structure that contains all your audio files. Select the top level folder and click 'Open'.
The folder and all subfolders are now mounted in the browser. Click on a sub folder to see it's audio content in the browser pane.
To see all content in the selected folder including content in all sub folders, tick the 'Include Subfolders' box.
5.6 Audition Audio Files
Audio files can be auditioned directly in the browser pane. When an audio file is selected, the waveform display shows the sample.
Activate the 'speaker icon' to play on selection. When active, audio files will play whenever selected.
Click the 'Play icon' to play the selected audio file at any time and adjust audition volume using the volume control.
5.7 Select, Delete and Rename
A patch is selected when it’s loaded but it may not remain selected. Clicking once on another patch will select that patch instead. Multiple patches, can be selected (or deselected) by using standard select key combinations such as [Cmd]+[click] in OSX and [Ctrl]+[click] in Windows.
Audio, patch and multipatch files can be deleted by following these steps:
- Select one or more files by clicking once to selected the content that should be deleted.
- Click the 'Trash/Delete' button.
- Click 'OK' in the popup dialog window to confirm. To abort deletion, click 'Cancel'.
Audio files are not physically deleted from the hard drive but simply removed from the browser.
A patch or multipatch can also be renamed.
- Select the patch by clicking once.
- Click the Rename button or right-click, then select 'rename'.
- Type a new name and press enter when done.
5.8 The Browser list: Sort, Search and Ratings
The Patch target list can be sorted in ascending or descending alphabetical order by clicking on the ‘Patch’ header. An arrow shows the direction of the sorting.
You can also sort by ratings to bring your favorites to the top of the list, by clicking on the ‘Rating’ header.
To change the rating for a patch, click in the ratings field and move the bar to the right for higher rating and to the left for a lower rating.
The Nektarine browser search field is likely the best option if you know exactly what you are looking for. The browser pane updates as you type so even a few letters may give you a good result. To clear search, click 'x' or press 'Esc' on your keyboard.
5.9 Browser Types
Browser settings are stored for every slot. For example, if a send slot is set up with a reverb tag, different reverb patches can easily selected. Selecting an insert FX slot updates the browser so tags can be selected without affecting the Send slot, or any other slot for that matter. All browser settings for every plugin slot are retained and recalled whenever a slot is selected.
This approach is called the 'Selected Slot Browser (Default)'. The currently selected plugin slot is listed in the browser pane immediately below the tabs. In the example below, insert FX1 is selected in instrument channel 1 (S1: FX1).
Click on the up/down arrow button reveals two additional options: Global Instrument Browser and Global Effects Browser.
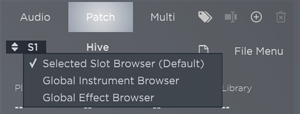
Global Browser settings do not affect the currently selected slot unless a patch is dragged and drop on the slot. By contrast, changing tags when using the 'Selected Slot Browser' affects that slot immediately which can have unintentional consequences, particularly when using drag and drop.
With the Global Browser settings can be freely changed in the knowledge that it does not affect a slot setup unless content is dragged and dropped on a slot. At that point, whatever settings are set in the Global Browser are copied across to any existing or newly created target slot so they are there when you switch back to using the 'Selected Slot Browser (Default)'.
If you are using drag and drop to create new slots, the Global Instrument Browser or Global Effect Browser types may be better suited.
5.10 Using Tags to Find Patches
Tags are a great tool to help condense Browser items to a targeted list, particularly when the browser contains a lot of content. Both Audio, Patch and Multipatch content can be tagged and even basic tagging (such as Synth, Drum Machine, Dynamics, Reverb etc) will improve workflow.
Tags can be selected directly from the Browser Pane, from the Tags View page or from compatible Nektar hardware. How to tag content is covered in Tag View: Assign & Manage Tags . If you have imported the Nektarine VST patch library or the DP1 factory drum sound bank, the content will already be tagged.
- With the 'Patch' tab selected, click in the field immediately below 'Category'. If you already have tagged content in your browser, you should be able to select a tag from the list and filter out any patches that don't match the selection. Click in the field again to change selection or select '--' for no selection.
- A 'Plugin' is not really a tag, but it works the same way. Click in the field below 'Plugin' and select any plugin from the list. At minimum the default patch, named after the plugin, is now accessible in the list.
- The Tag type defines what type of tag can be selected. Clicking directly on 'Category' reveals the tag type list which includes Plugin, Category, Timbre, Library and User. By default, 4 tag types are selected but up to eight tags can be selected in the browser pane. Click the 3rd row fields to select tag type for tags 5-8 and select tags following in the 4th row fields below.
- In the Audio tab, an additional tag type named 'Audio Folder' appears which enables you to select any mounted folder or subfolder.
The browser pane provides visibility of tag selection and is likely adequate for narrowing options most of the time.
5.11 Tags View: Refining the Patch List by Selecting Tags
If you need better and faster access to tag selection, click the 'Tags' button to open the Tags View page. 
Tags view have 6 main fields in addition to the browser pane:
Plugin: lists scanned plugins compatible with the selected plugin slot (i.e instruments if an instrument slot is selected and effects if an insert effect or send effect slot is selected).
Category: The type of plugin, sound or patch.
Timbre: Specific characteristics such as dark, bright, articulation etc.
Library: Banks, artists, factory or anything else that makes sense.
User Tags: Users can create Category, Timbre and Library tags but User Tags are intended to be specific to the individual user. Examples could include project names, set lists, favorites, artists etc.
Tag Group: A preset or group of tag selections. With tags selected, click the '+' icon, enter a name and click 'OK'. Selecting the group tag subsequently will recall the selected tags.
Tags are only visible for selection when the browser pane includes content that use them. Selecting a plugin will therefore result in a patch list for that plugin. Selecting a category tag following will narrow the patch list further to only show patches that are assigned the selected category tag.
Multiple tags can be selected by using common commands [Cmd]+[click] in MacOS and [Ctrl]+[click] in Windows.
The behavior is affected by the mode of the tag column which can be changed by clicking the round icon.
Blue = And.
Selecting multiple tags in the column displays patches that contain all selected tags.
Green = Or
Selecting multiple tags in the column displays patches that contain at least one of the selected tags.
Red = Not
Patches containing the selected tag in the column are excluded from the target patch list.
5.12 Tags Edit: Assign and Manage Tags
Tags can be created, deleted and assigned to patches, multipatches and even audio files.
To activate the Tags Edit page first make sure content (audio, patch or multipatch) is selected in the browser pane. Then right-click the ‘Tags’ button and select 'Tags Edit' from the list. 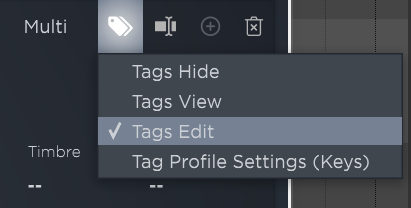
The browser columns are now used to select/deselect tags for the currently selected patches.
- To assign a tag to a patch, first select the patch and then select the tag you want assigned.
- To remove a tag, click the tag again to de-select it.
- Create tags by clicking the ‘+’ icon to the right in the tag header.
- Remove tags by clicking the trash icon.
- Select multiple patches to assign tags in bulk.
5.13 Batch Importing Patches
Complete these steps to import library files such as Nektarine VST patch library, or a .nek file exported from Nektarine.
The simplest option is to drag the .nek file and drop it on the browser pane in Nektarine. Click 'Ok' to start the import process.
You can also
- Make sure the browser pane is in view by clicking the [Browse] button in the header.
- In the browser pane, click on 'File Menu' and select 'Import'.
- In the file window, locate a .nek file.
- Select it and click “Open”.
- Click “Ok” in the dialogue box to start the import process.
Once import is complete, the patches appear in the browser, along with the associated tags.
5.14 Tag Profile Settings
Tag profile settings enable the hiding of content that might be cluttering your Nektarine experience. For example, there might be many plugins that you would never use with your Aura pad controller so it makes sense to remove them, at least from view.
Right-click the Tags button and select 'Tags Profile Settings'. For each tab, you now see all content tags listed including plugins and mounted folder paths each with a tickbox.
- Untick any tag to hide content.
- When done, click the Tags buttons to exit.
To view hidden content, repeat the process and tick tags to bring content back in to view.
Click the Tags button again, or any other menu button, to exit.If you own two Nektar products that each use different profiles, such as GXP (keyboard profile) and Aura (Pads profile), you'll be able to store profile settings separately for each product. For example you could remove all keyboard plugins when using the pads profile and all drum plugins when you use the keys profile.
Or if you use a T4/T6, you may want to hide your drum patches in the Keyboard profile and only show them when the Pads profile is selected.
Make sure the keyboard profile is selected and then follow the steps above to open the 'Tags Profile Settings' , then un-tick DP-1 in the plugin list and exit.
![]()
Nektarine Manual
Version 2.6
3. Channel Mixer & Audio Routing
5. Browser
5.1 Browser Tabs and Content Options
5.2 Loading Audio, Patch or Multipatch file
5.3 File Menu: Save a Patch or Multipatch
5.4 Saving a Default Multipatch
5.5 Adding Audio Files
5.6 Audition Audio Files
5.7 Select, Delete and Rename
5.8 The Browser list: Sort, Search and Ratings
5.9 Browser Types
5.10 Using Tags to Find Patches
5.11 Tags View: Assign and Manage Tags
5.12 Tags View: Refining the Patch List by Selecting Tags
5.13 Batch Importing Patches
5.14 Tag Profile Settings
6. Control Mapping
7. Settings
DP-1 Drum Player for Aruba/Aura
K1, S1 and T1 Drum Synth for Aruba/Aura
Controlling Battery 4 from Aruba/Aura
Controlling Groove Agent from Aruba/Aura
Aura: Hyper-Sensitive Pad Optimization