The Mix page is a vertical view of the plugin slots on the Rack page, laid out as a typical mixer.
The Rack page is unrivalled when it comes to plugin UI control whereas the Mix page uses a traditional mixer layout to give clear overview of levels and other channel parameters across all slots.
3.1 Instrument Channels
- The top of the instrument channel shows the hosted instrument plugin. Click to select a plugin from the popup list or drag and drop a patch from the browser pane. Once a plugin is loaded, click on the name to open the plugin window. Right-click to open the popup plugin list.
- Insert FX slots are immediately below. Click ‘+’ to create more insert FX slots, with a maximum of 4. The browser can also be used to load plugins and patches in created insert slots.
- To remove an insert FX slot, click ‘x’.
- Insert FX slot on/off. In addition, click on the Insert 1-4 label to select the slot. Only needed if browser type ‘Selected Slot Browser’ is selected. From the browser either double-click on a patch or drag and drop the patch on the target insert slot.
- Hosted FX plugin. Right-click to select from list. Once a plugin is loaded, click on the name to open the plugin window. Right-click to open the popup plugin list.
- If the Sends are hidden from view, click the > to show them.
- The send controls 1-4 are routed to Send Channels 1-4 respectively. If a plugin is loaded in Send Channel 1, the send 1 control on any of the instrument channels determines the level of signal from the instrument channel should be sent to the Send channel. When Send is set to 0, no signal is sent to the send channel.
- The Pre button changes the default post fader audio routing to pre fader. By default, the send signal is routed after the channels volume fader. Adjusting the channel volume by moving the fader will therefore result in a change to the send level. Sending the signal pre-fader means the signal stays constant and is sent to the send channel, even if the instrument channels volume is set to 0.
- The Tag name field shows selected tags but the channel can also be custom named. Double-click on the field and type a name.
- Pan
- Channel Mute
- Channel Solo
- Volume
- Channel number
|  |
3.2 Send Channels
The 4 send channels are structured similar to instrument channels with the ability to name a channel independently. Read all about send channels on the Rack: Send Channels page.
3.3 Audio Routing and Group Channels
A Group Channel is configured like an instrument channel without the instrument slot and appears in the mixer as G1 and G2 with red as the channel color. Up to 4 additional insert plugins can be added to the Group Channel. Channel sources routed to the Group Channel are all processed through the insert slots.
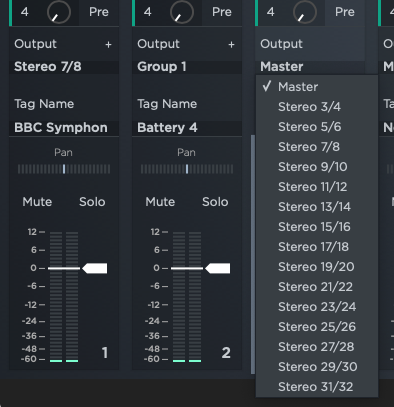
- To route any channel to a Group Channel, click the channels output field (Master is the default selection) and select the Group Channel it should be routed to (Group 1 or Group 2).
- If the Nektarine 32 Out version is used, each channel can be routed to any of of the 32 Nektarine outputs. In this case, the Group Channels are selectable at the bottom of the list.
- Configure your DAW so Nektarine’s 32 outputs are routed to channels in the DAWs mixer.
|  |
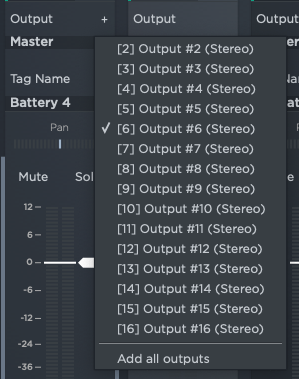
| Additional channels can be created for instrument plugins with multiple outs (such as Kontakt, Korg M1, Reason Rack, many drum machines etc). When a plugin hosted in Nektarine has multiple outs. a “+” button appears to the right of the Output label. - Click on the “+” button and select the output in the popup list that the new Nektarine channel should be created for.
- Repeat to create more channels or click “Add all outputs” to create all possible channels.
- To remove a channel, click “+” again and click on the output that should be deselected/removed.
|  |
If your DAW is able to send multiple MIDI channels from one track (Cubase, Logic Pro and Reaper examples of DAWs that allow this) you can setup of Nektarine to route MIDI to different slots and the route the audio of each instrument to a seperate channel in your DAW so you don’t have to mix in Nektarine.