MIDI Sync and your Nektar Controller
The Panorama T-series, Aura, Impact GXP series and Impact LX Mini controllers can receive MIDI clock messages from music software and synchronize their tempo based features to the tempo of your DAW.
Your Nektar controller is configured to automatically sync to an external clock when valid MIDI clock messages are received, and to switch back to the internal clock, a few moments after those clock messages stop. You can set the controller to always use external clock (see your controller’s user guide for more details) but keep in mind that many DAWs will stop sending clock messages when the transport is stopped, so the tempo based features may not work when the DAWs Transport is stopped.
Here are instructions for configuring many common DAWs to send clock messages to Nektar controllers.
Important Note: You should only send MIDI clock to your controller’s first output port.
In Mac OS, this port will be called ‘<Controller Name> Internal’ or ‘<Controller Name> MIDI 1’. In Windows, this port will simply be called ‘<Controller Name>’.
Bitwig
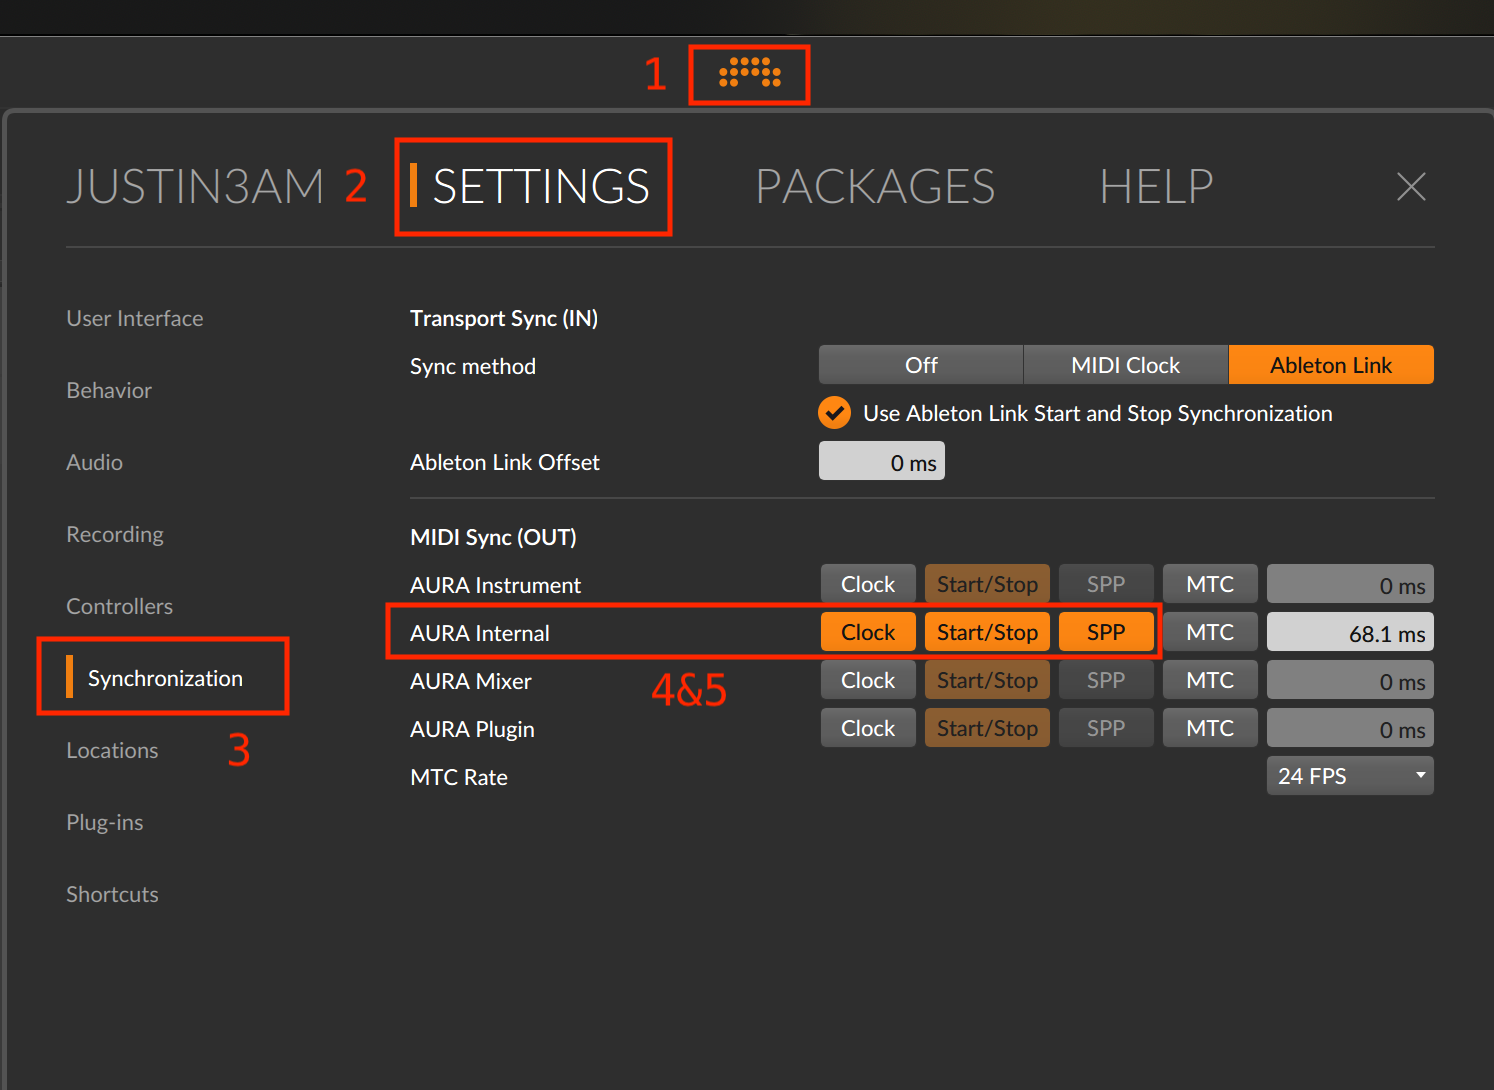
- Click on the Bitwig symbol at the top of the window
- Select the ‘Settings’ tab at the top of the home window.
- Go to the ‘Synchronization’ page.
- Activate the ‘Clock’ button for your controller’s first output port.
- If you are using Aura, also activate the ‘SPP’ button (Song Playback Position).
Bitwig
Bitwig
Reason
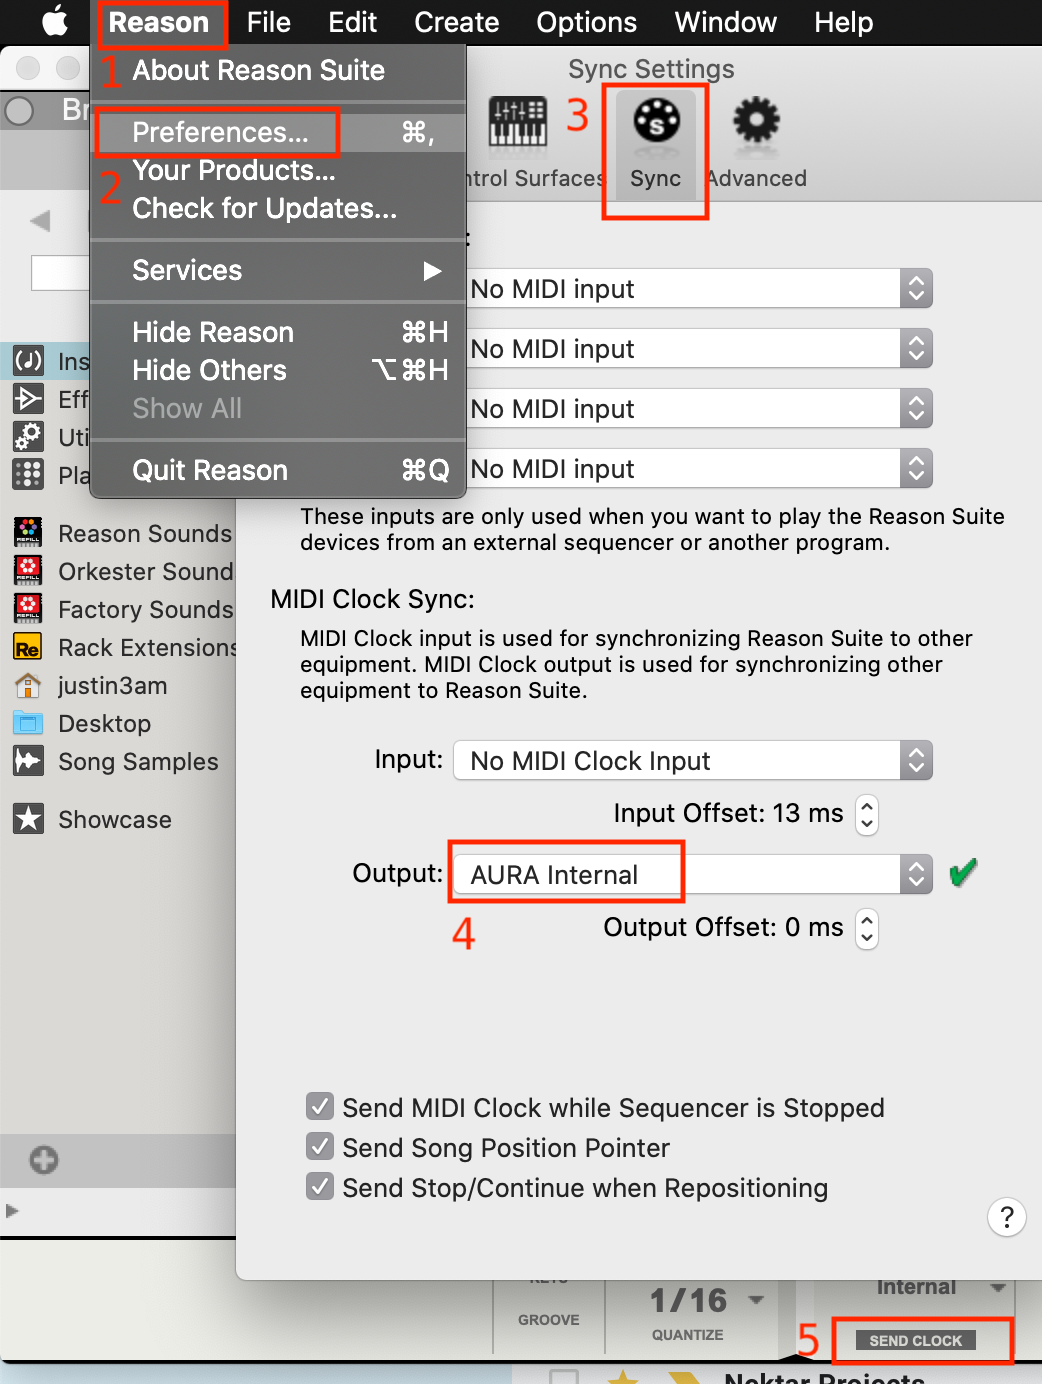
- In MacOS – Open the ‘Reason’ menu. In Windows – Open the ‘Edit’ menu.
- Select ‘Preferences’.
- Go to the ‘Sync’ tab.
- Set the ‘Output’ in the MIDI Clock Sync section to your controller’s first output port.
- Close the Preferences window.
- Click the ‘Send Clock’ button in Reason’s Transport.
Reason
Reason
Studio One
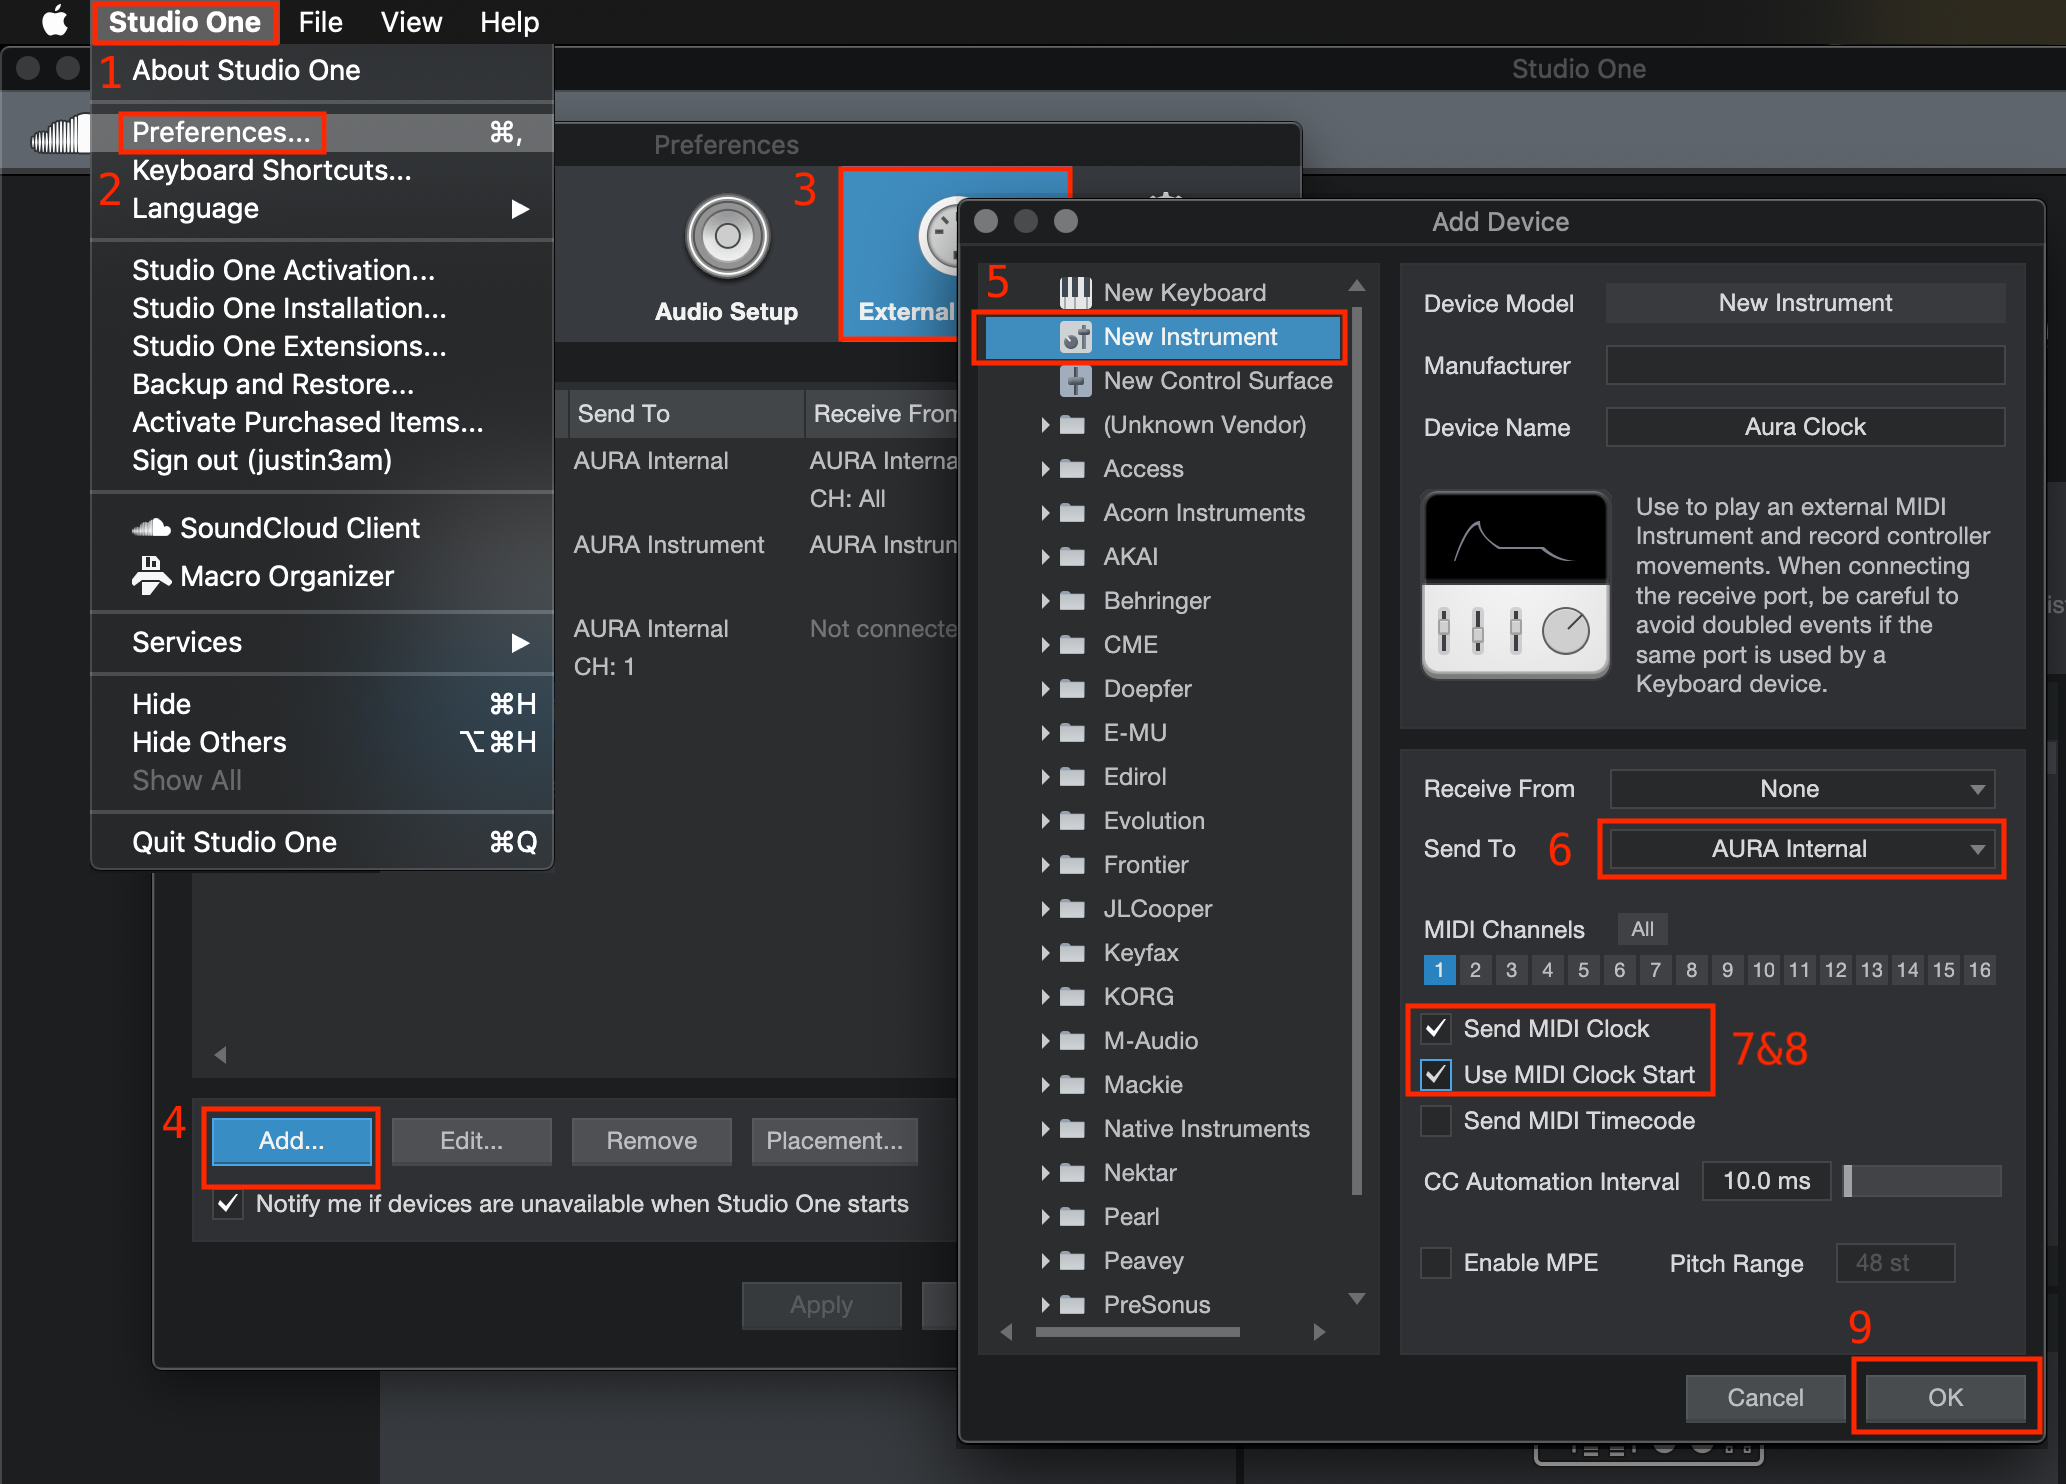
- Open the ‘Studio One’ menu.
- In MacOS – Select ‘Preferences’. In Windows – Select ‘Options’.
- Go to the ‘External Devices’ tab.
- Click the ‘Add…’ button.
- From the list on the left, select ‘New Instrument’.
- Select your controller’s first output port from the ‘Send To’ list. (If you encounter a message which indicates that then port is already in use, just click ‘OK’)
- Tick the ‘Send MIDI Clock’ option.
- Tick the ‘Use MIDI Clock Start’ option.
- Click ‘OK’.
Studio One
Studio One
Logic
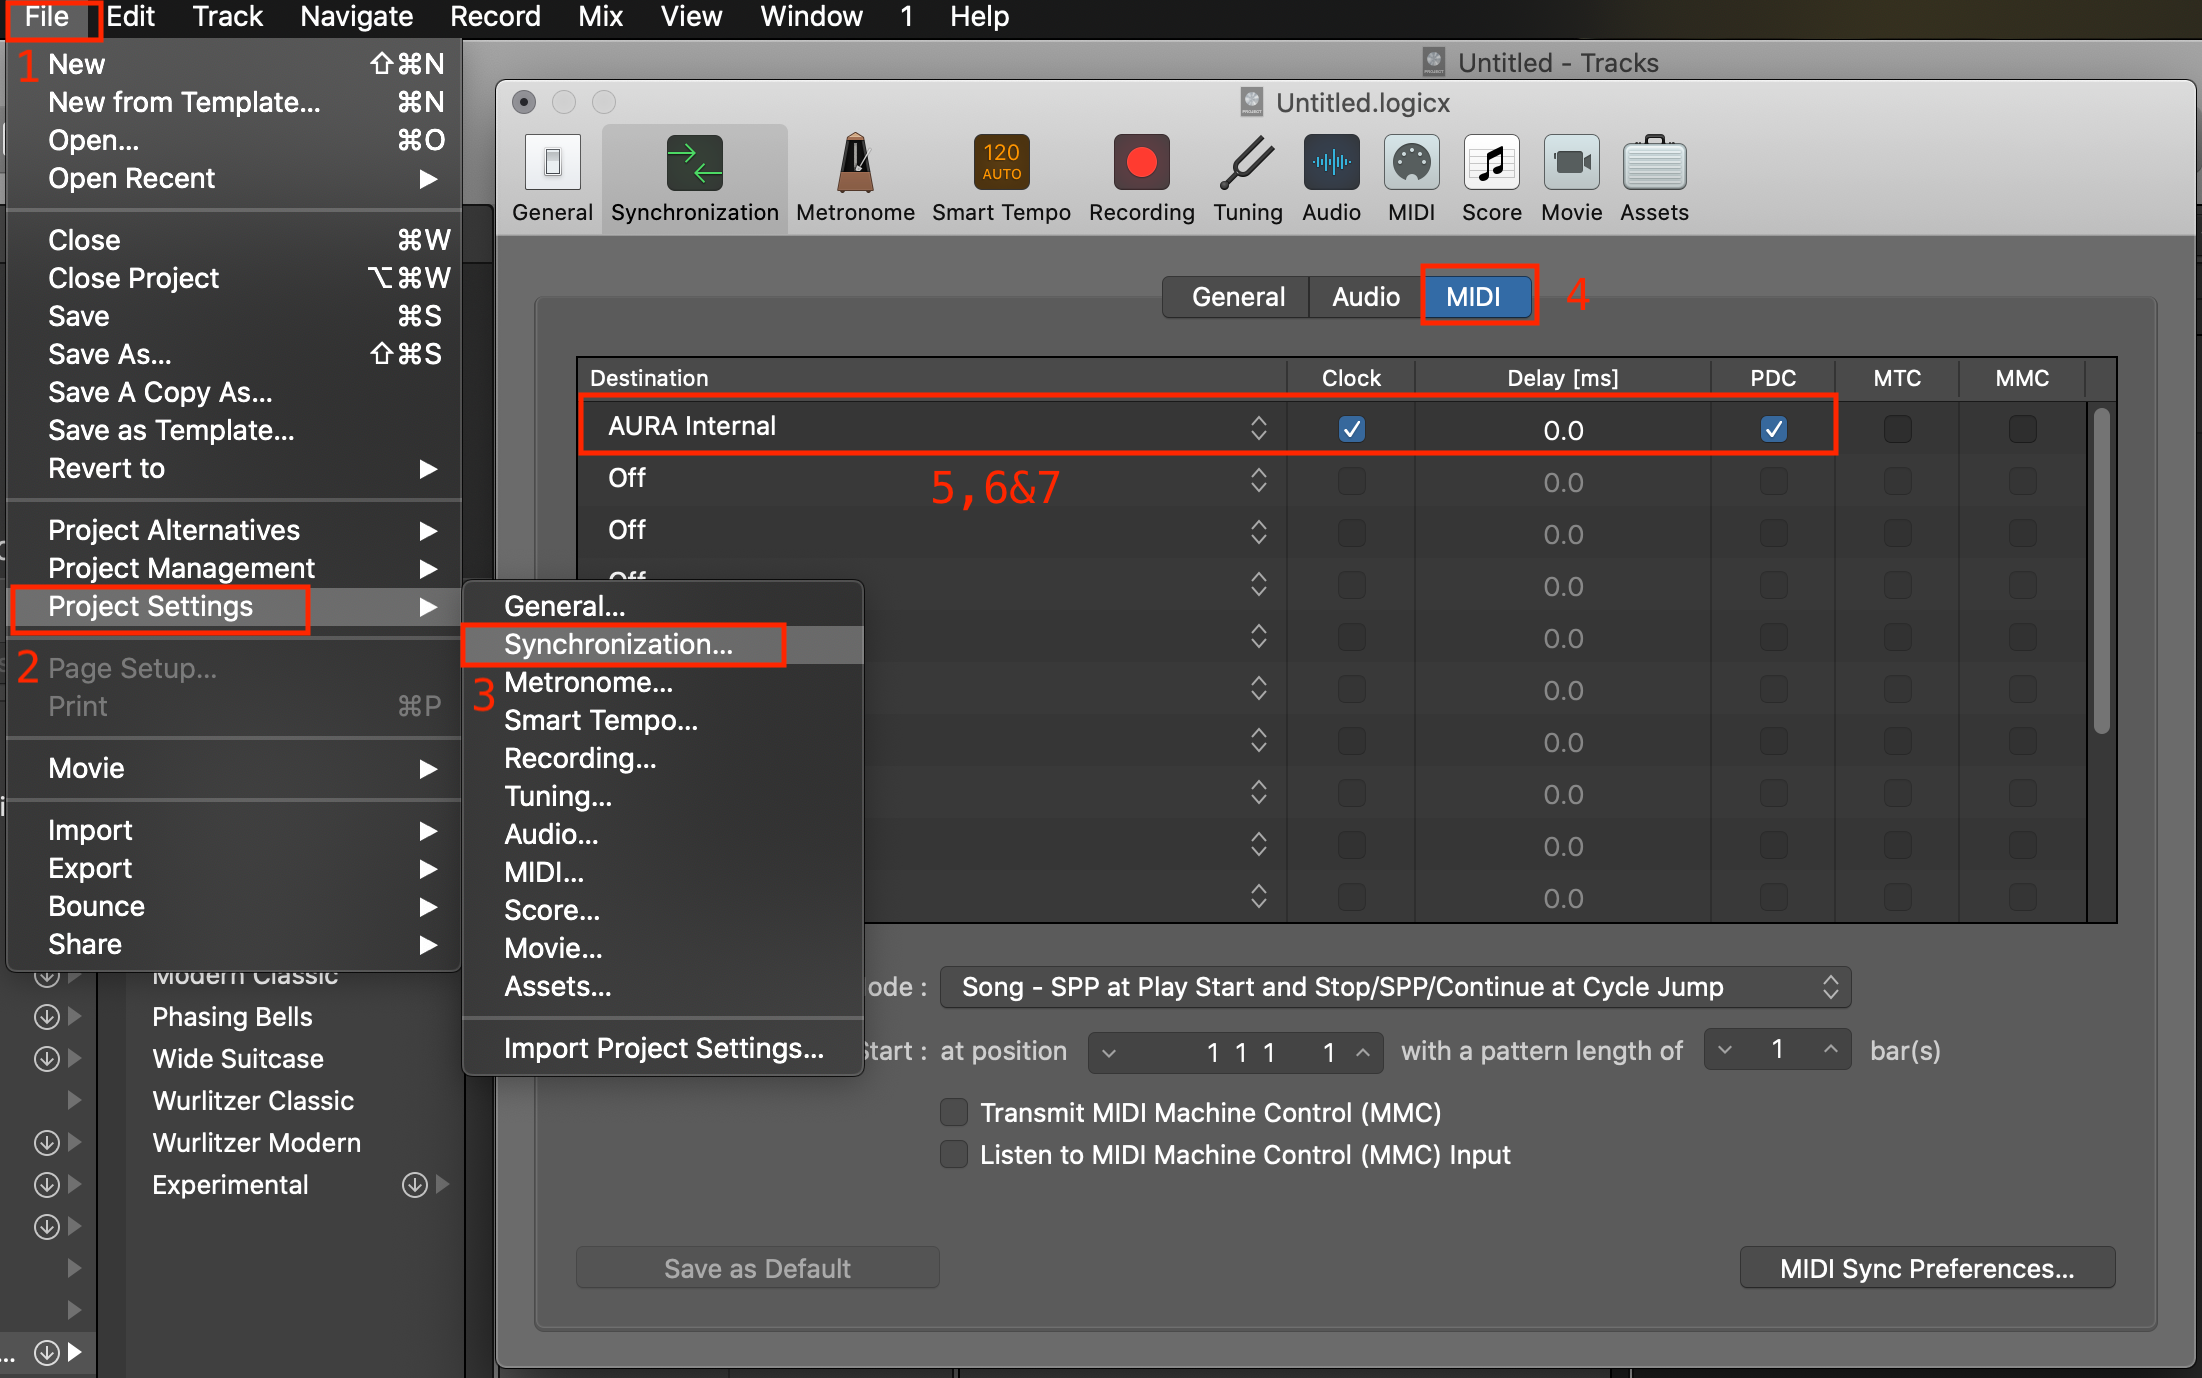
- Open the ‘File’ menu.
- Select ‘Project Settings’.
- Select ‘Synchronization’.
- Go to the ‘MIDI’ page.
- Set a Destination slot to your controller’s first output port.
- Tick the ‘Clock’ option.
- Tick the ‘PDC’ option.
Logic
Logic
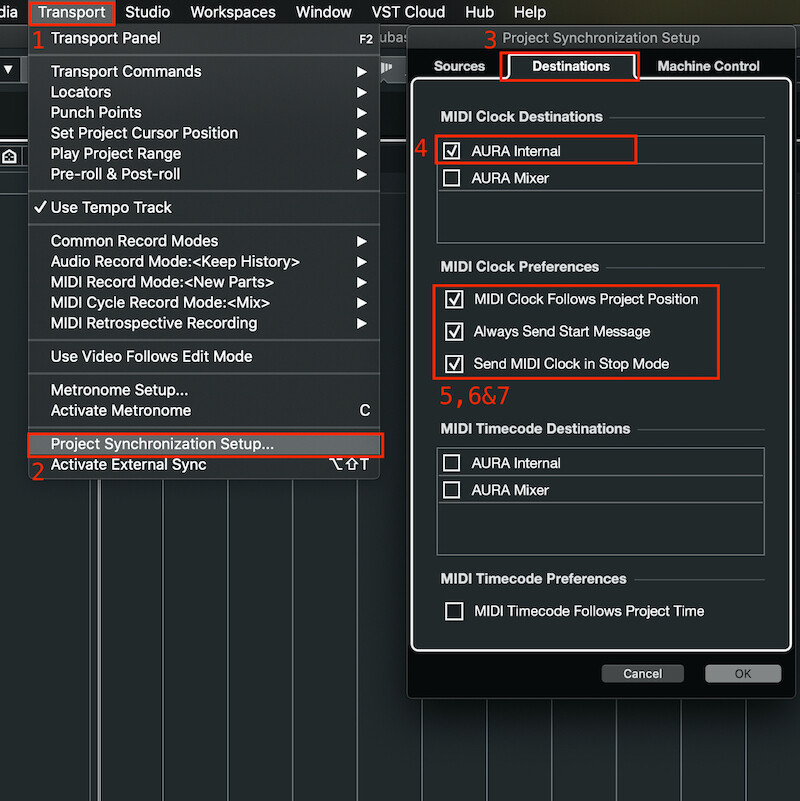
Cubase/Nuendo
- Open the ‘Transport’ menu.
- Select ‘Project Syncronization Setup…’.
- In the window that appears, go to the ‘Destinations’ tab.
- Tick the box for your controller’s first output port, in the ‘MIDI Clock Destination’ section.
- If you are using Aura, Tick the ‘MIDI Clock Follows Project Position’ box.
- Tick the ‘Always Send Start Message’ box.
- Tick the ‘Send MIDI Clock in Stop Mode’ box.
Cubase/Nuendo
Reaper
- Open the ‘Options’ menu.
- Select ‘Preferences…’.
- In the window that appears, go to the ‘MIDI Devices’ page.
- Double-click on the name of your controller’s first output port.
- Tick the ‘Enable output to this device’ box.
- Tick the ‘Send Clock to this device’ box.
- Click ‘OK’

Reaper
Reaper
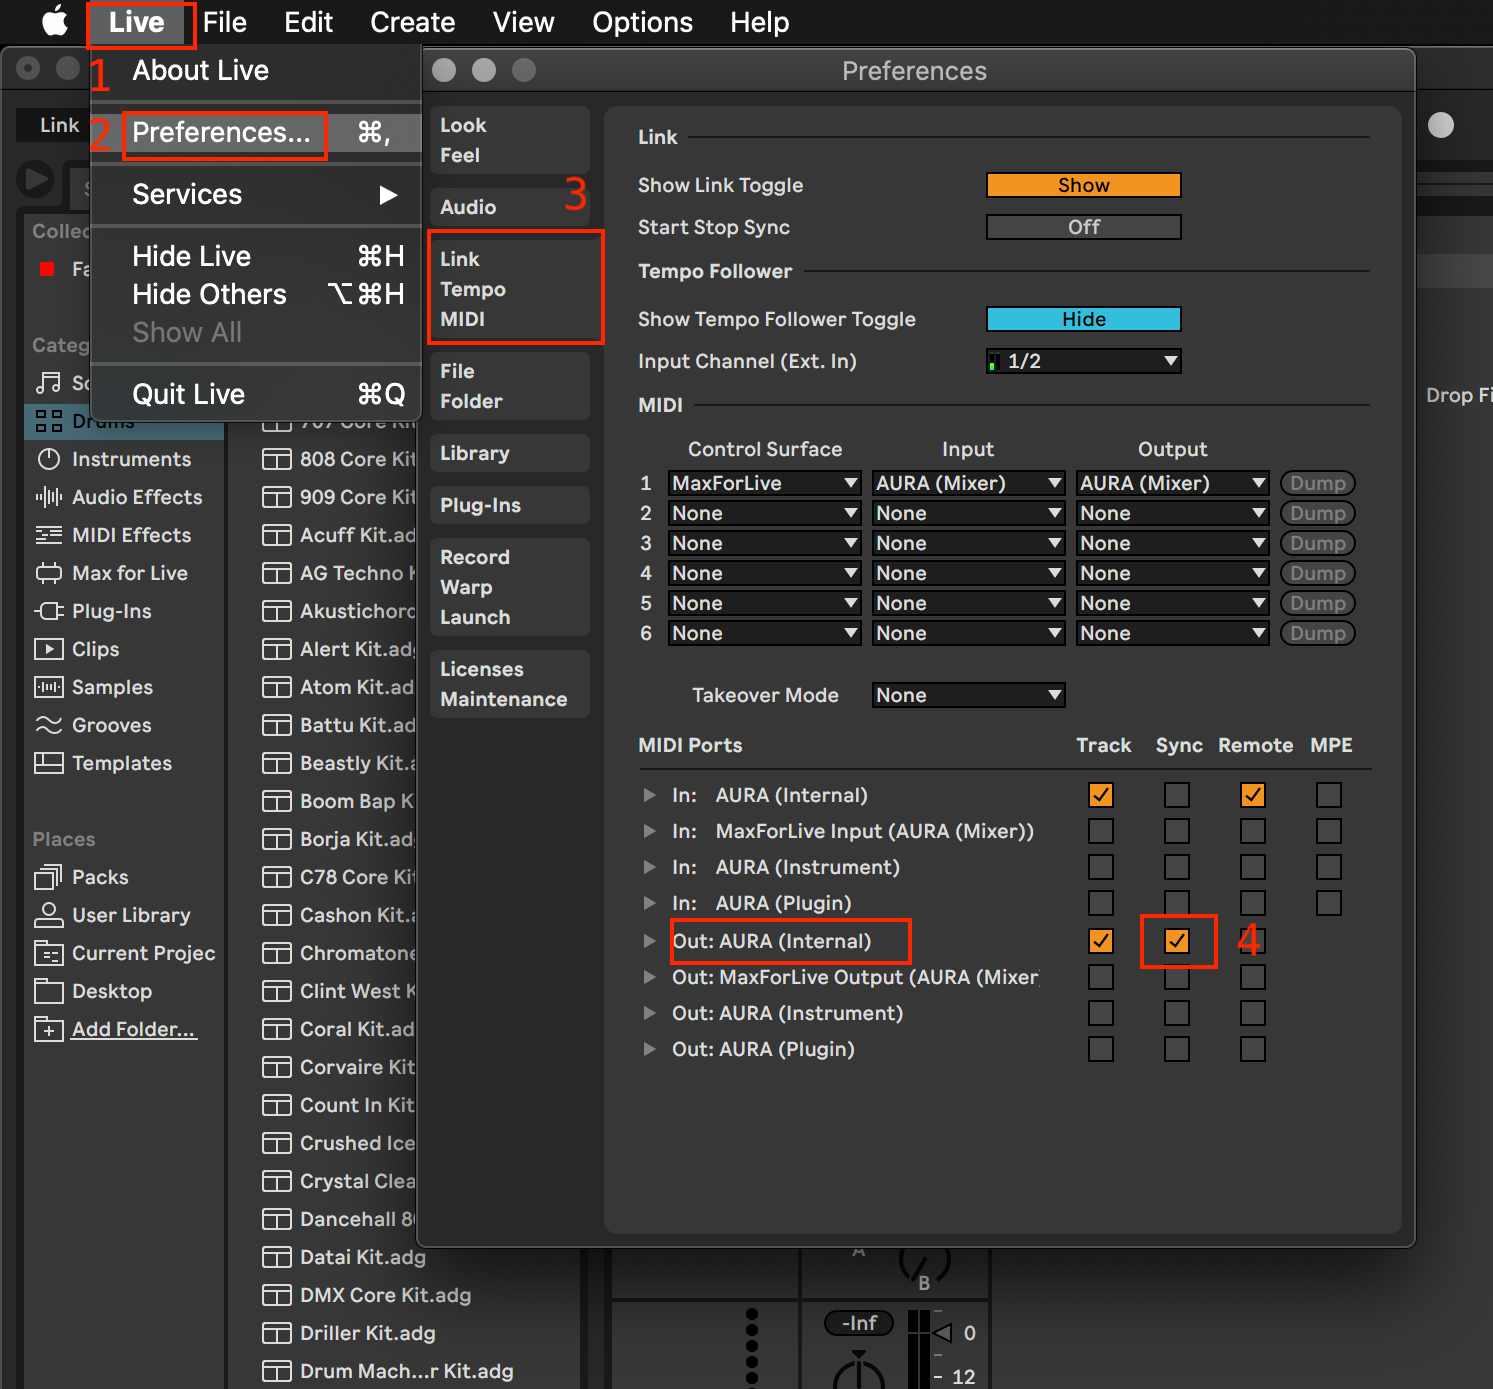
Live
- Open the ‘Live’ menu in MacOS or the ‘Options’ menu in Windows.
- Select ‘Preferences…’.
- In the window that appears, go to the ‘Link/Tempo/MIDI’ page.
- Tick the box in the ‘Sync’ column for your Nektar controller’s first output port.
- Close the Preferences window.
Live
Live
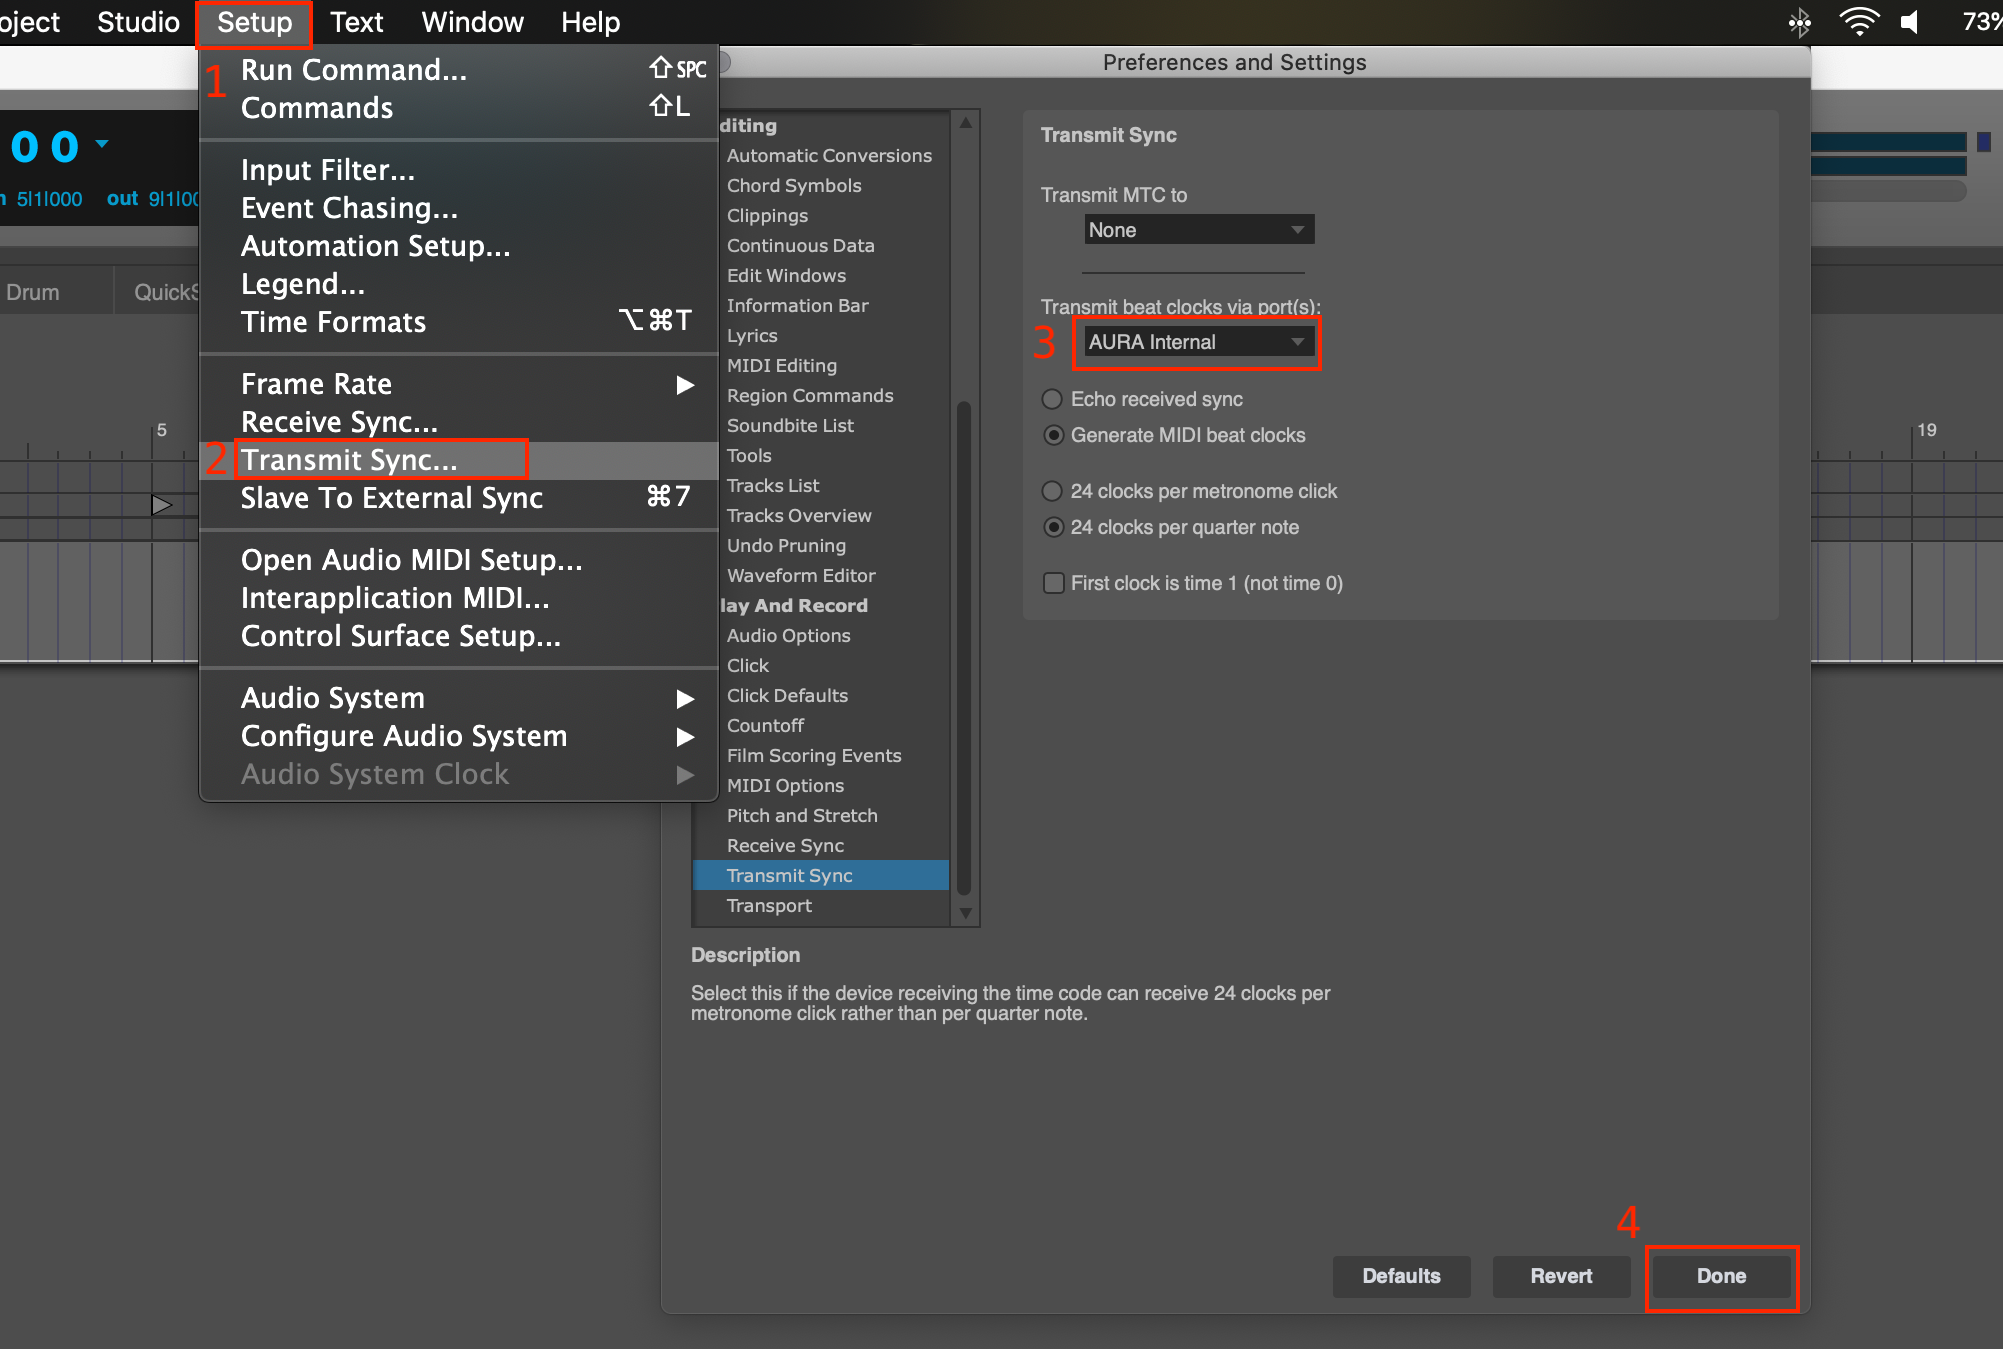
Digital Performer
- Open the ‘Setup’ menu.
- Select ‘Transmit sync…’.
- In the window that appears, select your Nektar controller’s first port from the ‘Transmit Beat clock..’ option.
- Click ‘Done’ at the bottom of the ‘Preferences’ window.
Digital Performer
Digital Performer