MainStage Setup and Troubleshooting: Pacer
Here is a link to a preset template for Pacer which is designed to work with Mainstage:
To send the sysex data to Pacer, use Sysex Librarian (OS X) or Bome’s Send SX (Windows).
The sysex data will be loaded as the ‘Current’ preset. You can then save the settings to any of Pacer’s preset slots. If you don’t save the preset, the settings will be lost the next time you select a different user preset.
- With Pacer in Preset Mode, turn the Data Encoder to select ‘SAVE’, then press the Encoder Button.
- The 5-character display will say ‘STORE’, press the Encoder button.
- Turn the data encoder to select the Preset slot, to which you would like to save this preset, then press the Encoder button.
Once you have saved that preset, Pacer’s controls will be configured as shown below:
The Preset
- Switch A: Track Preset
- Switch B: Transport Preset
- Switch C: Previous Preset
- Switch D: Next Preset
- Switch 1: MIDI CC 64 Sustain
- Switch 2: MIDI CC 65 Portamento
- Switch 3: MIDI CC 66 Sostenuto
- Switch 4: MIDI CC 67 Soft Pedal
- Switch 5: MIDI CC 68 Legato
- Switch 6: MIDI CC 69 Hold 2
- FS1: MIDI CC 80
- FS2: MIDI CC 81
- FS3: MIDI CC 82
- FS4: MIDI CC 83
- EXP1: MIDI CC 7 – Volume
- EXP2: MIDI CC 11 – Expression
Note that Stomp Switch [1] is pre-configured to transmit CC64. If you are using Pacer to control a Keyboard concert, use this Stomp Switch as your sustain pedal. If you are using a Guitar concert, Stomp Switch [1] can be used as another assignable control.
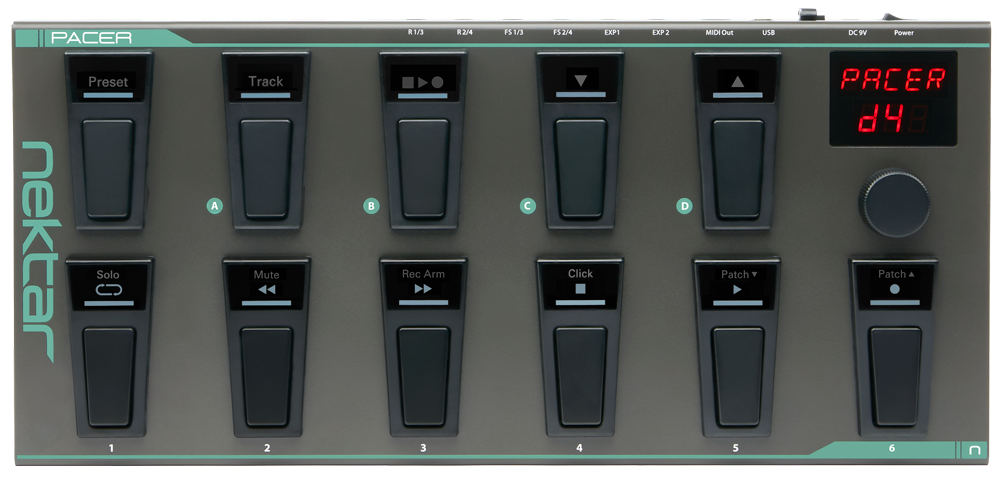
You can then use the ‘Assignments and Mappings’ panel, in MainStage’s Edit page, to assign control parameters and functions. Configure Stomp Switches [1]-[6] to control Smart Buttons (or any other parameter) as shown in Image 1. Configure Stomp Switch [C] to control the ‘Next Patch’ function and Stomp Switch [D] to control the ‘Prev Patch’ function, as shown in Image 2.
Pacer’s Expression and Footswitch inputs can also be assigned.
With this setup, you can select Next/Previous patches with Stomp Switches [C] and [D] respectively. As you navigate patches, you will see the LED feedback for Stomp Switches [1]-[6] update according to the state of the assigned parameters in the selected patch.
Customization
If you would like to configure your own Pacer preset for MainStage, you will find some tips below.
Program Change
If you would like to be able to select specific patches in a concert, rather than selecting Next/Previous patches one-by-one, you can do so by configuring the Stomp Switches to transmit Program Change messages. It’s recommended to use Presets A1-A4 as templates for this type of application. You can find more information about making custom Program Change assignments on this page: Creating and Customizing Presets for Pacer
MIDI Feedback
It’s possible to let MainStage send MIDI feedback to Pacer, to control the Stomp Switch LEDs. This way Pacer’s LEDs will respond to parameter changes, whether controlled from Pacer or from MainStage’s GUI.
First you will need to enable MIDI feedback for the Stomp Switches:
Press and hold the [Preset] Stomp Switch, then load preset D3.
- Turn the Data Encoder to select ‘CTRL’ (Control Edit menu), then press the Encoder Button.
- Press the Stomp Switch, to which you would like to send MIDI feedback.
- Turn the Data Encoder to select ‘LED’, then press the Encoder Button.
- The display should now say ‘MIDI’, press the Encoder Button.
- The display should now say ‘OFF’. Turn the Data Encoder to select ‘On’, then press the Encoder Button.
- Press the [Preset] button, then turn the Data Encoder to select ‘SETUP’.
- Repeat steps 3-7 for each of the Stomp Switches that you would like to respond to MIDI feedback.
- Press [Preset] button again to exit the Control Edit menu.
Once you have enabled MIDI feedback for the Stomp Switch, assign it to a Smart Button or any other parameter in Mainstage. With that done, make sure that the Assignment is configured as shown in Image 1.
With that done, the Stomp Switch LEDs will only change states in response to MIDI feedback. After making those changes described above to Preset D3, you should save the preset.
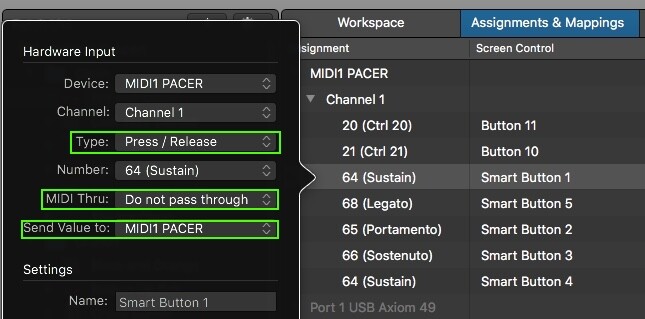
Image 1) Smart Button assignment with feedback
Image 1) Smart Button assignment with feedback
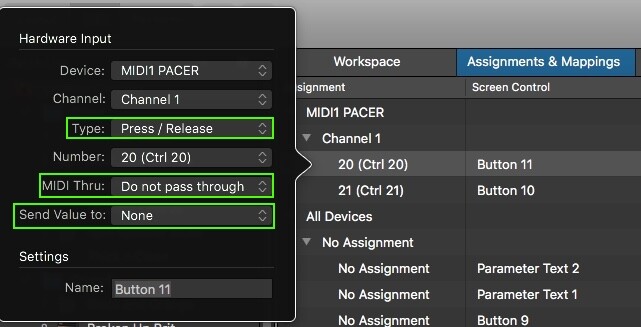
Image 2) Patch Previous/Next assignment
Image 2) Patch Previous/Next assignment