Reason Setup and Troubleshooting: Impact
Here are the steps you need to follow to get Reason up and running with your Impact series controller.
Installation & Setup
Impact Reason integration is compatible with Reason 6 and above. For Reason 5, please see below.
- Download the ‘Impact_Reason_Integration’ file from your Account page after registering your product.
- Run the “Impact_Reason_Support” installer from that file and follow the on-screen instructions.
- Plug-in your Impact and make sure it’s switched on (if you didn’t do so already).
- Launch Reason.
- Open the ‘Edit’ menu.
- Select ‘Preferences’.
- Select the ‘Control Surfaces’ tab.
- Click ‘Auto-detect surfaces’.
- After a few moments of scanning, Reason should show a dialogue box stating “Some of the control surfaces use the same MIDI ports.” (Image 1) That’s correct, so click ‘OK’.
- You should now see two control surfaces populated in the Control Surfaces window (Image 2-4 for OS X, Images 6-9 for Windows). One is named ‘Nektar Impact**’ and the other is named ‘Nektar Impact ** Mixer Mode’.
- Make sure both control surfaces are ticked ‘Use with Reason’.
- Close the Preferences menu.
Note: ‘**’ represents 25, 49, 61 or 88; depending on which Impact series controller you are using.
Surface Locking
In order to control Mixer parameters from Impact Mixer Mode, follow these steps:
- In Reason, open the ‘Options’ menu.
- Select ‘Surface Locking’. You should see the window shown in Image 5 for OSX and Image 10 for Windows.
- Set the ‘Surface’ option to ‘Nektar Impact ** Mixer Mode’.
- Set the ‘Lock to device’ option to ‘Master Section’ (alternately, you can choose Remix 14:2, Remix 6:2 or even the ReGroove Mixer).
Now when the Impact is in Mixer Mode, (press the Mixer button) you will have control over Mixer parameters.

Image 1) Warning
Image 1) Warning
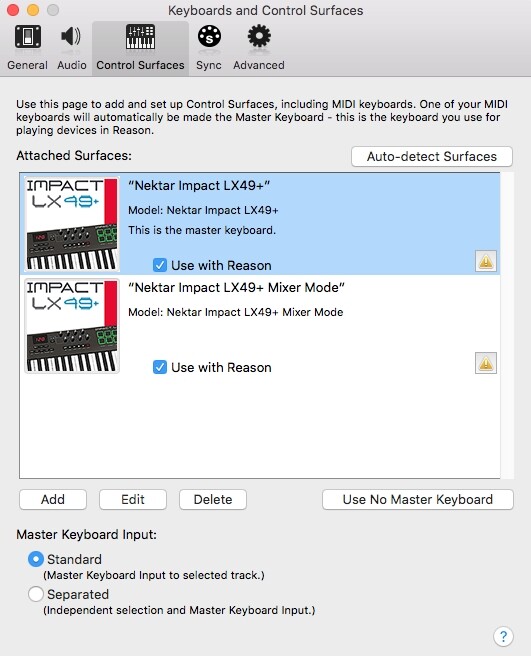
Image 2) OS X
Image 2) OS X
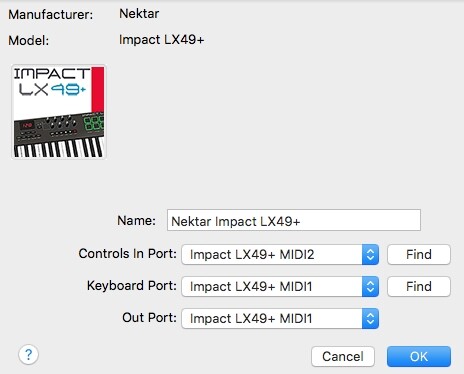
Image 3) OS X
Image 3) OS X
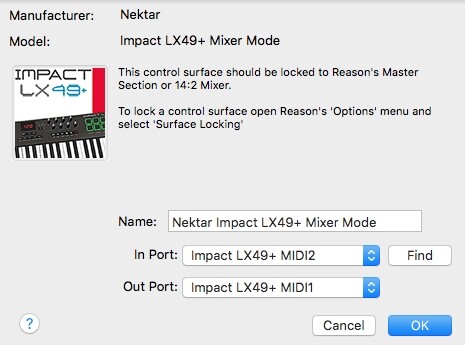
Image 4) OS X
Image 4) OS X
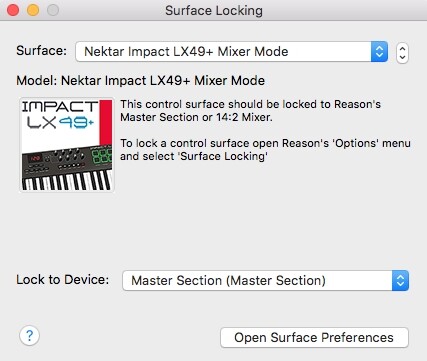
Image 5) OS X
Image 5) OS X
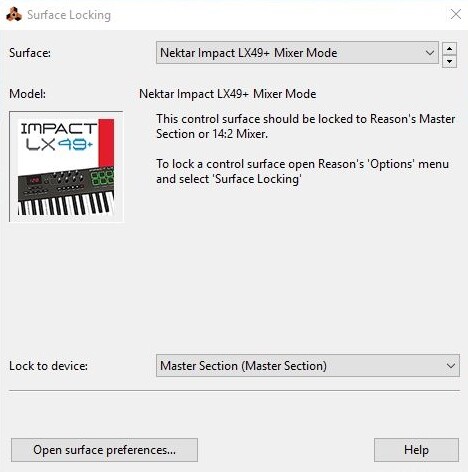
Image 10) Windows
Image 10) Windows
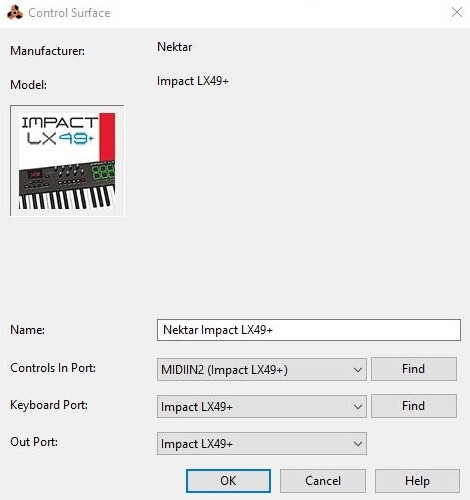
Image 8) Windows
Image 8) Windows
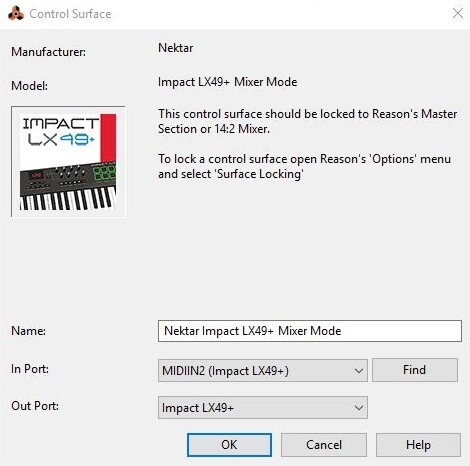
Image 9) Windows
Image 9) Windows
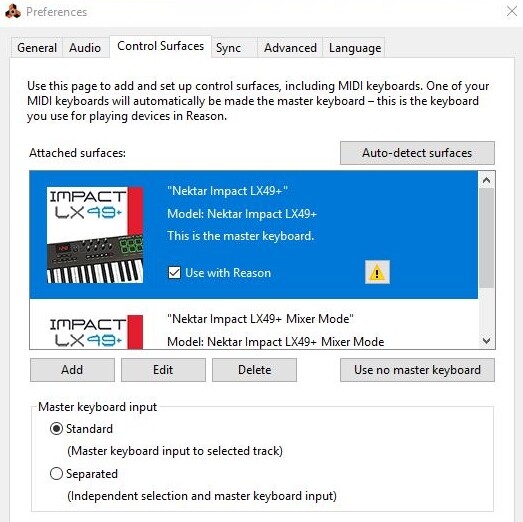
Image 6) Windows
Image 6) Windows
Image 6) Windows
Image 6) Windows
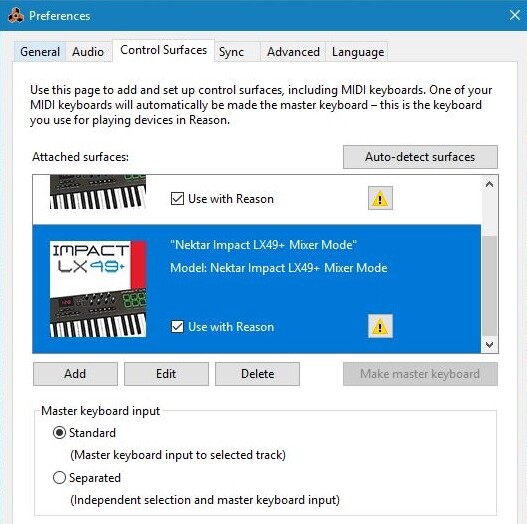
Image 7) Windows
Image 7) Windows
Image 8) Windows
Image 8) Windows
Image 9) Windows
Image 9) Windows
Image 10) Windows
Image 10) Windows
Note for Reason 5 users
The latest versions of the Reason support software for the LX+, GX and SE49 (v1.2.0 and above) are only compatible with Reason 6 and above. If you are using Reason 5, please run the installer from the links below:
Manual Setup
Windows:
- Open Reason.
- Open the ‘Edit’ menu.
- Select ‘Preferences’.
- Select the ‘Control Surface’ tab.
- Click the ‘Add’ button.
- For ‘Manufacturer’ select Nektar.
- For ‘Model’ select ‘Impact LX**’. (Image 8)
- For ‘Controls In Port’ select ‘MIDIIN2 (Impact LX**)’. (Image 8)
- For ‘Keyboard Port’ select ‘Impact LX**’. (Image 8)
- For ‘Out Port’ select ‘Impact LX**’. (Image 8)
- Click ‘OK’.
- Click the ‘Add’ button again
- For ‘Manufacturer’ select Nektar. (Image 9)
- For ‘Model’ select ‘Impact LX** Mixer Mode’. (Image 9)
- For ‘In Port’ select ‘MIDIIN2 (Impact LX**)’. (Image 9)
- For ‘Out Port’ select ‘Impact LX**’. (Image 9)
- Click ‘OK’.
Both ‘Nektar Impact LX**’ and ‘Nektar Impact LX** Mixer Mode’ should now appear in the Control Surface setup window with yellow exclamation marks (this is normal).
OS X:
- Open Reason.
- Open the ‘Reason Menu’ and select ‘Preferences’.
- Select the ‘Control Surface’ tab.
- Click the ‘Add’ button.
- For ‘Manufacturer’ select Nektar. (Image 3)
- For ‘Model’ select ‘Impact LX**’. (Image 3)
- For ‘Controls In Port’ select ‘Impact LX** MIDI2’. (Image 3)
- For ‘Keyboard Port’ select ‘Impact LX** MIDI1’. (Image 3)
- For ‘Out Port’ select ‘Impact LX** MIDI1’. (Image 3)
- Click ‘OK’.
- Click the ‘Add’ button again.
- For ‘Manufacturer’ select Nektar. (Image 4)
- For ‘Model’ select ‘Impact LX** Mixer Mode’. (Image 4)
- For ‘In Port’ select ‘Impact LX** MIDI2’. (Image 4)
- For ‘Out Port’ select ‘Impact LX** MIDI1’. (Image 4)
- Click ‘OK’.
Both ‘Nektar Impact LX**’ and ‘Nektar Impact LX** Mixer Mode’ should now appear in the Control Surface setup window with yellow exclamation marks (this is normal).
Note: ‘**’ represents 25, 49, 61 or 88; depending on which Impact series controller you are using.
Troubleshooting
Patch Changes
If you find that the [< Patch] and [Patch >] buttons don’t work when controlling a third-party plug-in, it’s likely because the plug-in uses it’s own patch browser. The Patch buttons on the Impact series control the patch navigation functions of the DAW, so you may need to save the plug-ins presets in your DAWs patch format, before you can use the Patch buttons on the Impact controller for patch navigation. You can find more information about saving patches in your DAW, in the documentation for that program.