Reaper Setup and Troubleshooting: Panorama T Series
Important: Panorama T-series Reaper integration is compatible with Reaper 4.59 or later. We recommend that you upgrade to the latest version if you have not already done so. These instructions assume you have a compatible Reaper program installed running on either Windows (Vista or higher) or Mac OS X 10.11 or higher.
Installation & Setup
Make sure Reaper is already installed on your computer. If not, please install Reaper first and open it at least once, before running the installer for Nektar DAW integration software.
- Download the ‘Panorama_T4_T6_Reaper_Support’ file from your Account page after registering your product.
- Run the ‘Panorama_T4_T6_Reaper_Support’ installer and follow the onscreen instructions.
Plug in your Panorama T-series controller and make sure it’s switched on (if you didn’t do so already). - Launch Reaper and open the ‘Options’ menu.
- Select ‘Preferences’.
- In the ‘Preferences’ window, select ‘Control/OSC/Web’. (Image 1)
- Click ‘Add’. (Image 1)
- In the pop-up window, select your Panorama T-series model in the ‘Control surface mode’ list. As long as your controller is connected and switched on, Reaper should automatically detect the correct ports. (See Image 2 for MacOS setup and Image 6 for Windows).
- Click ‘OK’.
- In the ‘Preferences’ window, select ‘MIDI Devices’ from the Audio category.
- Enable ‘Panorama T*’ (Windows) or ‘Nektar Technology – Panorama T* – Internal’ (MacOS) for your T-series controller. The mode should be ‘Enable+Control’. The other two T-series ports should remain disabled. (See Image 3 for MacOS setup and Image 7 for Windows).
- Click ‘Apply’.
- Click ‘OK’.
That’s it, setup is now complete and you can move on to the fun part, learning how it all works!
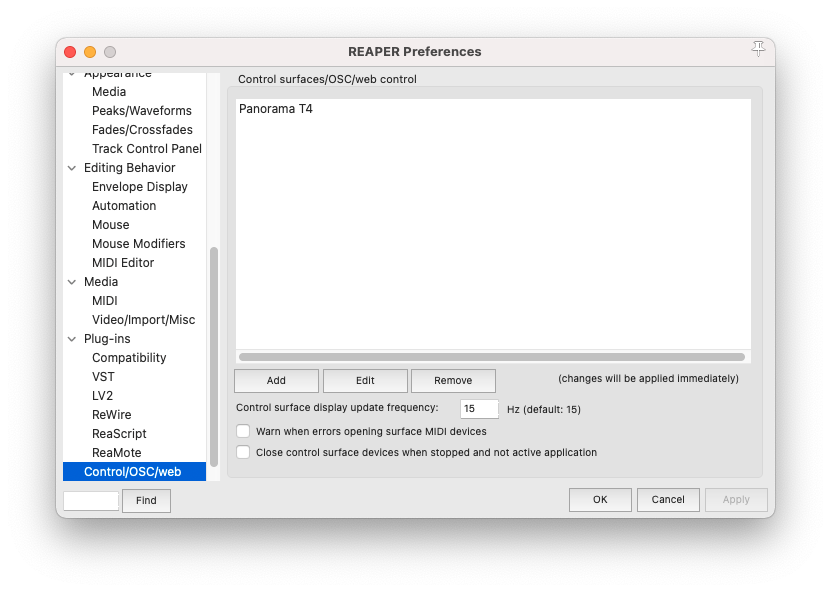
Image 1
Image 1
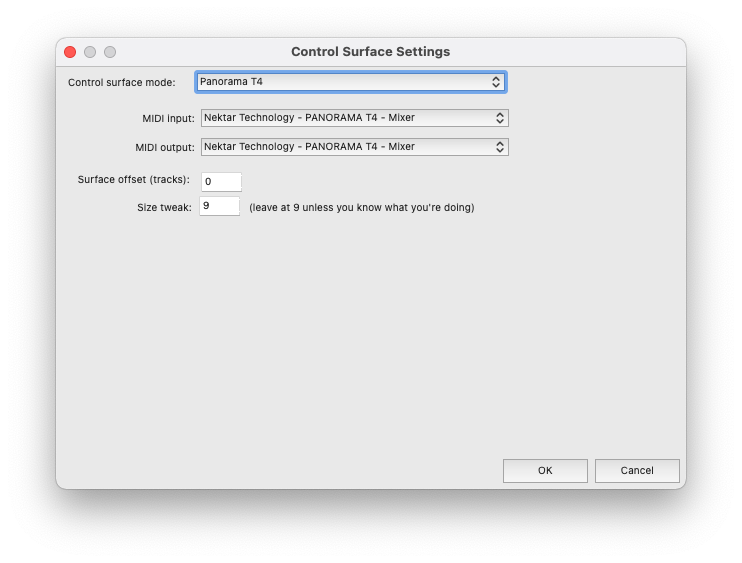
Image 2
Image 2

Image 3
Image 3
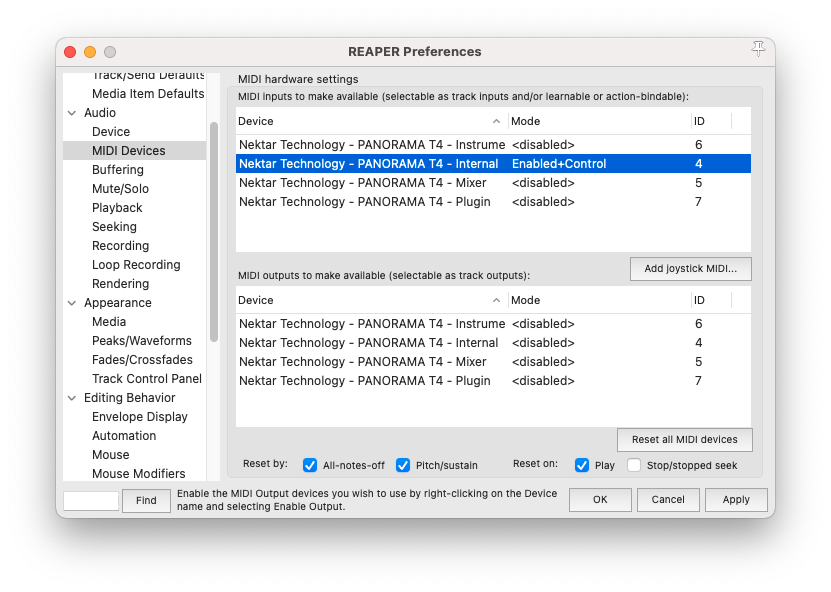
Image 4
Image 4
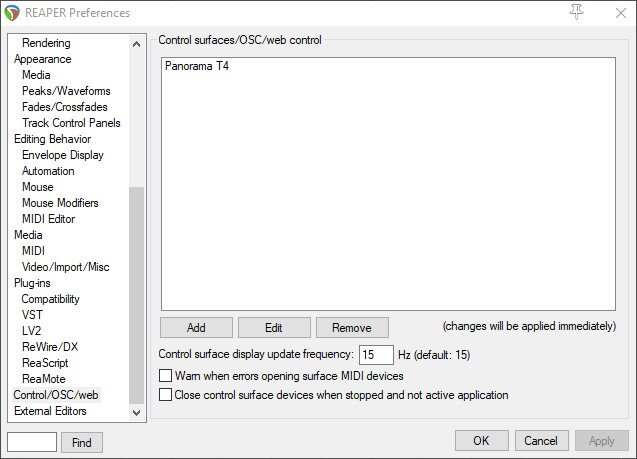
Image 5
Image 5
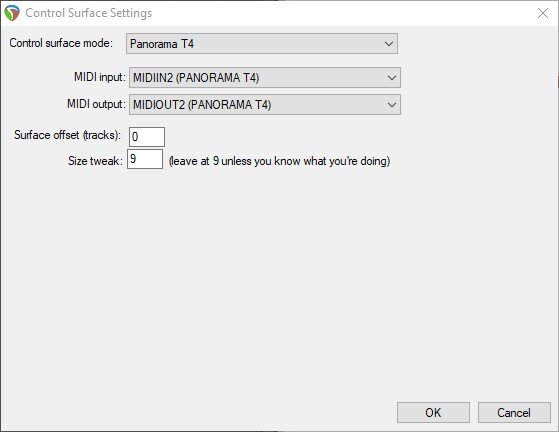
Image 6
Image 6
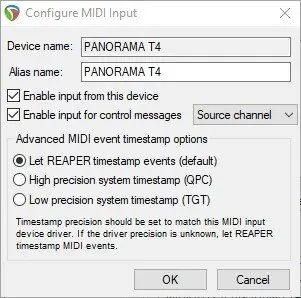
Image 7
Image 7
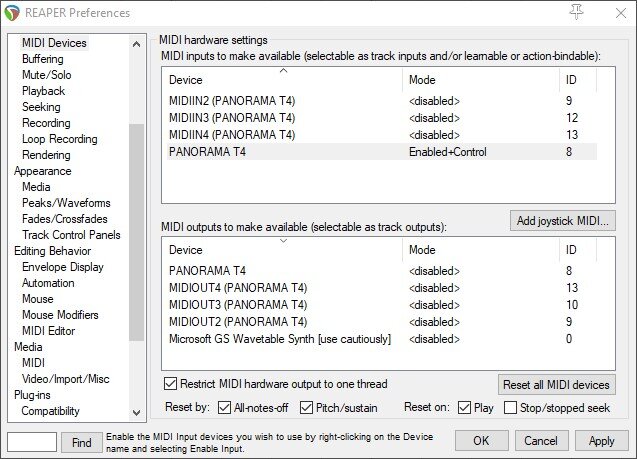
Image 8
Image 8
Troubleshooting
It is important to only enable port 1 in the MIDI Devices window. If multiple ports are enabled, your T-series controller will not function correctly. Make sure your setup mirrors that of Image 4 and 8.
If you installed our Reaper support files before starting Reaper for the first time and find that your Panorama T-series controller is not listed in Reaper’s Control Surfaces menu, please follow the steps below.
MacOS:
- Open a Finder window.
- Open the ‘Go’ menu at the top of your screen.
- Select ‘Go to folder’.
- Type or copy/paste ‘~/Library/Application Support’.
- Find the ‘REAPER’ folder in that directory and delete it.
- Start Reaper and then quit Reaper again.
- Run the Reaper support installer you downloaded from your Account page again.
Windows:
- Open a File Explorer window.
- Navigate to ‘C:\Users\\AppData\Roaming’ (note this is normally a hidden directory, follow the instructions on this page to unhide: Show hidden files).
- Find the ‘REAPER’ folder in that directory and delete it.
- Start Reaper and then quit Reaper again.
- Run the Reaper support installer you downloaded from your Account page again.
Patch Changes
If you find that the [< Patch] and [Patch >] buttons don’t work when controlling a third-party plug-in, it’s likely because the plug-in uses it’s own patch browser. The Patch buttons on the Panorama T-series control the patch navigation functions of the DAW, so you may need to save the plug-ins presets in your DAWs patch format, before you can use the Patch buttons on the Panorama T-series controller for patch navigation. You can find more information about saving patches in your DAW, in the documentation for that program.
Portable Installation
If you have a portable installation of Reaper, you will need to manually install the control surface files.
Navigate to ‘C:\Users\\AppData\Roaming\Reaper\UserPlugins’ (note this is normally a hidden directory, follow the instructions on this page to unhide: Show hidden files).
Copy the .dll files associated with the Panorama T-series and paste the files to the ‘Plugins’ folder within Reaper’s install path (usually C:\Program Files\REAPER (x64)).
Known Issues
Currently Nektar controllers will operate as generic MIDI devices when running Reaper, as native applications on M1 based Apple computers.
You can run these DAWs in an Intel Mac emulation layer called Rosetta and our support software for those applications will work. Please follow these steps:
- Open a Finder window.
- Select ‘Applications’ from the list on the left side of the window.
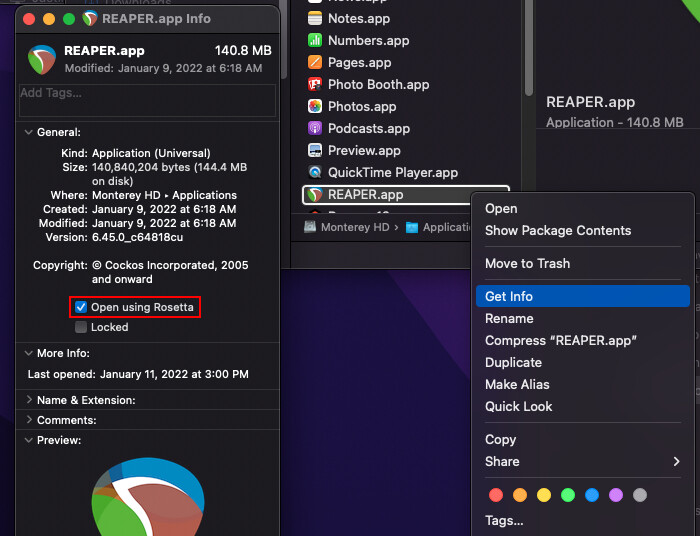
- Right-click on the Reaper app and select ‘Get Info…’.
- Tick the ‘Open in Rosetta’ option.
- Close the Info window.
- Start the DAW.
Open Reaper with Rosetta
Open Reaper with Rosetta