Pro Tools Setup and Troubleshooting: Impact LX
With the release of Pro Tools 2024.3, the ‘M-Audio Keyboard’ control surface profile is no longer an option in Pro Tools’ MIDI Controller settings. As a result, Nektar controllers will only operate as generic MIDI Devices in Pro Tools. You will be able to play instruments from the keys and wheels, but you will not be able to control mixer, transport or navigation functions.
It’s possible for you to set up the Impact LX to control Pro Tools using Impact LX’s generic MIDI controller capabilities.
To make it easier, we have created a simple setup which will program your Impact LX so you don’t have to. The following guide will have you up and running in no time.
Installation and Setup
Before we can do anything you’ll need to download one of the following:
Note: These templates will only work in Pro Tools 8.0 and above.
Once the download is complete, unzip and locate the ‘ImpactLX_PT_templatev1.0.syx’ file. This .syx file needs to be transmitted to your Impact LX controller and to do that you’ll need to download one of the following sysex tools:
- Mac OS X: Sysex Librarian (Image 1)
- Windows: Send SX (Image 2)
Next you’ll need to open your Sysex tool of choice and transmit the data to the Impact LX controller.
Below is an example of how it’s done using Sysex Librarian:
- Drag the file ‘ImpactLX_PT_templatev1.0.syx’ into the main window.
- Choose ‘Port 1’ as the destination (Image 1).
- Click ‘Play’.
During the transfer process the display on your Impact LX will read ‘SYS’.
Now it’s time to launch Pro Tools. With Pro Tools open go to the ‘Setup’ menu and select ‘Peripherals’, as shown in Image 3.
In the Peripherals menu, go to the ‘MIDI Controllers’ tab, then configure the following settings:
- Type: ‘M-Audio Keyboard’
- Receive From:
‘Impact LX Port 1’ in OSX
‘IMPACT LX [Emulated]’ in Windows - Send To:
‘Impact LX Port 1’ in OSX
‘IMPACT LX [Emulated]’ in Windows. - Click ‘OK’.
If everything is configured correctly, you should see the Impact LX’s MIDI ports configured as shown in Image 4.
Now your Impact LX is configured in Pro Tools.
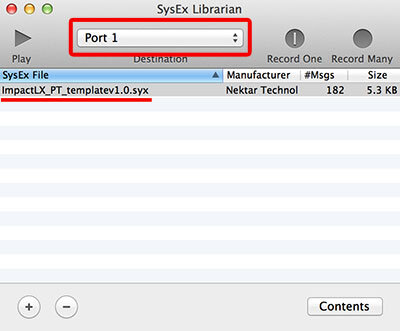
Image 1) SysEx Librarian
Image 1) SysEx Librarian
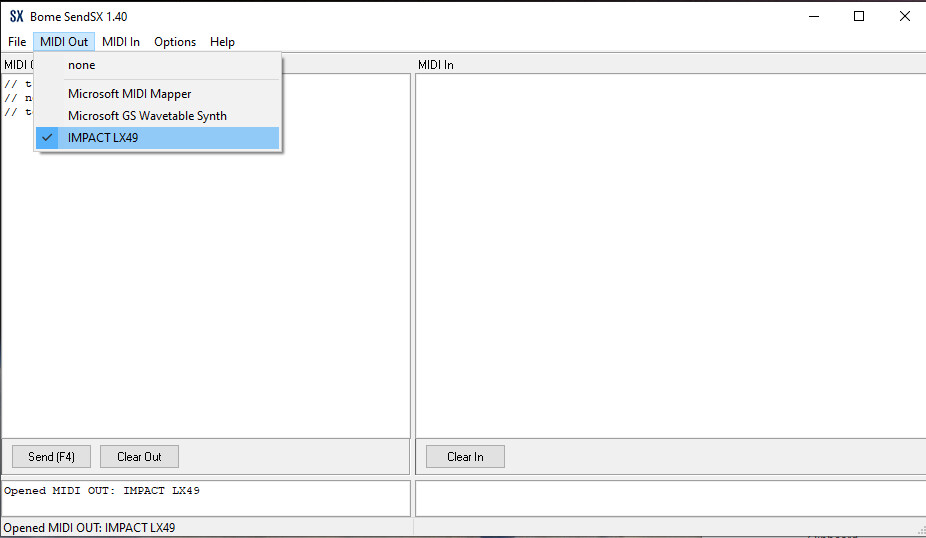
Image 2) Send SX
Image 2) Send SX
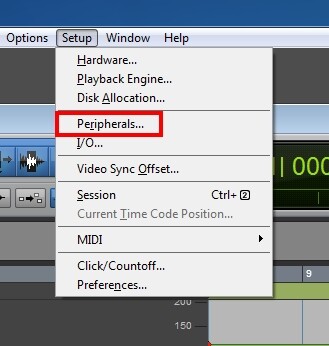
Image 3) Peripherals…
Image 3) Setup > Peripherals…
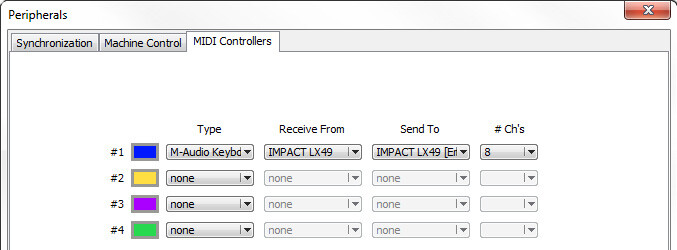
Image 4) Peripherals
Image 4) Peripherals setup
Using the Impact LX with Pro Tools
Transport Buttons
The Impact LX’s transport buttons perform the following functions:
| Button | Function |
|---|---|
| Loop | Used in conjunction with other buttons to activate loop functions |
| << | Rewind |
| >> | Fast Forward |
| Stop | Stop playback |
| Play | Start playback |
| Record | Arm the transport for recording |
The ‘Loop’ button provides additional options and gives access to the following functions:
| Buttons | Function |
|---|---|
| Loop + Play | Loop Playback |
| Loop + Record | Loop Record |
| Loop + Stop | Undo |
| Loop + RW | Go to start |
| Loop + FF | Go to end |
Note: The loop button has no function when pressed by itself.
New Preset Configuration
The sysex update you transmitted to the Impact LX not only programmed the transport buttons but also reprogramed the 5 internal presets. To move through these presets hold both transpose buttons down and then click through the options till you see ‘PRE’ on the LX display. Now hit the ‘Preset’ button and you should be able to scroll though presets 1-5 using the transpose buttons. More information on this can be found on page 12 of the user guide.
- Preset 1 = Learn Friendly
- Preset 2 = GM Mixer 1-8
- Preset 3 = GM Mixer 9-16
- Preset 4 = GM Instrument Preset
- Preset 5 = Pro Tools Mixer
This is significant because you will be using the presets for different purposes.
Controlling the Mixer (Image 5)
To control the Pro Tools mixer, first select preset 5. Now choose Pad Map 3 by holding down ‘Shift/Mute’ + the pad labeled ‘Pad Map3’ (page 18 in the user guide). The pads will now also function as important control buttons. Finally press the ‘Preset’ button.
Your Impact LX will now control the following parameters:
- Faders 1-8 control Channel Volume in banks of 8
- Buttons 1-8 (below faders) control Channel mute and Record Arm (use button 9 to toggle between Mute and Record Arm) in banks of 8
- The pads can be used to change Track, Bank and control Mute/Solo.
- Pad 1 and 2 – Track-/+.
- Pad 3 and 4 – Bank-/+.
- Pad 5 – Mute selected track.
- Pad 6 – Solo Selected track.
Controlling Virtual Instruments
To work with virtual instruments recall Preset 4 “GM” using the transpose buttons. Most of the AIR instruments bundled with Pro Tools will respond to the controls when using this preset. Some plugins allow you to MIDI “learn” parameters, such as the included Xpand. You can use the read-only ‘Mixer’ and ‘Inst’ presets for that purpose or of course preset 1 which has been set up to not conflict with the other presets.
Try loading Xpand, then right-click/Cmd + click on a parameter and select the learn menu. Xpand is multi-timbral meaning it can play more than one sound at a time. If you use Xpand this way, use presets 2 and 3 to control volume and pan for each channel.
That’s it for setting up the Impact LX with Pro Tools. If you get stuck on any of the above steps please refer back to the printed user guide.
Have fun experimenting!
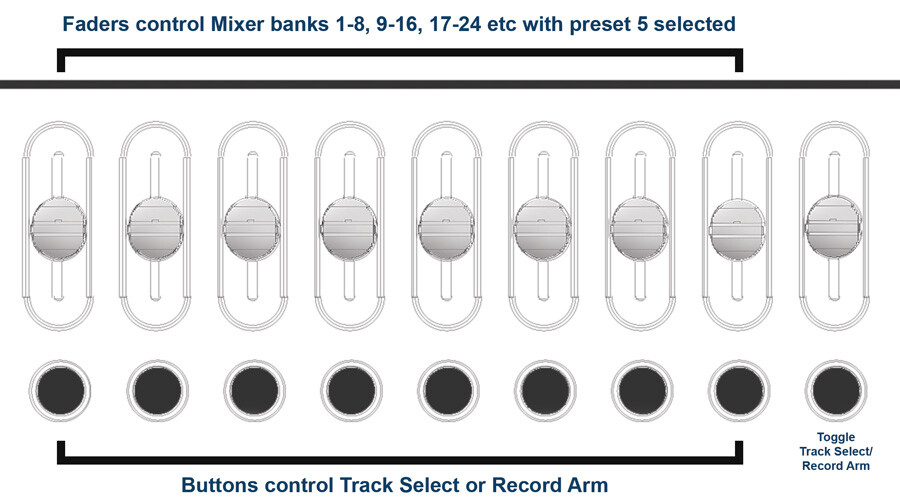
Image 5) Overview
Image 5) Impact LX overview