Pro Tools Setup and Troubleshooting: Impact GX
With the release of Pro Tools 2024.3, the ‘M-Audio Keyboard’ control surface profile is no longer an option in Pro Tools’ MIDI Controller settings. As a result, Nektar controllers will only operate as generic MIDI Devices in Pro Tools. You will be able to play instruments from the keys and wheels, but you will not be able to control mixer, transport or navigation functions.
First you will need to set the Impact GX keyboard to USB Port Setup Mode 4:
- Press the ‘Setup’ button. The Setup button’s LED will light up.
- Press key A2 (labeled ‘USB Port Setup’). The Setup button LED will begin to flash.
- Press key D4 on GX49 or key D5 on GX61 (labeled ‘4’).
- Press key C5 on GX49 or key C6 on GX61 (labeled ‘Enter’). The Setup button LED will turn off.
Now it’s time to launch Pro Tools. With Pro Tools open go to the ‘Setup’ menu and select ‘Peripherals’, as shown in Image 1.
In the Peripherals menu, go to the ‘MIDI Controllers’ tab, then configure the following settings:
- Type: ‘M-Audio Keyboard’
- Receive From:
‘Impact GX MIDI2’ in OS X
‘MIDIIN2 (IMPACT GX) [Emulated]’ in Windows - Send To:
‘Impact GX MIDI1’ in OS X
‘IMPACT GX [Emulated]’ in Windows - Click ‘OK’.
If everything is configured correctly, you should see the Impact GX’s MIDI ports configured as shown in Image 2 for Windows and Image 3 for OS X.
Now your Impact GX is configured in Pro Tools.

Image 1) Setup menu
Image 1) Setup menu
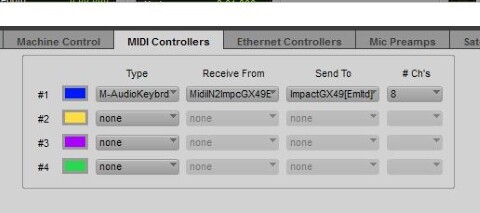
Image 2) Windows
Image 2) MIDI Ports in Windows
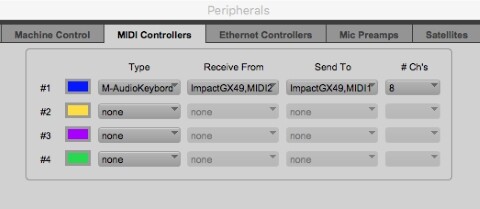
Image 3) OS X
Image 3) MIDI Ports in OS X
Features
Transport Buttons
When the ‘Shift’ button is not lit, the Impact GX’s buttons perform the following functions:
| Button | Function |
|---|---|
| Click | Not Assigned |
| << | Rewind |
| >> | Fast Forward |
| Loop | Used in conjunction with other buttons to activate loop functions |
| Stop | Stop playback |
| Play | Start playback |
| Record | Arm the transport for recording |
The ‘Loop’ button provides additional options and gives access to the following functions:
| Buttons | Function |
|---|---|
| Loop + Play | Loop Playback |
| Loop + Record | Loop Record |
| Loop + Stop | Undo |
| Loop + RW | Go to start |
| Loop + FF | Go to end |
Note: The loop button has no function when pressed by itself.
When the Shift button is lit, the blue labels printed above the buttons describe their functions:
| Label | Function |
|---|---|
| S1 | Mute selected track |
| S2 | Solo selected track |
| < Track | Select previous track |
| Track > | Select next track |
| < Patch | Jump back 8 tracks |
| Patch > | Jump ahead 8 tracks |
Controlling Instrument Parameters
It’s possible to assign the Impact GX’s control pot to instrument parameters in Pro Tools. Many of the AIR instruments and third-part plug-ins have a ‘Learn’ function.
For example, if you right-click on a parameter in the ‘XPand 2’ plug-in you will see a menu with assignment options, as shown in Image 4. Select ‘Learn CC’ then move the control pot on your Impact GX keyboard. That parameter should now be controlled by the pot.
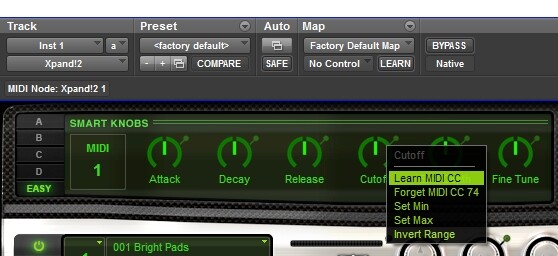
Pro Tools – MIDI CC assignment
Pro Tools – MIDI CC assignment
Troubleshooting
If you encounter the warning shown in Image 5, it is because the Impact series keyboards are not M-Audio keyboards. Simply click the ‘Don’t show this again’ option and then click ‘OK’.
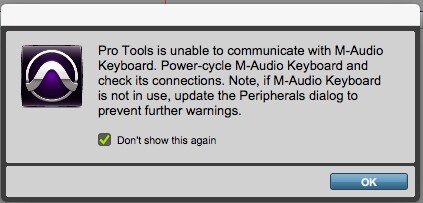
Pro Tools – Warning Message
Pro Tools – Warning Message