Logic Setup and Troubleshooting: Impact
Here are the steps you need to go through to get Logic Pro X up and running with your Impact LX+
Setup Instructions for Logic 10.6 and later
- Download the ‘Impact_LX+_Logic_10.6_or higher_support…’ file from your Account page after registering your product. If you selected Logic as your DAW, you’ll find the link below your product registration.
- A dialog box will appear stating “This package will run a program to determine if the software can be installed”. Click “Continue”.
- If a second message appears, informing that an older version of Nektar DAW integration for logic was found, click here for instructions. Otherwise continue following the installer prompts until complete.
- Plug in your Impact LX+ and make sure it’s switched on.
- Launch Logic.
- In Logic, a dialog box will appear asking ‘Do you want to automatically assign the controls of the Nektar “Impact LX+”?’ (see image)
- Click “Auto Assign”.
- The Control Surface window will appear showing the Impact LX+ icon. Close the window.
That’s it, setup is now complete.

Logic – Auto Assign – Impact
Logic – Auto Assign – Impact
Troubleshooting with Logic 10.6 and later
If you do not see the message detailed in step 6, or if the Nektar DAW integration is not working following, complete these steps:
- Open the ‘Logic Pro’ menu at the top left part of your screen and select ‘Control Surfaces/Preferences’.
- In the window that appears, select the ‘MIDI Controllers’ tab. (see image)
- Check the box in the ‘Auto’ column for your Impact LX+ controller.
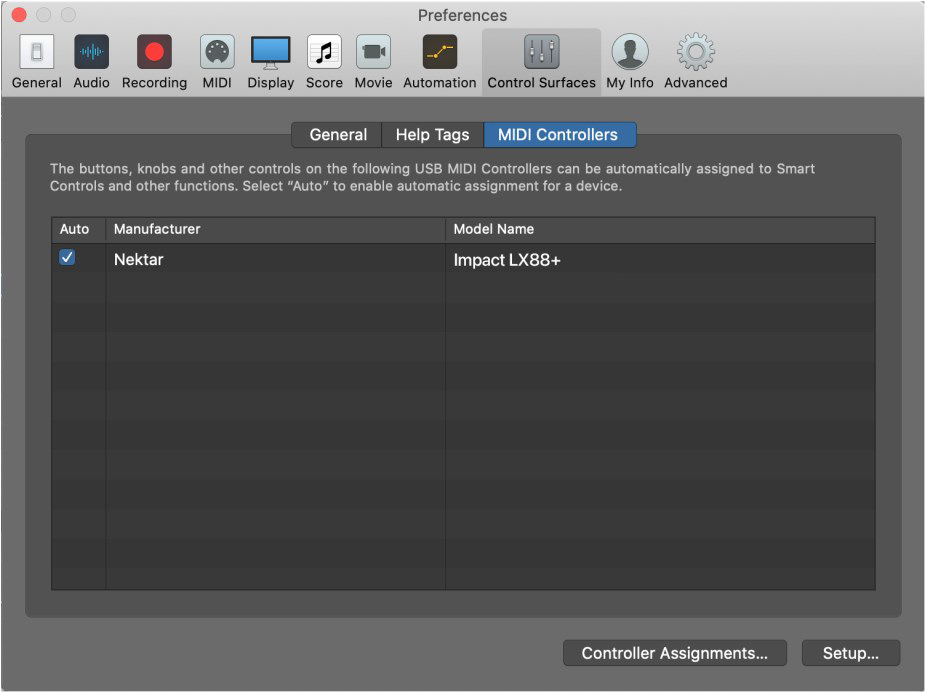
Logic – Control Surfaces/Preferences – Impact
Logic – Control Surfaces/Preferences – Impact
Setup instructions for Logic 10.5 and earlier
- Make sure Logic is already installed on your computer. If not, please install Logic first and open Logic at least once, before running the installer for Nektar DAW integration software.
- Download the ‘Impact_GX_LX+_SE49_Apple_Support_OSX_1.1.9.dmg’ file from your Account page after registering your product. If you selected Logic as your DAW, you’ll find the link below your product registration.
- Run the ‘Impact_Apple_Support’ installer and follow the onscreen instructions.
- Plug-in your Impact keyboard and make sure it’s switched on (if you didn’t do so already).
- Launch Logic.
- Create a new Project or open an existing one.
- The Control Surface Setup window will appear to indicate that Logic has detected a new control surface. See image.
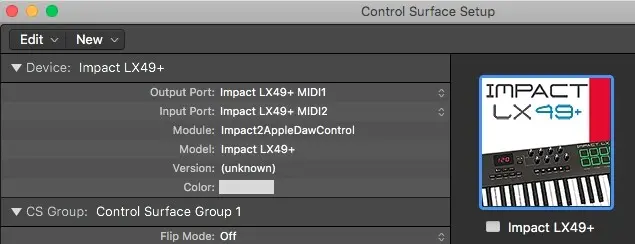
Logic – Control Surface Setup – Impact
Logic – Control Surface Setup – Impact
Troubleshooting with Logic 10.5 and earlier
If the controls/keys on your Impact iX, GX, LX, LX+, or SE25/49 are behaving unusually or simply not working try this fix.
- Close any applications you have open.
- Open a Finder window.
- Open the ‘Go’ menu at the top of the screen.
- Select ‘Go to folder…’
- Type ‘~/Library/Preferences‘
- Click ‘Go’.
- Find com.apple.logic.pro.cs and move it to the trash (Important!)
- Start Logic again.
You should now be able to control Logic’s mixer from Mixer Mode, and the instrument on the currently selected track in Instrument Mode.
If your Impact LX keyboard is detected in Logic but control surface functions are not working, check the USB Port Setup Mode:
- Press the ‘Setup’ button on your Impact keyboard (hold ‘Shift/Mute’ and ‘Patch> (Setup)’, if you have an LX+).
- Press the A2 key on the keyboard.
- The display should say ‘0.0.1.’ if you are using an original Impact LX. It should say ‘0.0.2.’ if you have an LX+.
- If the display says ‘0.0.0.’, change it by pressing the C# key with ‘+’ above it. If you are using an Impact LX25 or LX25+, you will need to press the C3 key (labeled ‘Enter’) before you can change this setting.
Patch Changes
If you find that the [< Patch] and [Patch >] buttons don’t work when controlling a third-party plug-in, it’s likely because the plug-in uses it’s own patch browser. The Patch buttons on the Impact series control the patch navigation functions of the DAW, so you may need to save the plug-ins presets in your DAWs patch format, before you can use the Patch buttons on the Impact controller for patch navigation. You can find more information about saving patches in your DAW, in the documentation for that program.