Digital Performer Setup and Troubleshooting: Impact
Here are the steps you need to go through to get your Impact up and running with Digital Performer 8 and above.
Setup
Run the ‘DAW Integration Installer’ in that folder and follow the on-screen instructions.
- If you have just completed a fresh install of Digital Performer, make sure to open the program one and quit again, before installing the Impact Digital Performer support files.
- Download the ‘Impact_Digital_Performer_Integration’ file from your Account page after registering your product.
- Plug-in your Impact and make sure it’s switched on (if you didn’t do so already).
- Launch Digital Performer and create a Project or open an existing one.
- Go to the ‘Setup’ menu.
- Select ‘Control Surface Setup…’
- Click the ‘+’ button in the upper right corner.
- For ‘Driver’ select ‘Nektar Impact’.
- For ‘Unit’ select ‘Multi MIDI’.
- For ‘MIDI Input’, select ‘MIDIIN2 (ImpactLX**)-16’ in Windows or ‘ImpactLX** MIDI2-16’ in OS X.
- For ‘MIDI Output’, select ‘ImpactLX**’ in Windows or ‘ImpactLX** MIDI1’ in OS X.
- Click ‘OK’ to close the Control Surface Setup window.
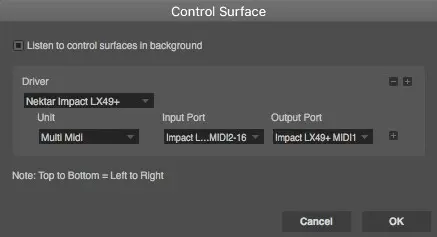
Image 1) OS X
Panorama MIDI ports should be configured as per the above in OS X
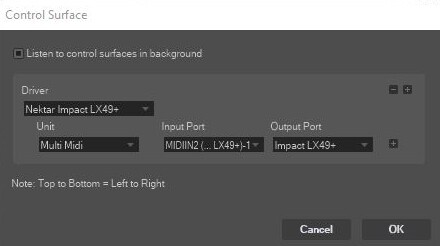
Image 2) Windows
Panorama MIDI ports should be configured as per the above in Windows
Troubleshooting
Patch Changes
If you find that the [< Patch] and [Patch >] buttons don’t work when controlling a third-party plug-in, it’s likely because the plug-in uses it’s own patch browser. The Patch buttons on the Impact series control the patch navigation functions of the DAW, so you may need to save the plug-ins presets in your DAWs patch format, before you can use the Patch buttons on the Impact controller for patch navigation. You can find more information about saving patches in your DAW, in the documentation for that program.