Reason Setup and Troubleshooting: Panorama T Series
Here are the steps you need to follow to get Reason up and running with your Panorama T-series controller.
Panorama T-series Reason integration is compatible with Reason 6 and above.
Installation & Setup
- Download the ‘Panorama_T4_T6_Reason_Support’ file from your Account page after registering your product.
- Run the ‘Panorama_T4_T6_Reason_Support’ installer from that file and follow the on-screen instructions.
- Plug-in your Panorama T-series controller and make sure it’s switched on (if you didn’t do so already).
- Launch Reason.
- Open the ‘Edit’ menu.
- Select ‘Preferences’.
- Select the ‘Control Surfaces’ tab.
- Click ‘Auto-detect surfaces’.
- After a few moments of scanning, you should now see two control surfaces populated in the Control Surfaces window (Image 2-4 for MacOS, Images 5-9 for Windows).
- One is named ‘Nektar Panorama T-Series’ and the other is named ‘Nektar Panorama T-Series Mixer Mode’.
- Make sure both control surfaces are ticked ‘Use with Reason’.
- Close the Preferences menu.
Surface Locking
In order to control Mixer parameters from Panorama T-series Mixer Mode, follow these steps:
- In Reason, open the ‘Options’ menu.
- Select ‘Surface Locking’. You should see the window shown in Image 4 for MacOS and Image 9 for Windows.
- Set the ‘Surface’ option to ‘Nektar Panorama T-Series Mixer Mode’.
- Set the ‘Lock to device’ option to ‘Master Section’ (alternately, you can choose Remix 14:2, Remix 6:2 or even the ReGroove Mixer).
Now when the controller is in Mixer Mode, (press the Mixer button) you will have control over Mixer parameters.
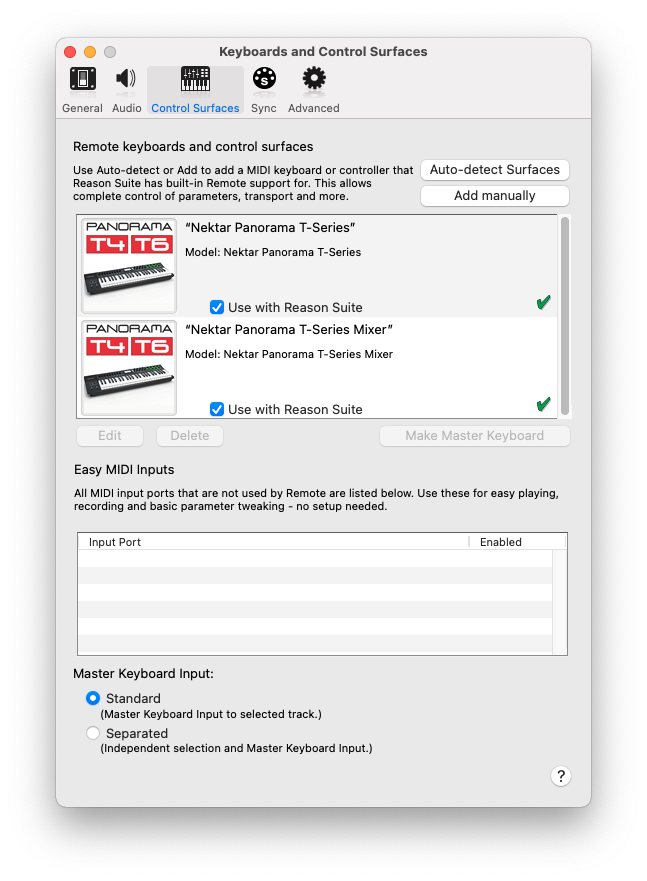
Image 1
Image 1
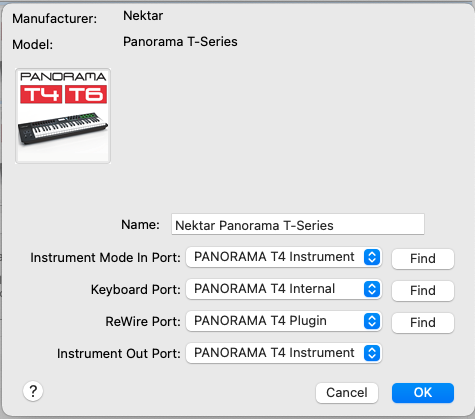
Image 2
Image 2
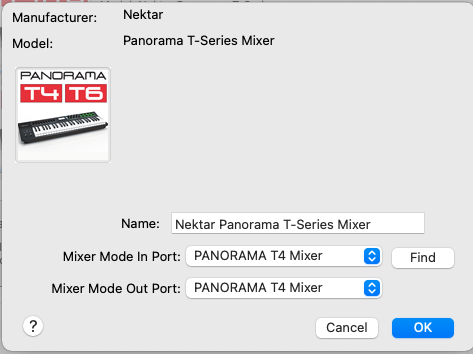
Image 3
Image 3
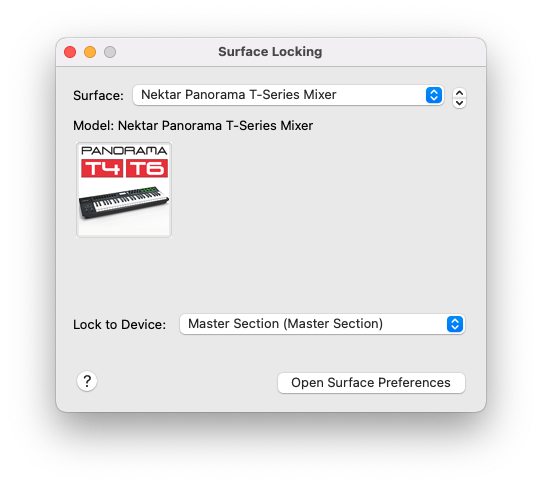
Image 4
Image 4
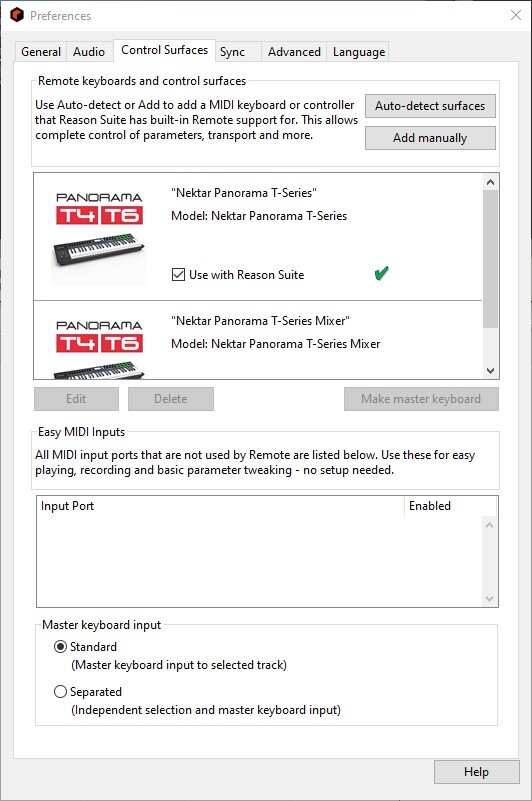
Image 5
Image 5
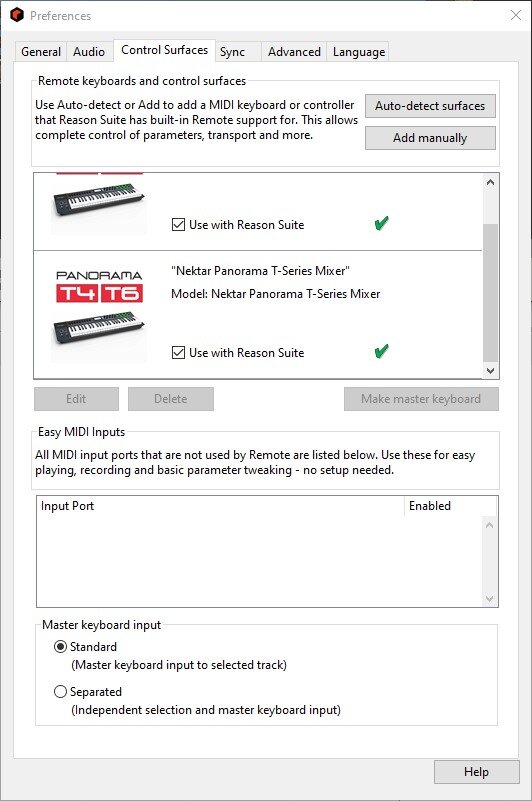
Image 6
Image 6
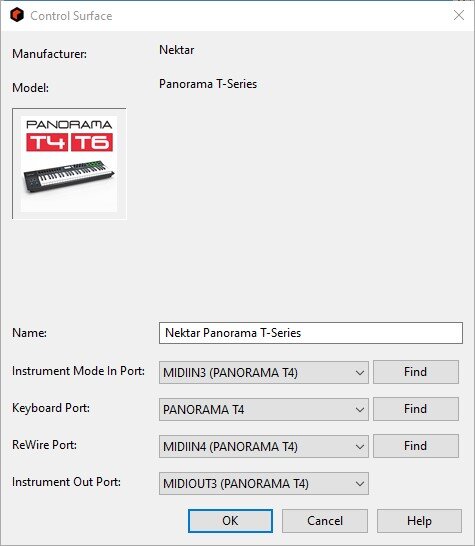
Image 7
Image 7
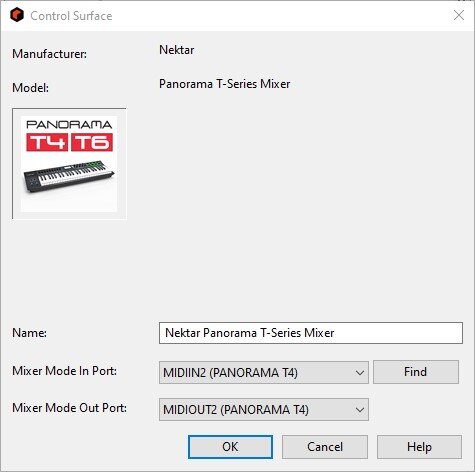
Image 8
Image 8

Image 9
Image 9
Manual Setup
Windows:
- Open Reason.
- Open the ‘Edit’ menu.
- Select ‘Preferences’.
- Select the ‘Control Surface’ tab.
- Click the ‘Add’ button.
- For ‘Manufacturer’ select ‘Nektar’.
- For ‘Model’ select ‘Nektar Panorama T-Series’. (Image 8)
- For ‘Instrument Mode In Port’ select ‘MIDIIN3 (Panorama T*)’. (Image 8)
- For ‘Keyboard Port’ select ‘Panorama T*’. (Image 8)
- For ‘ReWire Port’ select ‘MIDIIN4 (Panorama T*) ‘. (Image 8)
- For ‘Instrument Out Port’ select ‘MIDIOUT3 (Panorama T*)’. (Image 8)
- Click ‘OK’.
- Click the ‘Add’ button again.
- For ‘Manufacturer’ select Nektar. (Image 9)
- For ‘Model’ select ‘Nektar Panorama T-Series Mixer Mode’. (Image 9)
- For ‘Mixer Mode In Port’ select ‘MIDIIN2 (Panorama T*)’. (Image 9)
- For ‘Mixer Mode Out Port’ select ‘MIDIOUT2 (Panorama T*)’. (Image 9)
- Click ‘OK’.
MacOS:
- Open Reason.
- Open the ‘Reason Menu’ and select ‘Preferences’.
- Select the ‘Control Surface’ tab.
- Click the ‘Add’ button.
- For ‘Manufacturer’ select Nektar. (Image 3)
- For ‘Model’ select ‘Nektar Panorama T-Series’. (Image 3)
- For ‘Instrument Mode In Port’ select ‘Panorama T* Instrument’. (Image 3)
- For ‘Keyboard Port’ select ‘Panorama T* Internal’. (Image 3)
- For ‘ReWire Port’ select ‘Panorama T* Plugin’. (Image 3)
- For ‘Instrument Out Port’ select ‘Panorama T* Instrument’. (Image 3)
- Click ‘OK’.
- Click the ‘Add’ button again.
- For ‘Manufacturer’ select ‘Nektar’. (Image 4)
- For ‘Model’ select ‘Nektar Panorama T-Series Mixer Mode’. (Image 4)
- For ‘Mixer Mode In Port’ select ‘Panorama T* Mixer’. (Image 4)
- For ‘Mixer Mode Out Port’ select ‘Panorama T* Mixer’. (Image 4)
- Click ‘OK’.