Mapping Reason Rack Extensions for Panorama
Here are the locations of the files which determine how devices in Reason are mapped to Panorama.
- Windows: C:\ProgramData\Propellerhead Software\Remote\Maps\Nektar
- OSX: //Library/Application Support/Propellerhead Software/Remote/Maps/Nektar
Make sure to back-up your existing files and keep back-ups of any changes you make. If you run one of our installers, it will overwrite any changes to the files in the locations listed above.What you need to create your own map…
First, I recommend using an IDE instead of Text Edit or Note Pad. I use Programmer’s Note Pad in Windows and XCode in OSX. Both of these will allow you to show line numbers, which is very important when it comes to troubleshooting errors in the remotemap files.
The first line in the template is the ‘scope’. This is how Reason determines which device the mapping is related to.
This is what appears in the RemoteTemplate file:
The important parts of this are the name of the RE developer and the scope. You can get this information by exporting the Remote information for a device. Simply select the device in the rack, open the ‘File’ menu and select ‘Export Device Remote Info’. Here is an example (using Rob Papen’s Quad)…
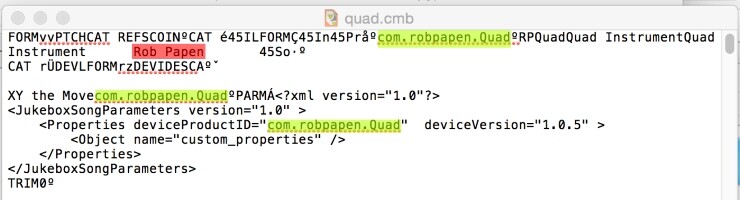
You can see the developer name is highlighted in red and scope is highlighted green/yellow.
So you want to replace the ‘Propellerhead Software’ with the dev name for the RE and the ‘se.propellerheads.example’ with the scope for the RE.
After making a change to the ‘Panorama.remotemap’ file, you will need to reload the ‘Nektar Panorama’ control surface. Simply go to the ‘Control Surfaces’ page in the Preferences menu, uncheck where it says ‘Use with Reason’ then recheck it. If all went well, you should see a green check mark. If there is an error in the remotemap, you will see a red ‘X’. If you see the red ‘X’ click on it and you should see an error message which indicates which lines have problems. If you are using an IDE, you should be able to locate the line which triggered the error very easily.
If there were no errors after making those changes, you should see the name of the selected patch when Panorama is in Instrument Mode and the Patch-/+ buttons should increment the selected patch. If you did encounter an error it’s most likely because a whitespace was not preserved when copying the scope or dev name. You can show whitespaces in Programmer’s Notepad (I don’t think you can in Xcode), to make sure that you haven’t accidentally removed any. You can enter a whitespace by pressing the ‘Tab’ key.
Once you have the patch navigation working, you’ll notice that the word ‘NAME’ appears in the upper-right corner of Panorama’s display in red section of the info bar. In the template you’ll see a comment that says //Device name that appears on Panorama’s display. Replace NAME with the name you want to see on the display.
Example:

Quad Map

Next, choose the parameter that you’d like to have mapped to fader 9 (we typically map an Instrument’s master volume to this control). You will need to get the parameter name, so right-click on the parameter in the GUI and select ‘Edit Remote Override Mapping…’. The window that appears will show the parameter name next to the name of the currently selected patch, like this:
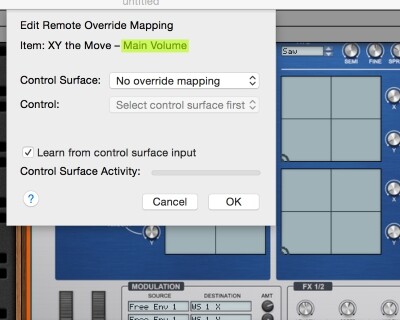
Note: The Parameter name is highlighted green/yellow
Replace the ‘0’ in the example, with the parameter name, like so:
Example:

Quad Map:

It’s a good idea to save frequently and test any changes you’ve made.
The next few sections are for mapping controls and creating display labels. The Instrument home page can display the parameter names and values for the round buttons below the display and the 2×4 encoders. We call these controls the ‘Display Buttons’ and ‘Display Encoders’. The parameter names and values assigned to the other controls only appear in the current parameter bar, so custom parameter names aren’t used. The other assignable controls are called the ‘Faders’, ‘Buttons’ and ‘Encoders’.
In the Display Button section, you can create your custom parameter name for the first display button here:

Put the name between the quotation marks, like this:

Then you can define the parameter controlled by that display button by replacing the 0 with a parameter name, at this line:

As it appears in the map for Quad:

The rest of the controls can be mapped the same way.;
Advanced concepts…
You may notice some maps have an extra group called Sync_Mode at the top of the map. This allows you to assign more than one parameter to a single control, depending on the state (value) of another control. We call these value dependent controls. They are very useful, for example, when an LFO or delay presents two different parameters for synced and unsynced rate values (look for parameters that seem to “jump” when pressing a sync button on a Rack Extension. There are many other examples of these kind of value dependent controls.
To create a modifier, you first need to create the group. Here is an example from the map for OchenK’s Driver RE:

Note: ‘Sync’ and ‘Free’ are arbitrary names for variables, any names can be used. The Mode can also have any name.
Next, define the values of the parameter, which determines the state of the value dependent control. For example a Sync switch would have two values, 0 and 1 (off and on).

Replace the CTRL mode for the control which is mapped to the sun parameter with MODIFIER1.

Now you can have two different maps and labels for any control. Simply add Free to the end of a line for a parameter which should be active when the sync button is off or Sync to the end of a line for a parameter which should be active when the sync button is on.

This is closely related to the way the page system for more advanced maps are created. Once you understand how this works you may want to take a look at the some of the more complex maps to understand how the Groups relate to menu pages and navigation.
scope_example