Mainstage Setup and Troubleshooting: Panorama
Install Mainstage Support For Panorama P-series
- Locate “Panorama_Mainstage_Support” installer in the zip file you downloaded from your Nektar account page, then run it.
- If the installer displays a “can’t be opened because it’s from an unidentified developer” dialog, right-click on the Installer and select ‘Open’. You will see the same warning but you will be given the option to continue anyway.
- With installation complete, make sure your Panorama controller is connected to your computer and switched on.
- Launch MainStage.
- When you open a concert, Instrument Mode will be activated automatically and the name of the first patch in the concert will appear on Panorama’s display.
MainStage Setup
For an example of how Panorama should be configured in Mainstage try creating a concert based on the Keyboard Quickstart template. Panorama’s encoders will automatically map to Smart Controls in that concert and you can look at the settings for those controls to get a better idea of how things should be mapped in your custom concert.
When using Panorama in Mixer, Instrument modes, with Mainstage, you will need to send and receive data via the ‘Instrument PANORAMA‘ ports. In these modes control data is transmitted on MIDI Channel 1. If you hover your mouse over an assignment, you will see a downward facing arrow. Click on that arrow to see the ‘Hardware Input’ settings as shown on the right.
Here is a list of CCs for Panorama’s controls in Mixer/Instrument Modes:
2×4 group of encoders:
- 1 – CC64 (make sure that when you use this control, it’s not part of the ‘All Devices’ group or the group which sends note data to your instruments)
- 2 – CC65
- 3 – CC66
- 4 – CC67
- 5 – CC68
- 6 – CC69
- 7 – CC70
- 8 – CC71
Encoders above faders
- 1 – CC48
- 2 – CC49
- 3 – CC50
- 4 – CC51
- 5 – CC52
- 6 – CC53
- 7 – CC54
- 8 – CC55
Black faders
- 1 – CC8
- 2 – CC1
- 3 – CC2
- 4 – CC3
- 5 – CC4
- 6 – CC5
- 7 – CC6
- 8 – CC7
Buttons below faders (only use these in Mixer Mode, in instrument mode they are used for patch/set navigation, by default)
- 1 – CC16
- 2 – CC17
- 3 – CC18
- 4 – CC19
- 5 – CC20
- 6 – CC21
- 7 – CC22
- 8 – CC23
Motorized fader
- MSB – CC15 (use this for full range control)
- LSB – CC47
- Touch – CC13
Buttons next to motorized fader
- Mute – CC30
- Solo – CC31
- Fader – CC105
Transport buttons
- Loop – CC80
- Rewind – CC81
- Forward – CC82
- Stop – CC83
- Play – CC84
- Record – CC85
- |<< – CC86
- >>| – CC87
- Undo – CC88
- Click – CC89
- Mode – CC90
Display buttons
- 1 – CC106
- 2 – CC107
- 3 – CC108
- 4 – CC109
- 5 – Do not use
Nav Buttons
- Shift – CC96
- Track- – CC91
- Track+ – CC92
- Patch- – CC93
- Patch+ – CC94
- View – CC95
When making control assignments for the encoders make sure that the ‘Type’ is set to ‘Relative (2’s complement)’.
When setting up feedback for a control, make sure the MIDI Thru is set to ‘Do not pass through’ and ‘Send Value to’ is set to ‘Instrument PANORAMA’.
See the ‘Encoder Configuration’ image for an example of a encoder assignment with feedback and the ‘Fader Configuration’ image for a fader assignment with feedback.
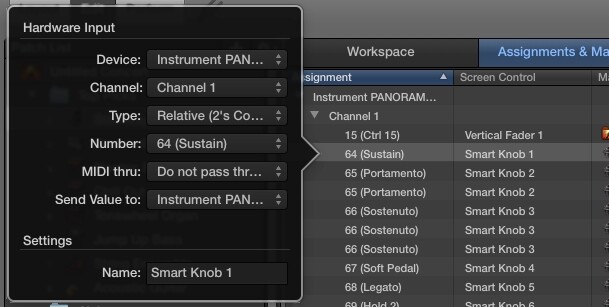
Encoder Configuration w/ Feedback
Encoder configuration w/ Feedback
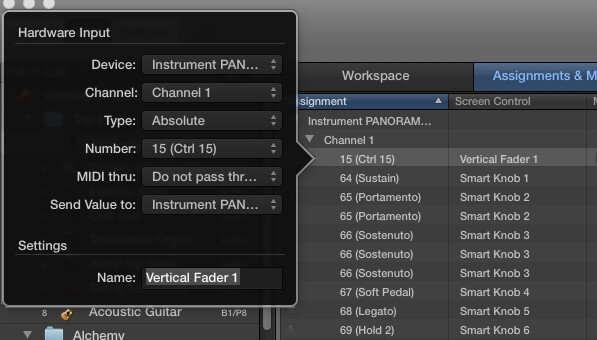
Fader Configuration w/ Feedback
Fader Configuration w/ Feedback
Troubleshooting
If you find that fader 2 acts as a Modulation Wheel or the first encoder in the 2×4 encoder group acts as a Sustain Pedal, it’s because those controls are set to receive data from all ports, rather than from a specific port. The images on the right show how to setup Modulation and Sustain functions.
If Panorama does not switch to Instrument Mode when you open a concert, first check that Panorama’s MIDI ports appear correctly in Audio MIDI Setup, as described here: Troubleshooting Panorama in OSX in MacOS 10.11 and later
If you recently updated to macOS 10.13 (High Sierra), you may have encountered the problem described on this page: Small warning when updating to macOS 10.13 High Sierra
Take a look in this directory: ~/Music
- Open a Finder window
- Open the ‘Go’ menu from the top of your screen
- Select ‘Home’
- Open the ‘Music’ folder
If the ‘Audio Music Apps’ folder appears as an alias (with a small curved arrow at the bottom-left of the folder icon), as shown in the image below, delete the alias and then run the Mainstage support installer again.
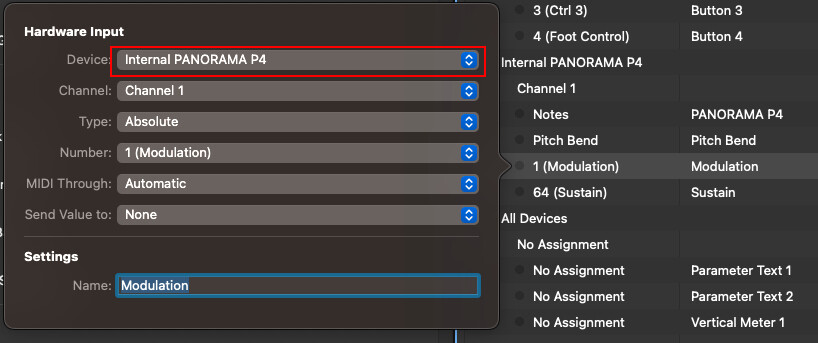
Modulation Wheel
Modulation Wheel
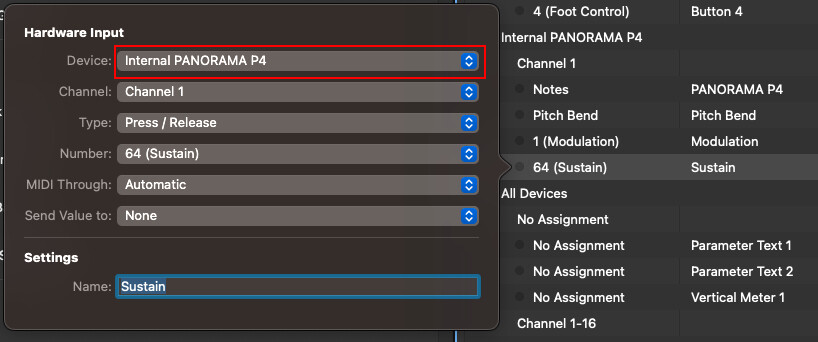
Sustain
Sustain
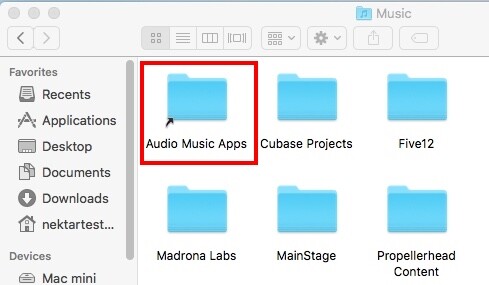
Audio Music Apps Alias
Audio Music Apps Alias