Internal Mode – Control Edit: Panorama P Series
There are many similarities between the capabilities of the various controller groups. But there are also some very important distinctions, which mostly break down along the lines of controller types.
For example, in Internal mode the assignment options for the buttons under the faders are the same as those of the F-Keys and the sustain pedal (which are basically buttons), while the assignment options for an encoder are not exactly the same as the ones available for the expression pedal (which is sort of a fader).
So we’ll look at each controller type one at a time.
To access the Control Edit pages:
- Press the Internal button to put Panorama in Internal mode.
- Press Menu button 5 (M5), currently labeled ‘Setup’.
Note: the ‘Setup’ menu can be accessed from any page where you see the word ‘Setup’ on M5. From this point onward the instructions would be the same for those pages.
Encoders
Encoders can be used for functions such as sweeping a filter, panning a sound from left to right, or any number of other functions.
To edit the encoder settings Panorama needs to be in the Control Edit pages.
- Use the data encoder to scroll through the pop-up menu and select ‘Control Edit’.
- Press M5 (Enter).
- Move one of the encoders on either side of the display.
You should see one of two pages (Image 1 + 2)
Let’s describe the contents of the display in the first page (Image 1):
- The right side of the display shows which encoder was moved. The circle and arrow draw your attention to the red highlight inside the graphic of each encoder.
- The top line of the display shows the assignment for the encoder and the last value it sent.
- The left side of the display shows the encoder’s assignments in greater detail: Message Type, MIDI Channel, MIDI CC#, Max/Min range settings, and Data Entry display type (Decimal or Hexadecimal).
We’ll explain these parameters one at at time.
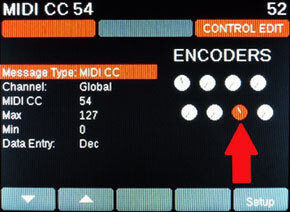
Image 1)
Image 1)
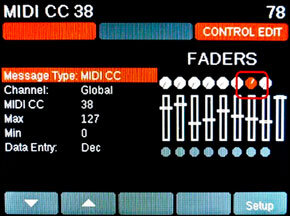
Image 2)
Image 2)
Control Options
The Message Type parameter sets the pace for the other parameters, sometimes changing which ones are available and even hiding them when they do not apply to the Message Type. Turning the data encoder while this parameter is highlighted will select a new Message Type. Here are the options:
- MIDI CC: (pictured above) Allows you to assign the encoder to any one of the MIDI Continuous Controller numbers from 0 to 127. The Max/Min parameters set the range of MIDI CC values which the encoder can send.
- Pitch Bend: Rather than controlling the pitch on a spring-loaded wheel, this lets you send Pitch Bend messages from an encoder. The Max/Min parameters set the range of pitch bend values which the encoder can send.
- Aftertouch: Tricky to control from the keyboard, assigning this to an encoder gives you precise control over the amount of aftertouch, and also allows it to stay active at a given value while doing other things (try that with a keyboard!). The Max/Min parameters set the range of aftertouch values which the encoder can send.
- NRPN (coarse): This stands for Non-Registered Parameter Number, a method by which it is possible to control parameters in a device which fall outside the standard MIDI CC number assignments. Controlling devices with NRPNs requires the use of both the Most Significant Bit (MSB) and Least Significant Bit (LSB) values at the same time to identify the correct parameter to be edited. This must be done in conjunction with another MIDI CC# in order to change the value of the selected parameter.
This sounds complicated, but Panorama makes it easy by sending all three of these controller messages at the same time when either NRPN (coarse) or NRPN (fine) is the Message Type. We’ll cover how this works in more detail in the article ‘Using the NRPN settings for the controllers’ (see the bottom of the page for links).
- NRPN (fine): See above for a general explanation. The difference between this Message Type and NRPN (coarse) is that NRPN (fine) may be used on its own or in conjunction with NRPN (coarse) when greater precision is needed to edit a certain parameter. It is also possible that NRPN (fine) may be the only control recognized by some devices for particular parameters.
- Fixed Velocity: This parameter is used in conjunction with the Keyboard or the Pads when their velocity curves are set to Fixed. The encoder can then be used to increase or decrease the velocity output of all keys or pads at once. (This can make for some very smooth crescendos, for example.) Use the Target parameter to choose whether to control the Keys or Pads, and use the Max/Min parameters to set the range of velocity values which the encoder can tell the Target to send. See the article ‘Controlling the fixed velocity value of the keyboard or Pads’ for more information.
- Program: The Message Type ‘Program’ allows you to set up the encoders so they can send Program Change messages. This will allow you to scroll through a program bank and find the patch you want.
- MIDI CC (Rel): This setting allows an encoder assigned to a particular parameter to make its edits based on the current value of the parameter, rather than generating a value for the parameter based on the current position of the encoder. To learn more about this setting, read the article ‘Encoder control: Relative vs. absolute’.
- OFF: Deactivates the selected encoder.
Setting the MIDI Channel for the encoder
Each encoder can be assigned to an independent MIDI Channel or assigned to a ‘floating’ Global channel. So it is possible for each encoder to control a single parameter on separate devices, or to control multiple parameters on several devices, etc. Or if several encoders are assigned to the Global channel, for example, you can play and control an instrument on MIDI channel 1 and then switch the Global channel to Channel 2 using the Performance buttons, at which point you will have an equal amount of control over the instrument on channel 2 without having to reconfigure any of the encoders. There are lots of possibilities.
To change the MIDI channel for the selected control, highlight the Channel parameter and use the data encoder to select either Global or a number between 1 and 16.
Max and Min
These parameters work together to determine the maximum and minimum values that the selected encoder will be allowed to transmit for the chosen MIDI CC number. This can be very handy, for example, in those situations when you want a particular parameter to increase only a certain amount, but never decrease past a certain point (Image 3).
For example, let’s say the target device has LFO speed assigned to MIDI CC #3. You always want the LFO at a certain speed when it is brought in with the Mod wheel, and you want to be able to increase the LFO speed, but you don’t want it to become so fast that it sounds unrealistic. Here are some settings that would accomplish this using the first encoder in the fader group:
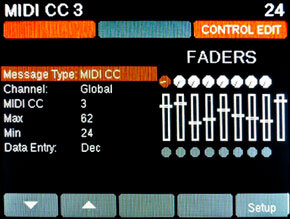
Image 3)
Image 3)
MSB and LSB
For the NRPN (coarse) and NRPN (fine) Message Type settings you will see the Max and Min parameters replaced by the MSB and LSB parameters. These allow the selected control to pinpoint which parameter they will edit inside a MIDI device. Refer to the documentation of the target device to determine how to access its parameters with NRPNs.
Data Entry
Sometimes MIDI implementation documents for certain devices may render the MIDI CC numbers in hexadecimal format (00-7F) rather than in decimal format (0-127). If this is the case for a device you’re working with, just switch the Data Entry parameter from Dec to Hex and use the data encoder to dial in the proper value.
Relative vs. absolute
Each controller and button has its own range of options for the Message Type settings found in Control Edit mode. “MIDI CC (Rel)” is one option for the encoders, and it can help maximize the potential that exists between Panorama and your DAW or plug-in.
First, “Rel” means “Relative”. This setting allows an encoder assigned to a particular parameter to make its edits based on the current value of the parameter, rather than generating a value for the parameter based on the current position of the encoder.
With the other Message Type settings the encoders have predetermined minimum/maximum locations. In this case, when you edit a parameter its value may jump noticeably from the current setting to the value represented by the physical position of the encoder. Sometimes this turns out okay, but sometimes it’s a fairly large jump.
In contrast, “Rel” begins to reduce or increase a value from wherever the encoder happens to be in its throw. So a slight motion in a counter-clockwise direction will take a value of 45, say, and edit it downward to 44 with no jump in the value.
The MIDI CC (Rel) setting is only available for the “endless” rotary controls (i.e., the encoders) found on Panorama, since they do not have definite physical “stops” in their positions. Faders, on the other hand, have very definite starting and ending points. You will probably find that one type of controller is better suited for particular types of editing than the other, and vice versa.
And likewise, there may be times when you want an encoder to behave in an “endless” manner and other times when you want it to have more definite boundaries. Between the MIDI CC and MIDI CC (Rel) settings you can set up the encoders to behave either way you like.
One other thing: the MIDI CC (Rel) setting may seem to behave strangely when you’re looking at the Panorama display; while turning the knob you’ll probably only see low values (1-10) or high values (in the 120s). This is normal! It’s how the math that’s going on under the hood works (two’s complement, if you want to look it up).
Note: To take advantage of the MIDI CC (Rel) setting you will need to be working inside a compatible software program such as Mainstage by Apple/Propellerhead Software, Steinberg’s Cubase or Ableton Live.
Faders, wheels and the expression pedal
Another such grouping of similar controller types includes the Faders, the Pitch Bend wheel, the Modulation wheel, and the Expression pedal, since they have identical assignment options. This article will describe what the Faders can do, but the information also applies to the wheels and the expression pedal [*].
Focus on the Faders
Often used to ‘fade in’ or ‘fade out’ a signal, faders also can be used for other functions such as sweeping a filter, editing an envelope stage, or any number of other functions where gradual, linear control may be preferable to a rotary control. For one thing, their physical positions are easy to read at a glance, and you can move several of them at once with a reasonable amount of precision. These factors can make them the ideal choice for certain applications.
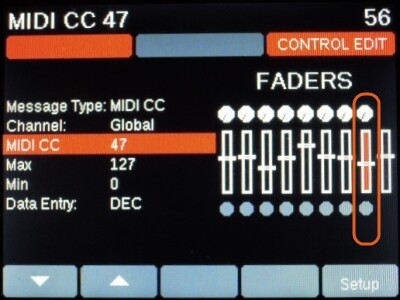
Image 4)
Image 4)
- Use the data encoder to scroll through the pop-up menu and select ‘Control Edit’.
- Press M5 (Enter).
- Move one of the nine faders to the left of the display. You should see something like Image 4.
Let’s describe the contents of the Image 4.
- The right side of the display shows which fader was moved (#8). It’s circled to draw your attention to the red highlight inside the graphic of the fader track.
- The top line of the display shows the assignment for Fader 8 and the last value it sent
- The left side of the display shows Fader 8’s assignments in greater detail: Message Type, MIDI Channel, MIDI CC#, Max/Min range settings, and Data Entry display type (Decimal or Hexadecimal).
We’ll explain these parameters one at at time.
Control Options[*]
The Message Type parameter sets the pace for the other parameters, sometimes changing which ones are available and even hiding them when they do not apply to the Message Type. Turning the data encoder while this parameter is highlighted will select a new Message Type.
Here are the options:
- MIDI CC (pictured above): Allows you to assign the fader to any one of the MIDI Continuous Controller numbers from 0 to 127. The Max/Min parameters set the range of MIDI CC values which the fader can send.
- Pitch Bend: Rather than controlling the pitch on a spring-loaded wheel, this lets you send Pitch Bend messages from a fader. The Max/Min parameters set the range of pitch bend values which the fader can send.
- Aftertouch: Tricky to control from the keyboard, assigning this to a fader gives you precise control over the amount of aftertouch, and also allows it to stay active at a given value while doing other things (try that with a keyboard!). The Max/Min parameters set the range of aftertouch values which the fader can send.
- NRPN (coarse): This stands for Non-Registered Parameter Number, a method by which it is possible to control parameters in a device which fall outside the standard MIDI CC number assignments. Controlling devices with NRPNs requires the use of both the Most Significant Bit (MSB) and Least Significant Bit (LSB) values at the same time to identify the correct parameter to be edited. This must be done in conjunction with another MIDI CC# in order to change the value of the selected parameter.
This sounds complicated, but Panorama makes it easy by sending all three of these controller messages at the same time when either NRPN (coarse) or NRPN (fine) is the Message Type.
- NRPN (fine): See above for a general explanation. The difference between this Message Type and NRPN (coarse) is that NRPN (fine) may be used on its own or in conjunction with NRPN (coarse) when greater precision is needed to edit a certain parameter. It is also possible that NRPN (fine) may be the only control recognized by some devices for particular parameters.
Please refer to the documentation of the target device to determine how to edit its parameters using NRPNs.
- Fixed Velocity: This parameter is used in conjunction with the Keyboard or the Pads when their velocity curves are set to Fixed. The Fader can then be used to increase or decrease the velocity output of all keys or pads at once. (This can make for some very smooth crescendos, for example.) Use the Target parameter to choose whether to control the Keys or Pads, and use the Max/Min parameters to set the range of velocity values which the fader can tell the Target to send. See the article ‘Controlling the fixed velocity value of the keyboard or Pads‘ for more information.
- OFF: Deactivates the selected fader.
Setting the MIDI Channel for the Fader[*]
Each fader can be assigned to an independent MIDI Channel or assigned to a ‘floating’ Global channel. So it is possible to have each fader control a single parameter on separate devices, or to have sub-sets of faders controlling parameters on several devices, etc. Or if several faders are assigned to the Global channel, for example, you can play and control an instrument on MIDI channel 1 and then switch the Global channel to Channel 2 using the Performance buttons, at which point you will have an equal amount of control over the instrument on channel 2 without having to reconfigure any of the faders. There are lots of possibilities.
To change the MIDI channel for the selected control, highlight the Channel parameter and use the data encoder to select either Global or a number between 1 and 16.
Max and Min[*]
These parameters work together to determine the maximum and minimum values that the selected fader will be allowed to transmit for the chosen MIDI CC number. This can be very handy, for example, in those situations when you want a particular parameter to increase only a certain amount, but never decrease past a certain point.
For example, let’s say the target device has vibrato amount assigned to MIDI CC #1. You always want the selected instrument to have a minimal amount of vibrato, and you want to be able to increase the vibrato depth, but you don’t want the vibrato to become so deep that it sounds unrealistic. Here are some settings that would accomplish this: (Image 5)
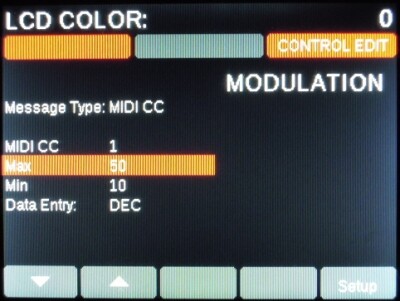
Image 5)
Image 5)
MSB and LSB[*]
For the NRPN (coarse) and NRPN (fine) Message Type settings you will see the Max and Min parameters replaced by the MSB and LSB parameters. These allow the selected control to pinpoint which parameter they will edit inside a MIDI device. Refer to the documentation of the target device to determine how to access its parameters with NRPNs.
Data Entry[*]
Sometimes MIDI implementation documents for certain devices may render the MIDI CC numbers in hexadecimal format (00-7F) rather than in decimal format (0-127). If this is the case for a device you’re working with, just switch the Data Entry parameter from Dec to Hex and use the data encoder to dial in the proper value.
[*] Remember, these parameters and settings are also available for the Pitch Bend wheel, the Modulation wheel, and the Expression pedal.
Buttons and the sustain pedal
One such grouping of similar controller types includes the buttons under the faders, the Transport buttons and the sustain pedal, since they have identical assignment options (they’re all basically switches). This article will describe what the fader buttons can do, but the information also applies to the Transport buttons and the sustain pedal.
The Control Buttons[*]
Beneath the nine faders to the left of the display is a row of nine buttons. But unlike many buttons you will find elsewhere, these are capable of much more than simply turning something on or off! Let’s take a moment to explore the possibilities.
- Use the data encoder to scroll through the pop-up menu and select ‘Control Edit’.
- Press M5 (Enter).
- Press one of the nine fader buttons to the left of the display. You should see something like Image 6.
Let’s describe the contents of the Image 6.
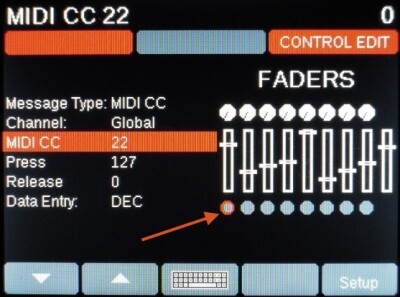
Image 6)
Image 6)
- The right half of the display shows which fader button was pressed (the first one, in this case). You can tell which was pressed by the red circle around the outside the button graphic.
- The top line of the display shows the assignment for fader button 1 and the last value it sent.
- The left side of the display show the fader button’s assignments in greater detail: Message Type, MIDI Channel, MIDI CC#, Press/Release values, and Data Entry display type (Decimal or Hexadecimal).
We’ll explain these parameters one at at time.
Control Options[*]
The Message Type parameter sets the pace for the other parameters, sometimes changing which ones are available and even hiding them when they do not apply to the Message Type.
Turning the data encoder while this parameter is highlighted will select a new Message Type. Here are the options for switch-type / button controls:
- MIDI CC: (pictured above) Allows you to assign the button to any one of the MIDI Continuous Controller numbers from 0 to 127. The Press/Release parameters determine which value will be sent for that CC# when the button is pressed and which will be sent when the button is released.
- Pitch Bend: This lets you send Pitch Bend messages from a button. The Press/Release parameters determine which pitch bend value will be sent when the button is pressed and which will be sent when the button is released. You could use this to set up a ‘trill’, for example, with a press value of 127 and a release value of 64 (center, or no pitch bend).
- Fixed Velocity: This parameter is used in conjunction with the Keyboard or the Pads when their velocity curves are set to Fixed. A press of the selected button will set the Fixed velocity value for the selected Target to that of the Press parameter. One or more buttons can be set to various velocity values so you can increase or decrease the velocity output of all keys or pads at once. Use the Target parameter to choose whether to control the Keys or Pads. See the article ‘Controlling the fixed velocity value of the keyboard or Pads‘ for more information.
- Note: You can trigger a particular sample or a loop by using the Note feature and setting the proper MIDI note number value in the Note field. With the default settings, a Note On message will be sent when the button is pressed and a Note Off command will be sent when the button is released; this shuts off the note that was triggered when the button was pressed. By default, the value for the Press parameter sets the MIDI velocity for the Note On message and the Release parameter is set to 0 (Note Off). But both the Press and Release parameters are capable of either action:
- When set to 0, either action will send a Note Off command.
- When set to a value greater than zero, either action will send a Note On command at a MIDI velocity determined by the selected value.
Applications abound: a bass note or a drum loop can be triggered at one velocity while the button is held and retriggered at another velocity when the button is released, for example. But you may be wondering, “If both actions will send Note On messages, how do you make the loop stop?” Here’s how: set up a second button with the same MIDI note number and set both the Press and Release values to 0. Then whether you press or release the second button it will send a Note Off message to that MIDI note number and shut it off.
Better yet, you could set the second button to Note (toggle). See below!
- Note (toggle): Similar to the Note setting described above: You can trigger a particular sample or a loop by using the Note (toggle) feature and setting the proper MIDI note number value in the Note field. In this case a Note message is sent when the button is pressed and nothing is sent when the button is released. The second press of the button will send another Note message. By default, the Press 1 value sets the MIDI velocity for the Note On message and the Press 2 value is set to 0 (Note Off). But both the Press 1 and Press 2 parameters are capable of either action:
- When set to 0, either action will send a Note Off command.
- When set to a value greater than zero, either action will send a Note On command at a MIDI velocity determined by the selected value.
Let’s use the same example from above so the contrast between the Message Types of Note and Note (toggle) is clear.
A bass note or a drum loop can be triggered by the button when Note (toggle) is selected. When the button is first pressed it sends a MIDI Note message at one velocity, and when the button is released nothing happens. The second press of the button can either shut off the note by sending a Note Off command (value = 0) or trigger the loop again at a different velocity level (value > 0). This can free up a hand because you don’t have to keep pressing the button to sustain the note.
- Program & Bank: Often in the middle of a performance you will want to change from one sound to the next. You may even have three or more sounds you want to use for a single song. But if those programs are not next to each other in the receiving device you need a way to ‘leap-frog’ over the sounds you don’t want to use at the moment. The Message Type ‘Program & Bank’ allows you to set up the buttons so they can send the desired Program Change message, including any Bank Select messages that may be required to find that sound wherever it is on the target device. Refer to the MIDI Implementation documents of the external MIDI device(s) to see which Bank Select messages should be used.
- Program (step): This feature will step you through a specific range of consecutive program numbers, and do so in either direction. So you may want to use two buttons for this: one to move forward and one to move backward. An example of a use for this could be to reserve a certain range of program numbers for the ‘favorites’ you always use, say 120-127, or to set up a show order. Then set the Start and Stop values at 120 and 127 or vice versa, depending on which direction you want to move.
- MIDI CC (toggle): If you want to introduce a momentary blast of reverb or pan a sound hard left/right manually, the MIDI CC (toggle) parameter is the one you want. Select the proper MIDI CC number (#93 for reverb send, for example), and then set the two values you want to have at your disposal. Set Press 1 to 127 and Press 2 to something more moderate, like a value of 40, and then when the moment comes, press that button and the reverb send will be maxed out until you press the button again. In the case of panning a sound (CC #10), a second button could be used to put the sound back to center (values of 64 for both presses).
- MIDI CC (step): Sometimes a subtle increase or decrease in the value of a controller can be desirable. This Message Type allows you to select a MIDI CC number and set a range within which repeated presses of the button will allow you to cycle. Set the Start and Stop parameters to the desired values, with the Start value lower than the Stop value if you want to ‘climb’ through the values, or the Start value higher than the Stop value if you want to ‘descend’ through the values.
- QWERTY Macro: Selecting this Message Type shows an icon of a computer keyboard, pointing you to Menu button 3 (M3) which has the same icon. Pressing M3 will open the Nektar Macro Editor on your computer, which allows you to assign up to eight sets of computer keystrokes to a Panorama switch control. Refer to the article ‘QWERTY Macros: Shortcuts triggered by Panorama controls‘ for more information.
- OFF: Deactivates the selected button.
Setting the MIDI Channel for the Button[*]
Each of these buttons can be assigned to an independent MIDI Channel or assigned to a ‘floating’ Global channel. So it is possible to have each button control a single parameter on separate devices, or to have sub-sets of buttons controlling multiple parameters on several devices, etc. Or if several buttons are assigned to the Global channel, for example, you can play and control an instrument on MIDI channel 1 and then switch the Global channel to Channel 2 using the Performance buttons, at which point you will have an equal amount of control over the instrument on channel 2 without having to reconfigure any of the buttons. There are lots of possibilities.
To change the MIDI channel for the selected button, highlight the Channel parameter and use the data encoder to select either Global or a number between 1 and 16.
Press and Release[*]
Message types that are “momentary” will make these parameters available. By “momentary” we mean those times when the button does not “toggle” a status or value: as soon as you release the button, the initial value is replaced by the value of the Release parameter.
Press 1 and Press 2[*]
Parameters which “toggle” will make these parameters available. These Parameter Types allow the button to send a specific value each time the button is pressed, and leave the value unchanged when the button is released.
Bank MSB and Bank LSB[*]
Some devices require both the MSB and LSB for the Bank number to be transmitted along with a program change; some will ignore the LSB and use the MSB, or vice versa. Refer to the MIDI Implementation documents of the external MIDI device(s) to see which Bank Select messages should be used.
Start and Stop[*]
These parameters work together to determine the maximum and minimum values that the selected button will be allowed to transmit for the chosen MIDI CC number. This allows a particular parameter to increase or decrease only within a certain range as you press the button repeatedly.
Data Entry[*]
Sometimes MIDI implementation documents for certain devices may render the MIDI CC numbers or value ranges in hexadecimal format (00-7F) rather than in decimal format (0-127). If this is the case for a device you’re working with, just switch the Data Entry parameter from Dec to Hex and use the data encoder to locate the proper value.
[*] Remember, these parameters and settings are also available for the Transport buttons and the Sustain pedal.
Pads
There are many similarities between the capabilities of the various controller groups. As a result you’ll see many features listed for the pads that have been listed for other controllers, such as the buttons and faders. But the pads are unique in that they can be both button-like and fader-like: when you play them they can trigger MIDI events or notes, but when you press them they can send variable MIDI data like a fader. Taken together, they’re actually more like the Panorama keyboard than anything else: velocity- and pressure-sensitive.
The pads are so versatile, in fact, that they have an additional set of features that are edited outside of the Control Edit pages. See the article ‘Pad Maps: under the Pads button’ for details.
The Pads: Plenty of possibilities
To edit the pad settings Panorama needs to be in the Control Edit section:
- Use the data encoder to scroll through the pop-up menu and select ‘Control Edit’.
- Press M5 (Enter).
- Press one of pads. You should see something like Image 7.
Let’s describe the contents of Image 7:
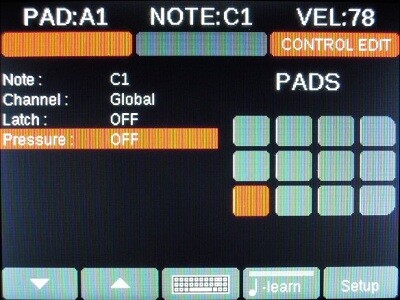
Image 7)
Image 7)

Image 8)
Image 8)
- The right half of the display shows which pad was pressed (the first one, in this case).
- The top line of the display shows the assignment for pad 1 and the last value it sent
- The left side of the display show the pad’s assignments in greater detail: MIDI Note number, MIDI Channel, Latch and Pressure.
Note that having Pressure and Latch set to OFF does not mean the pad is inactive: you can still hit the pad and have it transmit a MIDI note.
But both parameters add a lot of functionality. So with the Pressure parameter highlighted, turn the data encoder fully counter-clockwise: (Image 8).
As you can see, several more assignment options have become visible: MIDI CC#, Maximum / Minimum values, and Data Entry display type (Decimal or Hexadecimal).
We’ll explain these parameters one at at time. See the bottom of the page for a description of the Latch feature.
Pressure control options
Turning the data encoder while the Pressure parameter is highlighted will select one of the following Message Types for the pads:
- MIDI CC (pictured above): Allows you to assign the pad to any one of the MIDI Continuous Controller numbers from 0 to 127. The Max / Min parameters determine the range of values the pad can send for that CC#.
- Pitch Bend: This lets you send Pitch Bend messages from the pad. The Max / Min parameters determine the range of pitch bend values the pad can send. You could use this to set up a ‘guitar-style’ positive-going vibrato, for example, with a Max value of 127 and a Min value of 64 (center, or no pitch bend).
- Aftertouch: This lets you send aftertouch messages from the pad. The Max/Min parameters set the range of aftertouch values which the pad can send. Volume swells, opening a filter: these are just two of many possible uses for this feature.
- NRPN (coarse): This stands for Non-Registered Parameter Number, a method by which it is possible to control parameters in a device which fall outside the standard MIDI CC number assignments. Controlling devices with NRPNs requires the use of both the Most Significant Bit (MSB) and Least Significant Bit (LSB) values at the same time to identify the correct parameter to be edited. This must be done in conjunction with another MIDI CC# in order to change the value of the selected parameter.
This sounds complicated, but Panorama makes it easy by sending all three of these controller messages at the same time when either NRPN (coarse) or NRPN (fine) is the Message Type. Please refer to the documentation of the target device to determine how to edit its parameters using NRPNs.
- NRPN (fine): See above for a general explanation. The difference between this Message Type and NRPN (coarse) is that NRPN (fine) may be used on its own or in conjunction with NRPN (coarse) when greater precision is needed to edit a certain parameter. It is also possible that NRPN (fine) may be the only control recognized by some devices for particular parameters.
Please refer to the documentation of the target device to determine how to edit its parameters using NRPNs.
- Fixed Velocity: This parameter is used in conjunction with the Keyboard or the Pads when their velocity curves are set to Fixed. The selected pad can then be used to increase or decrease the velocity output of all keys or pads at once. (This can make for some very smooth crescendos, for example.) Use the Target parameter to choose whether to control the Keys or Pads, and use the Max / Min parameters to set the range of velocity values which the pad can tell the Target to send. See the article ‘Controlling the fixed velocity value of the keyboard or Pads‘ for more information.
- QWERTY Macro: Selecting this Message Type shows an icon of a computer keyboard, pointing you to Menu button 3 (M3) which has the same icon. Pressing M3 will open the Nektar Macro Editor on your computer, which allows you to assign up to eight sets of computer keystrokes to a Panorama pad. Refer to the article ‘QWERTY Macros: Shortcuts triggered by Panorama controls‘ for more information.
- OFF: Deactivates pressure-sensitivity for the selected pad. The pad will still send MIDI note data, though. To change the MIDI note assignment, either use the Note-Learn feature described below or refer to the article ‘Pad Maps: under the Pads button’.
The Pressure control option selected above determines which additional parameters will be available. You won’t see all of the following parameters at the same time, but they’re listed here for reference.
Max and Min
These parameters work together to determine the maximum and minimum values that the selected pad ill be allowed to transmit for the chosen MIDI CC number. This can be very handy, for example, in those situations when you want a particular parameter to increase only a certain amount, but never decrease past a certain point.
For example, let’s say the target device has vibrato amount assigned to MIDI CC #1. You always want the selected instrument to have a minimal amount of vibrato, and you want to be able to increase the vibrato depth, but you don’t want the vibrato to become so deep that it sounds unrealistic. Here are some settings that would accomplish this: (Image 9)
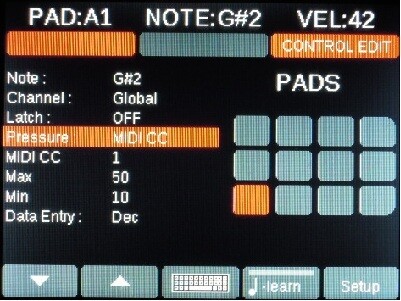
Image 9)
Image 9)
MSB and LSB
Some devices require both the MSB and LSB for the Bank number to be transmitted along with a program change; some will ignore the LSB and use the MSB, or vice versa. Refer to the MIDI Implementation documents of the external MIDI device(s) to see which Bank Select messages should be used.
Setting the MIDI Channel for the Pad
Each of the pads can be assigned to an independent MIDI Channel or assigned to a ‘floating’ Global channel. So it is possible to have each pad control a single parameter on separate devices, or to have sub-sets of pads control multiple parameters on several devices, etc. Or if several pads are assigned to the Global channel, for example, you can play and control an instrument on MIDI channel 1 and then switch the Global channel to Channel 2 using the Performance buttons (PB1 and PB2), at which point you will have an equal amount of control over the instrument on channel 2 without having to reconfigure any of the pads. There are lots of possibilities.
To change the MIDI channel for the selected pad, highlight the Channel parameter and use the data encoder to select either Global or a number between 1 and 16.
Latch
This parameter determines one of two behaviors for the pads:
- OFF: The note will start when the pad is played and stop when the pad is released.
- ON: The note will start the first time the pad is played and stop the second time the pad is played.
Technically speaking, the Latch parameter determines whether the pad will send a MIDI Note Off message each time the pad is released (Latch = OFF) or send it every other time the pad is released (Latch = ON).
Data Entry
Sometimes MIDI implementation documents for certain devices may render the MIDI CC numbers or value ranges in hexadecimal format (00-7F) rather than in decimal format (0-127). If this is the case for a device you’re working with, just switch the Data Entry parameter from Dec to Hex and use the data encoder to locate the proper value.
Note-Learn
There’s a very quick way to assign a new MIDI note to each pad. Just press Menu button 4 (M4) and hit a pad and it will be highlighted in red. Next, press the desired key on Panorama’s keyboard. Do that for each pad, and when you’re done press M4 again to exit the Note-Learn function.
Image 10)
Image 10)
F-Keys vs. Transport buttons
By now you’re accustomed to each control on Panorama being a multi-layered thing: it can fulfill one purpose in Mixer mode, for example, and do something completely different in Instrument mode.
But there’s one set of controls that serves dual purposes in each mode: The Transport buttons, which are also known as the F-Keys depending on whether you’re holding down the F-Key button when you press them. If there’s any confusion about that, hopefully this article will clear that up.
Transport buttons: Internal mode
When Panorama is in Internal mode the Transport buttons behave like any other control button: they are assignable to the various Message Types like MIDI CC and Program change, etc. But keep in mind that the assignments you make to the Transport buttons on the Internal mode Control Edit page are not saved with the Preset or with the F-Keys map. They’re considered “Global” settings, so they do not change when a new Preset or F-Keys map is loaded. They are only “saved” when you back up the Panorama memory, and are restored or overwritten when you load the memory file back into the Panorama.
F-Keys: all modesThe thing that turns a Transport button into an F-Key is just that: the F-Keys button. To illustrate this:
- Enter a Control Edit page (Internal / Setup / Control Edit / Enter)
- Press one of the Transport buttons. The display will let you know that’s where you are by showing the word ‘TRANSPORT’ above the button icons.
- Now hold the F-Keys button and press the same Transport button again. You’ll see the word ‘F-KEYS’ show up above the button icons.
As long as you keep holding down the F-Keys button, any Transport button you press is considered an F-Key. But as soon as you let go of the F-Keys button, the same buttons are considered Transport buttons.
The F-Key button itself serves no other purpose than to decide the state of the Transport buttons, so when you press it by itself you won’t see it selected on the Control Edit page.
The difference is…
The list of assignable Message Types is the same for the F-Keys and the Transport buttons in Internal mode. The main difference between them, other than the need for the F-Key button or lack thereof, is that the default Message Type for the Transport buttons is MIDI CC, while the default Message Type for the F-Keys is a QWERTY Macro.
Once Panorama is locked to Reason, though, the differences become very stark (and mostly obvious): The Transport buttons serve as Transport controls, and the F-Keys will do whatever you told them to do in Control Edit mode: launch a QWERTY Macro, play a note, send a MIDI CC message, whatever.
Auto-fader group
The Auto-fader group includes the motorized fader (a.k.a. the Auto-fader) and three buttons: Mute, Solo, and Fader. When the Panorama is in Internal mode the Auto-fader and two of those buttons (Mute and Solo) can be assigned to a number of different MIDI control functions [*].
Note: Whereas other faders and buttons allow you to define their MIDI channels while you’re on their Control Edit pages, the Control Edit page for the Auto-fader group does not allow that. This is because these controls are assigned a MIDI channel number as a group, not independently, and so this value must be selected on a different page (the one you access when you press the Fader button).
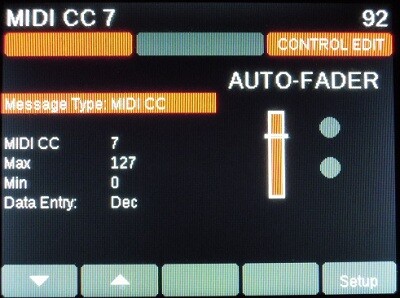
Image 11)
Image 11)
The Auto-fader
The obvious use for the Auto-fader is for automated control of the level of a mixer channel in a DAW. But it can be used for other functions as well, especially in Internal mode and/or while controlling external MIDI devices without a computer attached. So you can assign it to sweep a filter, edit an envelope stage, or any number of other functions depending on the capabilities of the target device.
To assign the Auto-fader and its buttons to these functions Panorama needs to be in the Control Edit section:
- Use the data encoder to scroll through the pop-up menu and select ‘Control Edit’.
- Press M5 (Enter).
- Move the Auto-fader or press one of the assignable buttons near it (labeled Mute and Solo). You should see something like this in the display: (Image 11).
Let’s describe the contents of Image 11:
- The right side of the display shows that the auto-fader was moved (notice the red highlight inside the fader track graphic). If one of the Mute/Solo buttons had been pressed, it would be circled in red instead.
- The top line of the display shows the assignment for the Auto-fader and the last value it sent.
- The left side of the display shows the Auto-fader’s assignments in greater detail: Message Type, MIDI CC#, Max/Min range settings, and Data Entry display type (Decimal or Hexadecimal).
We’ll explain these parameters one at at time.
Auto-fader control options
The Message Type parameter determines which of the other parameters are available, and hides them when they do not apply to the Message Type.
Turning the data encoder while this parameter is highlighted will select a new Message Type. Here are the options:
- MIDI CC (pictured above): Allows you to assign the Auto-fader to any one of the MIDI Continuous Controller numbers from 0 to 127. The Max/Min parameters set the range of MIDI CC values which the fader can send.
- Pitch Bend: Rather than controlling the pitch on a spring-loaded wheel, this lets you send Pitch Bend messages from the Auto-fader. The Max/Min parameters set the range of pitch bend values which the Auto-fader can send.
- Aftertouch: Assigning this to the Auto-fader gives you precise control over the amount of aftertouch, and also allows aftertouch to stay active at a given value while doing other things. The Max/Min parameters set the range of aftertouch values which the Auto-fader can send.
- NRPN (coarse): This stands for Non-Registered Parameter Number, a method by which it is possible to control parameters in a device which fall outside the standard MIDI CC number assignments. Controlling devices with NRPNs requires the use of both the Most Significant Bit (MSB) and Least Significant Bit (LSB) values at the same time to identify the correct parameter to be edited. This must be done in conjunction with another MIDI CC# in order to change the value of the selected parameter.
Panorama sends all three of these controller messages at the same time when either NRPN (coarse) or NRPN (fine) is the Message Type. Please refer to the documentation of the target device to determine how to edit its parameters using NRPNs.
- NRPN (fine): See above for a general explanation. The difference between this Message Type and NRPN (coarse) is that NRPN (fine) may be used on its own or in conjunction with NRPN (coarse) when greater precision is needed to edit a certain parameter. It is also possible that NRPN (fine) may be the only control recognized by some devices for particular parameters.
Please refer to the documentation of the target device to determine how to edit its parameters using NRPNs.
- Fixed Velocity: This parameter is used in conjunction with the Keyboard or the Pads when their velocity curves are set to Fixed. The Auto-fader can then be used to increase or decrease the velocity output of all keys or pads at once. (This can make for some very smooth crescendos, for example.) Use the Target parameter to choose whether to control the Keys or Pads, and use the Max/Min parameters to set the range of velocity values which the Auto-fader can tell the Target to send. See the article ‘Controlling the fixed velocity value of the keyboard or Pads‘ for more information.
- OFF: Deactivates the Auto-fader.
Max and Min
These parameters work together to determine the maximum and minimum values that the selected encoder will be allowed to transmit for the chosen MIDI CC number. This can be very handy, for example, in those situations when you want a particular parameter to increase only a certain amount, but never decrease past a certain point.
For example, let’s say the you want to be able to fade out the target device but you don’t want to be able to increase its volume level past a certain point. Here are some settings that would accomplish this: (Image 12).
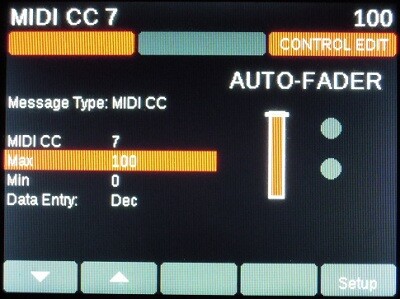
Image 12)
Image 12)
MSB and LSB
For the NRPN (coarse) and NRPN (fine) Message Type settings you will see the Max and Min parameters replaced by the MSB and LSB parameters. These allow the Auto-fader to pinpoint which parameter it will edit inside a MIDI device. Refer to the documentation of the target device to determine how to access its parameters with NRPNs.
Data Entry
Sometimes MIDI implementation documents for certain devices may represent MIDI CC numbers in hexadecimal format (00-7F) rather than in decimal format (0-127). If this is the case for a device you’re working with, just switch the Data Entry parameter from Dec to Hex and use the data encoder to dial in the proper value.
The Mute / Solo buttons
To the right of the Auto-fader is a vertical row of three buttons, two of which can be assigned to various MIDI control options. There are some similar parameters to those of the Auto-fader, but naturally the way these parameters are used is different so we’ll cover them below anyway.
To assign the Auto-fader and its buttons to these functions Panorama needs to be in the Control Edit section:
- Use the data encoder to scroll through the pop-up menu and select ‘Control Edit’.
- Press M5 (Enter).
- Press one of the two programmable buttons in the Auto-fader group (Mute or Solo). You should see something like this: (Image 13).
Let’s describe the contents of Image 13:
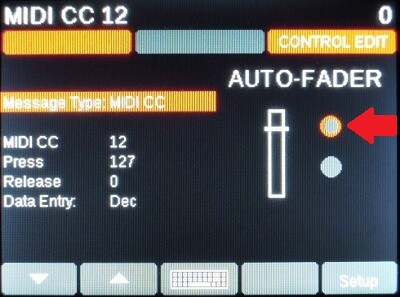
Image 13)
Image 13)
- The right half of the display shows which fader button was pressed (the top one, in this case). You can tell which was pressed by the red circle around the outside the button graphic.
- The top line of the display shows the assignment for fader button 1 and the last value it sent.
- The left side of the display show the fader button’s assignments in greater detail: Message Type, MIDI CC#, Press/Release values, and Data Entry display type (Decimal or Hexadecimal).
We’ll explain these parameters one at at time.
Mute / Solo Control Options
The Message Type parameter determines which of the other parameters are available, and hides them when they do not apply to the Message Type.
Turning the data encoder while this parameter is highlighted will select a new Message Type. Here are the options for these buttons:
- MIDI CC (pictured above): Allows you to assign the button to any one of the MIDI Continuous Controller numbers from 0 to 127. The Press/Release parameters determine which value will be sent for that CC# when the button is pressed and which will be sent when the button is released.
- Pitch Bend: This lets you send Pitch Bend messages from a button. The Press/Release parameters determine which pitch bend value will be sent when the button is pressed and which will be sent when the button is released. You could use this to set up a ‘trill’, for example, with a press value of 127 and a release value of 64 (center, or no pitch bend).
- Fixed Velocity: This parameter is used in conjunction with the Keyboard or the Pads when their velocity curves are set to Fixed. A press of the selected button will set the Fixed velocity value for the selected Target to that of the Press parameter. One or more buttons can be set to various velocity values so you can increase or decrease the velocity output of all keys or pads at once. Use the Target parameter to choose whether to control the Keys or Pads. See the article ‘Controlling the fixed velocity value of the keyboard or Pads‘ for more information.
- Note: You can trigger a particular sample or a loop by using the Note feature and setting the proper MIDI note number value in the Note field. With the default settings, a Note On message will be sent when the button is pressed and a Note Off command will be sent when the button is released; this shuts off the note that was triggered when the button was pressed. By default, the value for the Press parameter sets the MIDI velocity for the Note On message and the Release parameter is set to 0 (Note Off). But both the Press and Release parameters are capable of either action:
- When set to 0, either action will send a Note Off command.
- When set to a value greater than zero, either action will send a Note On command at a MIDI velocity determined by the selected value.
Applications abound: a bass note or a drum loop can be triggered at one velocity while the button is held and retriggered at another velocity when the button is released, for example. But you may be wondering, “If both actions will send Note On messages, how do you make the loop stop?” Here’s how: set up a second button with the same MIDI note number and set both the Press and Release values to 0. Then whether you press or release the second button it will send a Note Off message to that MIDI note number and shut it off.
Better yet, you could set the second button to Note (toggle). See below!
- Note (toggle): Similar to the Note setting described above: You can trigger a particular sample or a loop by using the Note (toggle) feature and setting the proper MIDI note number value in the Note field. In this case a Note message is sent when the button is pressed and nothing is sent when the button is released. The second press of the button will send another Note message. By default, the Press 1 value sets the MIDI velocity for the Note On message and the Press 2 value is set to 0 (Note Off). But both the Press 1 and Press 2 parameters are capable of either action:
- When set to 0, either action will send a Note Off command.
- When set to a value greater than zero, either action will send a Note On command at a MIDI velocity determined by the selected value.
Let’s use the same example from above so the contrast between the Message Types of Note and Note (toggle) is clear.
A bass note or a drum loop can be triggered by the button when Note (toggle) is selected. When the button is first pressed it sends a MIDI Note message at one velocity, and when the button is released nothing happens. The second press of the button can either shut off the note by sending a Note Off command (value = 0) or trigger the loop again at a different velocity level (value > 0). This can free up a hand because you don’t have to keep pressing the button to sustain the note.
- Program & Bank: Often in the middle of a performance you will want to change from one sound to the next. You may even have three or more sounds you want to use for a single song. But if those programs are not next to each other in the receiving device you need a way to ‘leap-frog’ over the sounds you don’t want to use at the moment. The Message Type ‘Program & Bank’ allows you to set up the buttons so they can send the desired Program Change message, including any Bank Select messages that may be required to find that sound wherever it is on the target device. Refer to the MIDI Implementation documents of the external MIDI device(s) to see which Bank Select messages should be used.
- Program (step): This feature will step you through a specific range of consecutive program numbers, and do so in either direction. So you may want to use two buttons for this: one to move forward and one to move backward. An example of a use for this could be to reserve a certain range of program numbers for the ‘favorites’ you always use, say 120-127, or to set up a show order. Then set the Start and Stop values at 120 and 127 or vice versa, depending on which direction you want to move.
- MIDI CC (toggle): If you want to introduce a momentary blast of reverb or pan a sound hard left/right manually, the MIDI CC (toggle) parameter is the one you want. Select the proper MIDI CC number (#93 for reverb send, for example), and then set the two values you want to have at your disposal. Set Press 1 to 127 and Press 2 to something more moderate, like a value of 40, and then when the moment comes, press that button and the reverb send will be maxed out until you press the button again. In the case of panning a sound (CC #10), a second button could be used to put the sound back to center (values of 64 for both presses).
- MIDI CC (step): Sometimes a subtle increase or decrease in the value of a controller can be desirable. This Message Type allows you to select a MIDI CC number and set a range within which repeated presses of the button will allow you to cycle. Set the Start and Stop parameters to the desired values, with the Start value lower than the Stop value if you want to ‘climb’ through the values, or the Start value higher than the Stop value if you want to ‘descend’ through the values.
- QWERTY Macro: Selecting this Message Type shows an icon of a computer keyboard, pointing you to Menu button 3 (M3) which has the same icon. Pressing M3 will open the Nektar Macro Editor on your computer, which allows you to assign up to eight sets of computer keystrokes to a Panorama switch control. Refer to the article ‘QWERTY Macros: Shortcuts triggered by Panorama controls‘ for more information.
- OFF: Deactivates the selected button.
Press and Release
Message types that are “momentary” will make these parameters available. By “momentary” we mean those times when the button does not “toggle” a status or value: as soon as you release the button, the initial value is replaced by the value of the Release parameter.
Press 1 and Press 2
Parameters which “toggle” will make these parameters available. These Parameter Types allow the button to send a specific value each time the button is pressed, and leave the value unchanged when the button is released.
Bank MSB and Bank LSB
Some devices require both the MSB and LSB for the Bank number to be transmitted along with a program change; some will ignore the LSB and use the MSB, or vice versa. Refer to the MIDI Implementation documents of the external MIDI device(s) to see which Bank Select messages should be used.
Start and Stop
These parameters work together to determine the maximum and minimum values that the selected button will be allowed to transmit for the chosen MIDI CC number. This allows a particular parameter to increase or decrease only within a certain range as you press the button repeatedly.
Data Entry
Sometimes MIDI implementation documents for certain devices may render the MIDI CC numbers or value ranges in hexadecimal format (00-7F) rather than in decimal format (0-127). If this is the case for a device you’re working with, just switch the Data Entry parameter from Dec to Hex and use the data encoder to locate the proper value.
[*] The MIDI CC# assignments for the Auto-fader group controls are Global settings, which means they are not stored with the Preset. If they are changed by way of the Control Edit section they will maintain those settings for all Presets.