FL Studio: Panorama setup and template
The FL Studio integration makes Panorama an extension of the powerful music making environment. Though you still need to rely on your computer monitor for feedback, Panorama provides good navigational and parameter name feedback and stretches controlling FL Studio beyond what can be done with other controllers.
Panorama P4 and P6 both feature a motorized fader section that’s wired in to the currently selected channel on the FL Studio mixer. That means the motorized fader will always follow your channel or track selections, controlling the mixer volume. In addition you have access to Mute, Solo and Arm.
The P1 does not feature a motorized fader or associated buttons but otherwise is setup and configured the same way as the P4 and P6. Before getting in to the operation detail, lets first go through how to get up and running with FL Studio.
Setup
Panorama products are set up the same way in FL Studio. In our example here, we use a P6 but just substitute the model number with the Panorama model number of the unit you own and you’ll be fine.
You’ll need to have completed the driver installation and firmware update for you unit as described in the Panorama installation instructions.
- In FL Studio go to Options/MIDI Settings. See MIDI Settings images on the right.
- In the output section set the ‘MIDIOUT2 (Panorama P*)’ to port 160, in MacOS the port is called ‘PANORAMA P* Instrument’.
- In the input section, enable the ‘Panorama P*’ Input port and set it to Generic Controller, with no port number. In MacOS this port is called ‘PANORAMA P* Internal’
- Enable the ‘MIDIIN2 (Panorama P*)’ Input port and select “Nektar Panorama P4” from the Controller Type drop down list. Set this input to Port 160. In MacOS this port is called ‘PANORAMA P* Instrument’.
Panorama should now be connected to FL Studio and the controllers display will appear as shown in the ‘Mixer’ image on the right.
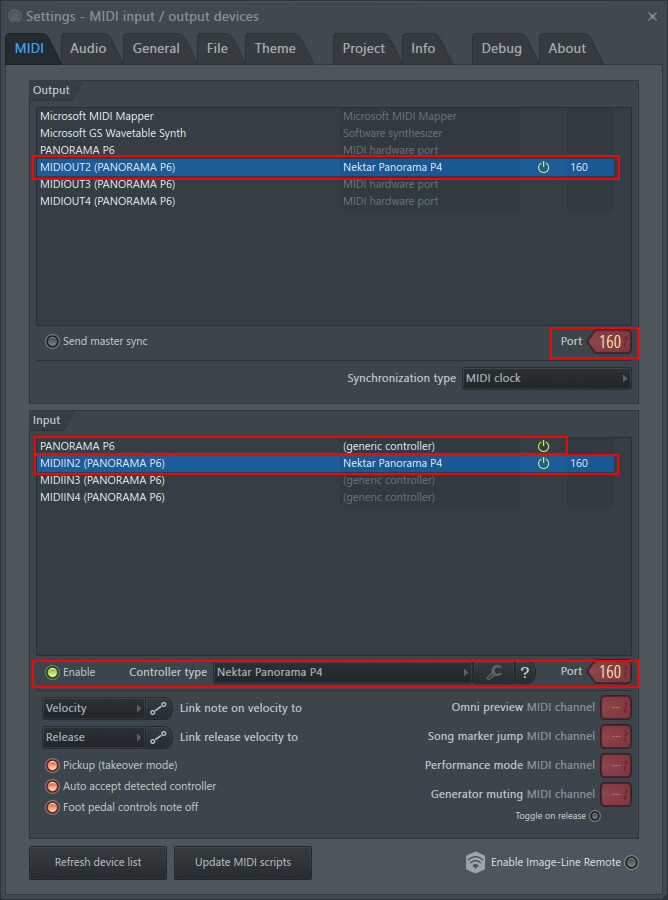
MIDI Settings Windows
MIDI Settings Windows
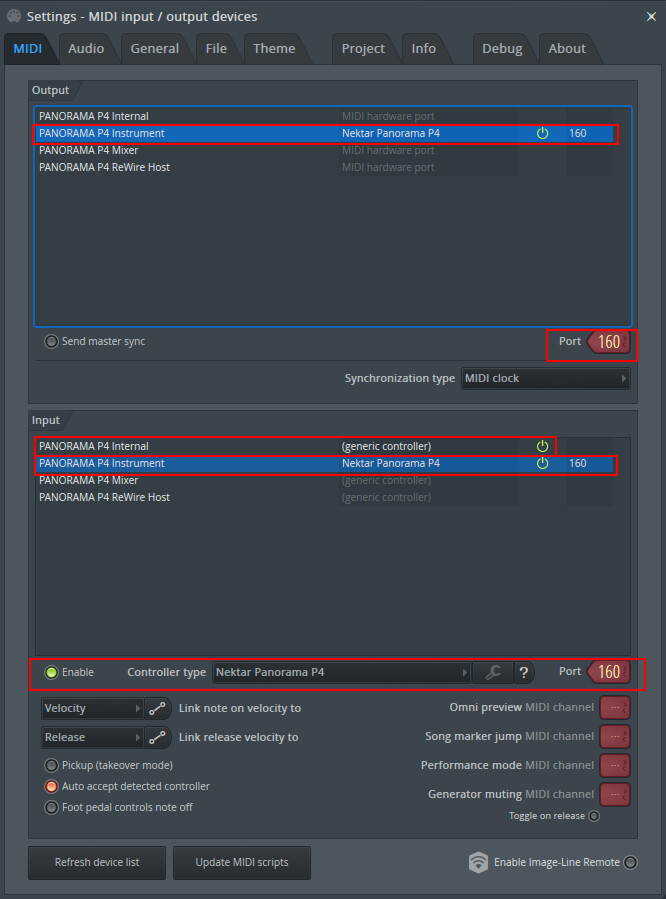
MIDI Setup MacOS
MIDI Setup MacOS
Overview
With Panorama and FL Studio now up and running, let’s take a look at the functionality. It works quite different from our integration for other DAWs but it’s pretty powerful. The ‘Control Surface Functions’ image on the right provides a brief overview of what each control does. You will notice that all 16 encoders and 9 faders are freely assignable to your liking but the main navigational buttons are configured so you don’t have to worry about it. Let’s take a look at what each button does:
First press the [Track -] and [Track +] buttons. This will bring up the mixer in FL Studio and for each press, either move forward or backwards one mixer insert/send depending on which button you press.
The info-bar updates showing Mixer insert name/Song Position Meter/Blank (see the ‘Mixer Control’ image).
Next press the [Patch-] and [Patch+] buttons. This time you are navigating the FL Studio channels with associated instruments and you will notice that the mixer follows the selection also.
You can also press [Shift]+[Track+] (Bank>) to jump 8 mixer insert/send forward from your current position or [Shift]+[Track-] (<Bank) to go 8 channels backwards. Note: This does not change the assignments of the 8 faders.
If your Panorama has a motorized fader, now try moving it. This will change the mixer volume for the current mixer insert/send. When you select a new mixer insert/send (using either the mouse or the navigation buttons on Panorama) the motorized fader will move the fader volume position to correspond with that insert/send. The solo and mute buttons associated with the motorized fader will similarly update with mixer insert/send selection. The Fader button allows you to record arm the selected track.
The 5 buttons below the display are currently labeled Pan/Stereo/EQ1/EQ2/EQ3 (again, see the ‘Mixer Control’ image).
By default, Pan is selected so you can now control pan for the selected Mixer insert/send using Panorama’s Data Control. Parameter feedback is displayed in the top info-line.
Pressing any of the other display buttons will change the assignment of the Data Control encoder to control Stereo (separation), EQ1 Gain, EQ2 Gain, EQ3 Gain.
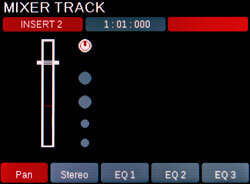
Mixer Control
Mixer Control
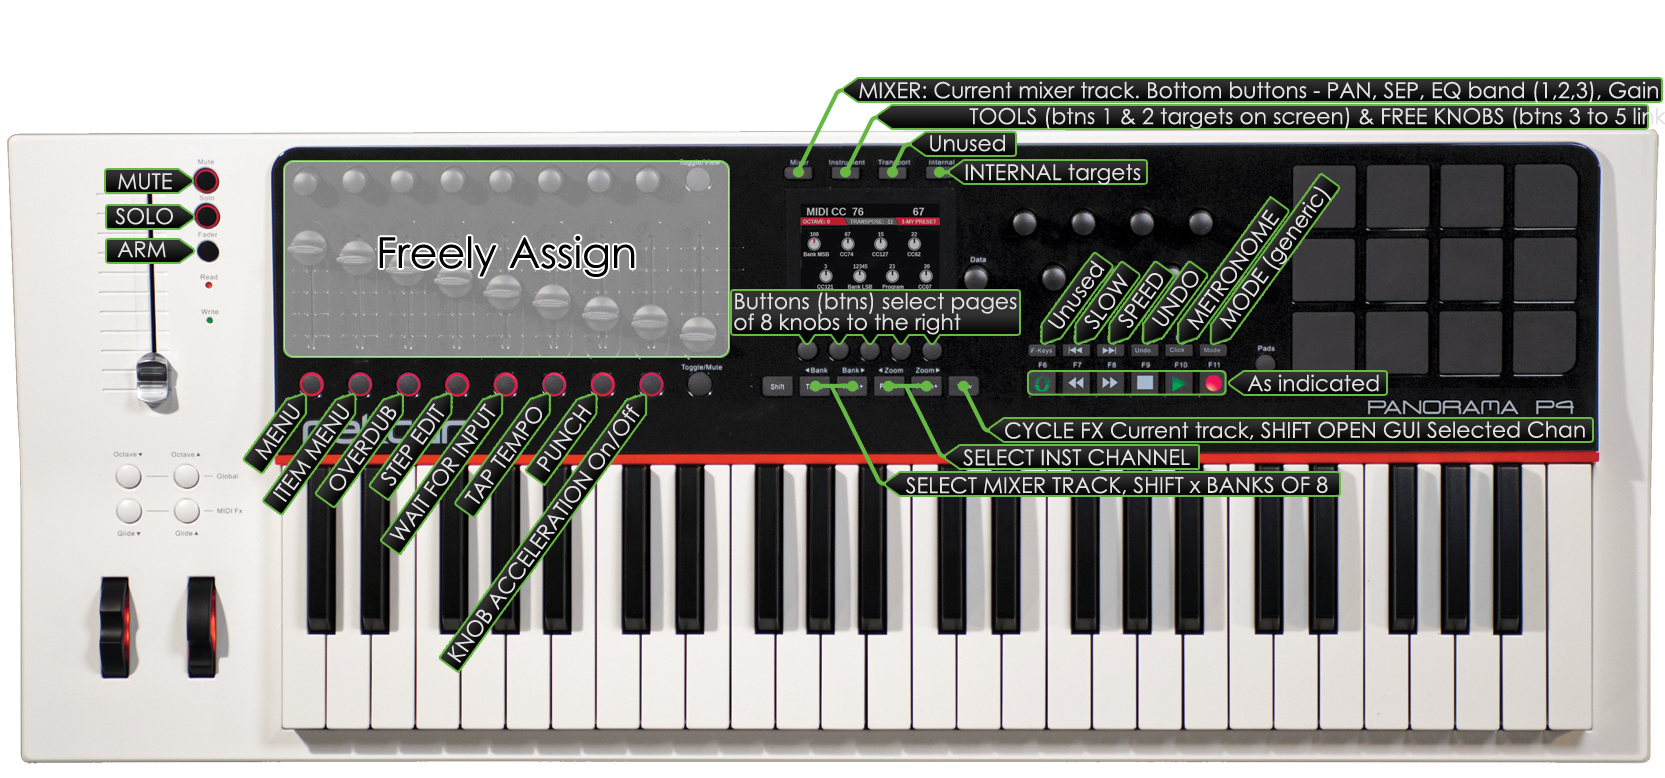
Control Surface Functions
Control Surface Functions