Bitwig Setup & Troubleshooting: Impact GXP
If you are just getting started with your Impact GXP49, 61 or 88, follow these steps to activate your Bitwig 8-Track license.
- Create and activate your account at: Bitwig.com/register.
- Add your Bitwig 8-Track serial number to your user account.
- The serial number will be printed on the flier that came with your Nektar controller.
- Download Bitwig 8-Track from your user account.
- Install Bitwig 8-Track, start the application and follow the on-screen instructions.
Have fun with Bitwig 8-Track!
Find out more about Bitwig 8-Track here.
Setup
The files necessary for using Impact GXP controllers with Bitwig are included with the latest versions of Bitwig Studio and Bitwig 8-Track. Nektar’s Bitwig integration is known to work in the latest versions of Windows, MacOS, and Ubuntu.
- Plug in your Impact GXP and make sure it’s switched on (if you didn’t do so already).
- Launch Bitwig Studio. Your Nektar controller should be detected automatically.
- Go to Files > Settings > Controllers to confirm that your Nektar controller is listed.
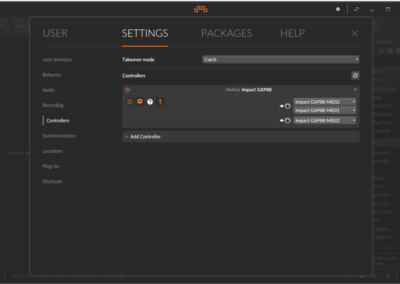
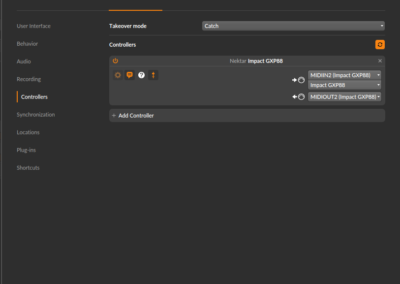
- Check the ports match that of images 1 (MacOS) or 2 (Windows).
- If your controller is not automatically detected press the ‘Add controller manually’ button, choose your Impact GXP model and ensure the ports are set up correctly as in images 1 (MacOS) or 2 (Windows).
- Click ‘OK’ and exit Device Setup.
That’s it, setup is now complete and you can move on to the fun part, learning how it all works! Please refer to the user guide for further information on that front.
Troubleshooting
If Impact GXP isn’t detected automatically, try adding the controller manually. The controller’s ports should be configured as shown in images 1 and 2.
If you don’t see your Impact GXP controller listed under ‘Nektar’ when you click the ‘Add Controller Manually’ button, make sure that you have installed the latest version of Bitwig Studio or Bitwig 8-Track.
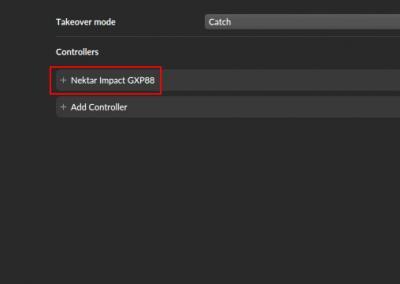
If you have deleted an Impact GXP controller in the past and are trying to set it up again, it will not be added automatically. You will need to click the Add button as shown in image 3.
Patch Changes
If you find that the [< Patch] and [Patch >] buttons don’t work when controlling a third-party plug-in, it’s likely because the plug-in uses it’s own patch browser. The Patch buttons on the Impact series control the patch navigation functions of the DAW, so you may need to save the plug-ins presets in your DAWs patch format, before you can use the Patch buttons on the Impact controller for patch navigation. You can find more information about saving patches in your DAW, in the documentation for that program.
If you’re still experiencing problems please contact one of our support staff.


