Ableton Live Setup and Troubleshooting: Panorama P-series
Panorama can be used as a simple control surface in Ableton Live with some simple configuration. To make this process even simpler, we’ve provided a Live ‘Set’ and a Panorama template for Live to get you started.
Template Files
To get started, please download the Live Remote Script below:
Note: This will only work in Live 8.3 and above.
Installation & Setup: Windows
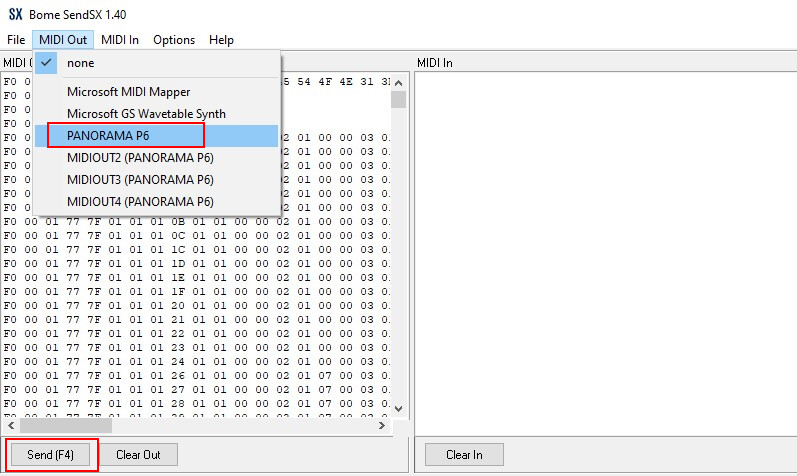
1. Once you’ve downloaded the template, unzip the file and locate the ‘live_template.syx’ file for your Panorama model. This file needs to be transmitted to the Panorama and to do that you’ll need to download a sysex tool. We recommend Send SX:
- Open Send SK and set the MIDI Output to ‘Panorama P*’ as shown in the ‘Send SX’ image on the right.
- Load the.syx file associated with you Nektar controller into Send SX.
- Click the ‘Send’ button.
- The P-series controller’s page will now say ‘Loading Memory Bank Via Sys ex’
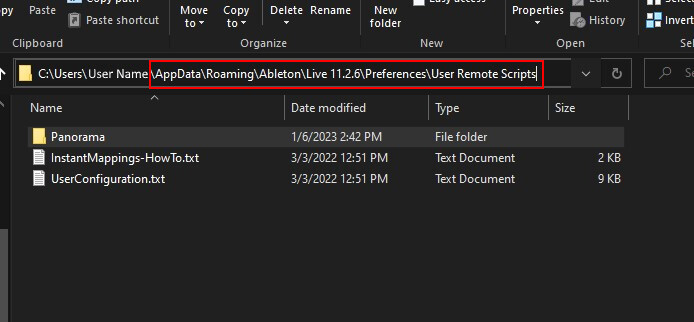
2. With the transfer complete it’s now time to copy the ‘Panorama’ folder you unzipped to the following location:
C:\\Users\\\\AppData\\Roaming\\Ableton\\Live \\Preferences\\User Remote Scripts
(See the ‘File Path’ Image on the right).
Note:This is a hidden directory. To access this directory you will need to configure Windows to ‘Show Hidden Files and Folders’ and deactivate ‘Hide Protected Operating System files’. Please follow the instructions on this page: Show hidden files.
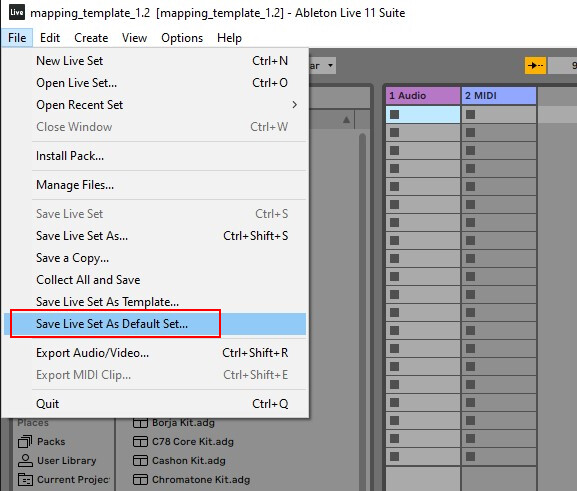
3. Launch Ableton Live and open the mapping template file you unzipped ‘mapping_template_1.2.als’. In order for this mapping to be recalled each time you restart Live, you must save the Live set as your default. To do this, go to the ‘File’ menu and select ‘Save Live Set as default set…’. See the ‘Default Set’ image on the right.
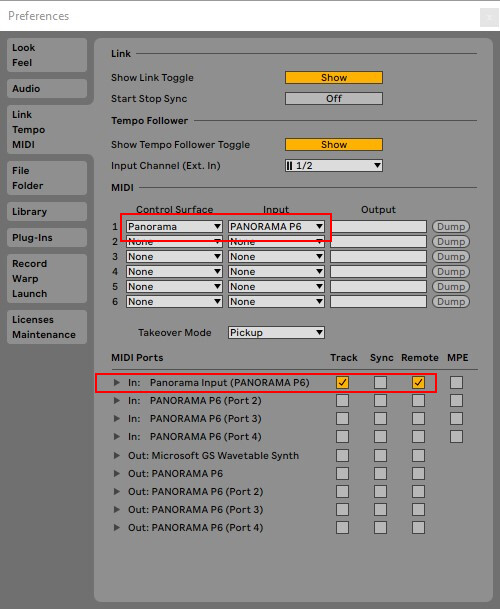
4. With the preferences window still open select the MIDI Tab. Select ‘Panorama’ from the list of Control Surfaces and set the Input port to Panorama. See the ‘Link/Tempo/MIDI’ image on the right.
SEND SX
File Path
Default Set
Link/Tempo/MIDI
Installation & Setup: MacOS
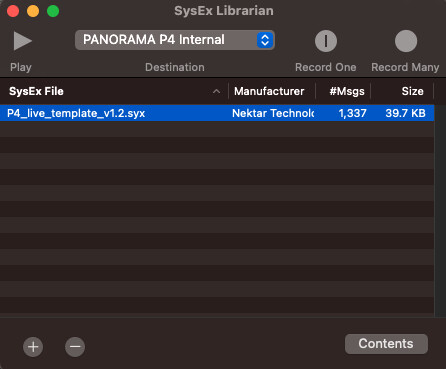
1. Once you’ve downloaded the template, unzip the file and locate the ‘live_template.syx’ file for your Panorama model. This file needs to be transmitted to the Panorama and to do that you’ll need to download a sysex tool. We recommend Sysex Librarian:
Next, open your Sysex tool of choice and transmit the data to the Panorama. Below is how its done using Sysex Librarian.
- Drag the file ‘live_template.syx’ into the window as shown in the ‘Sysex Librarian’ image on the right.
- Choose ‘Internal’ as the destination (in older versions of OSX, you may see a port called ‘Panorama’, instead)
- Click play
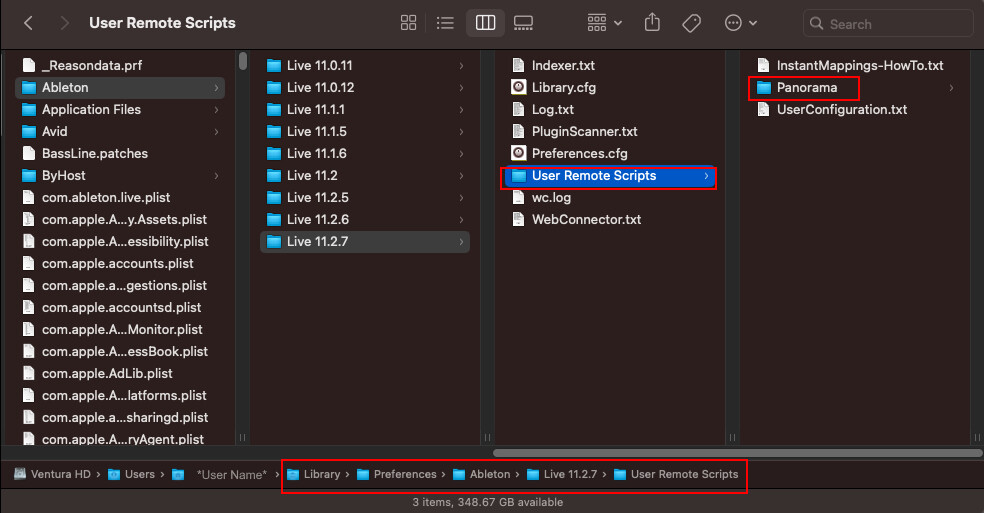
2. With the transfer complete it’s now time to copy the ‘Panorama’ folder you unzipped to the following location:
~/Library/Preferences/Ableton/Live**/User Remote Scripts
(See the ‘File Path’ image on the right.
Note:This is a hidden directory, to access this directory do the following:
- Open a Finder window
- Open the ‘Go’ menu at the top of the screen
- With the Go menu open, hold the Alt/Option key on your keyboard
- Select ‘Library’ from the Go menu
- In the Finder window, open the ‘Preferences’ folder
- Open the ‘Ableton’ folder
- Open the folder for the most recent version of Live
Open the ‘User Remote Scripts’ folder and copy the ‘Panorama’ folder into this directory.
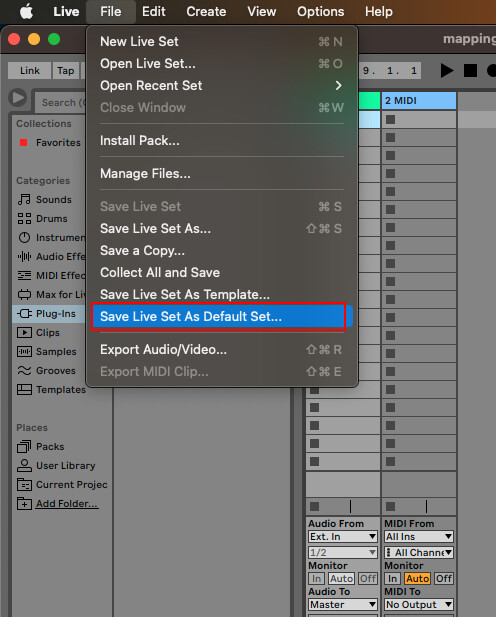
3. Launch Ableton Live and open the mapping template file you unzipped ‘mapping_template_1.2.als’. In order for this mapping to be recalled each time you restart Live, you must save the Live set as your default. To do this, go to the ‘File’ menu and select ‘Save Live Set as default set…’. See the ‘Default Set’ image on the right.
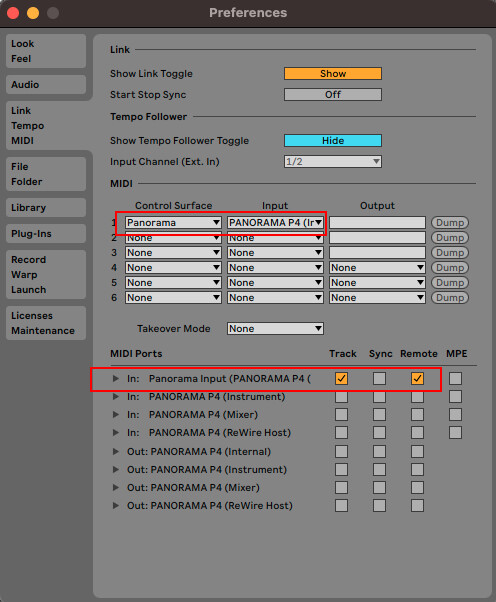
4. With the preferences window still open select the MIDI Tab. Select ‘Panorama’ from the list of Control Surfaces and set the Input port to Panorama. See the ‘Link/Tempo/MIDI’ image on the right.
Sysex Librarian
Sysex Librarian
File Path
File Path
Default Set
Default Set
Link/Tempo/MIDI
Link/Tempo/MIDI
Features
Note: In OSX 10.11 (El Capitan) and later, QWERTY Macro features are not supported.
- Faders control Volume for first 8 channels in the mixer
- Encoders above faders control Send 1 level
- Buttons below faders control Record Arm
- 2×4 group of Encoders control Rack/Plug-in parameters.
- Transport buttons control Transport functions.
- Track- sends a ‘Left Arrow’ qwerty macro
- Track+ sends a ‘Right Arrow’ qwerty macro
- Patch- sends a ‘Up Arrow’ qwerty macro
- Patch+ sends a ‘Down Arrow’ qwerty macro
- View button switches between Arrangement and Session
- Motorized fader is assignable (motor functions disabled in Internal Mode)